
Your stick is plugged in. File Explorer shows it, yet Microsoft's Media Creation Tool still says it can't find a USB flash drive. Formatting it again changes nothing.
I would stop fighting the drive list after one or two tries. The same Windows files come as an ISO. Microsoft documents a way to put those on your stick without the tool.
The Super User question from August 2015 has over 265,000 views. A Windows 11 owner on Microsoft Q&A hit it in January 2026 with several sticks on two laptops.
Why the tool skips a stick File Explorer can see
The tool is picky about which drives it lists. Microsoft asks for "a blank USB flash drive with at least 8GB of space". The asker's own stick held only 4 GB.
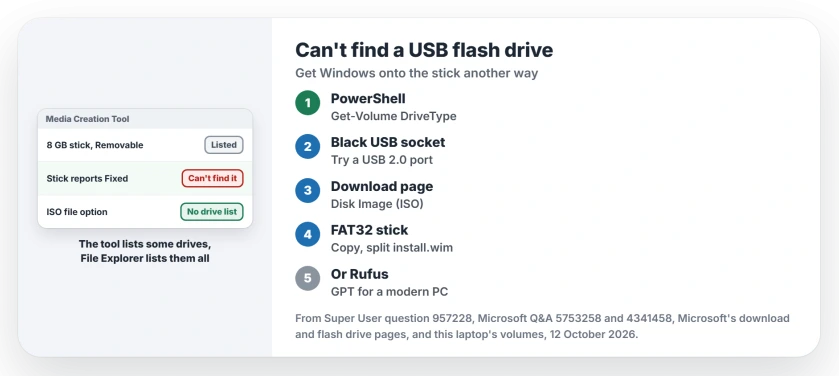
The accepted answer blames sticks that report themselves as hard drives rather than removable ones. In their words, those drives "are not in the removable drives section", so the tool will not let you pick them.
Owners found one more cause: some sticks only showed up on a USB 2.0 port.
Status: Microsoft's download and installation media pages, Microsoft Learn's flash drive steps, this laptop's volumes, and stick owners from 2015 to 2026, checked 12 October 2026.
1. Check the size and how Windows labels the stick
Microsoft's minimum is 8 GB, so a smaller stick is out. Then check whether Windows calls yours removable. Open PowerShell and run:
Get-Volume | Select-Object DriveLetter, FileSystemLabel, DriveType, SizeA normal flash drive says Removable. Ours: on this laptop every volume says Fixed. All four sit on the internal SSD. Fixed is the label the accepted answer says the tool will not offer you.
One owner's external hard drive failed in the tool the same way as their stick. Some sticks say Fixed too. On Q&A, a SanDisk owner found theirs listed as a local disk after the tool had written to it.
If yours says Fixed, a different stick from another brand is the quick fix, and it costs little. If it says Removable, try step 2 next. Step 3 works either way, because the tool never has to see the stick.
2. Try a USB 2.0 port
One owner's stick and external drive both went unseen on USB 3.0 ports. On a USB 2.0 port the tool found both.
Another owner replied "as soon as I plugged my flash USB in a 2.0 port it was properly recognized by the media creation tool".
On many PCs the USB 2.0 sockets are the black ones, while the blue ones are USB 3. Our guide to telling USB ports apart shows how Windows names each one.
3. Save an ISO, then copy it to the stick yourself
On Microsoft's Download Windows 11 page, use the section called Download Windows 11 Disk Image (ISO) for x64 devices. It puts the Windows files into one file on your PC, with no drive list to fail.
Then follow Microsoft's flash drive steps. Microsoft says to format the stick as FAT32 "to be able to boot either BIOS-based or UEFI-based PCs".
Double-click the downloaded ISO so it opens as a drive with its own letter in File Explorer. Copy everything except sources\install.wim first. Then split install.wim, because FAT32 refuses any file over 4 GB.
robocopy D: E: /s /max:3800000000
Dism /Split-Image /ImageFile:D:\sources\install.wim /SWMFile:E:\sources\install.swm /FileSize:3800
D: is the opened ISO and E: is your stick. Check both letters first. Microsoft notes that Windows Setup installs from the pieces "so long as you name it install.swm".
The tool's own ISO file option works too, but it can hold install.esd rather than install.wim, and if that file is under 4 GB, plain copying with File Explorer is enough.
4. Or let Rufus write the ISO
The asker wrote the ISO with Rufus. The install worked with about 700 MB to spare on the 4 GB stick. Two more owners said Rufus did the trick. A third made the ISO with the tool first, then used Rufus.
I would pick GPT in Rufus for any PC made in the last several years. Our page on setup failing at the very last step shows what the MBR choice does on a UEFI machine.
The Short Version
- Pick a stick with 8 GB or more.
- Get-Volume should show it as Removable.
- Try a USB 2.0 port.
- Or save an ISO and copy it to a FAT32 stick.
- Split install.wim with Dism when it passes 4 GB.
Where to Next
Did the port swap work, or did you copy the ISO by hand? Your comment, with the stick's brand, helps me spot the sticks the tool refuses.

Isaac Smith is the founder and editor of PC Glance, a website that covers computers, laptops, and technology. He is a tech enthusiast and a computer geek who loves to share his insights and help his readers make smart choices when buying tech gadgets or laptops. He is always curious and updated about the latest tech trends.