

Select the row numbers in Excel, right-click the selection and choose Delete. Excel removes those rows and moves the remaining records up. Pressing Delete on your keyboard only empties the cells and leaves the rows in place.
Decide whether you want to remove a whole worksheet row or just a row inside an Excel table. That matters when another list or calculation sits beside the records you're removing.
Select the row headings before using Delete
For one worksheet row, click its number at the left edge. The selection should stretch across the sheet. Right-click that number and choose Delete from the menu, rather than pressing Delete on your keyboard.
Microsoft describes this method in its row insertion and deletion instructions. In desktop Excel for Windows, you can also use Home > Delete > Delete Sheet Rows on the ribbon.
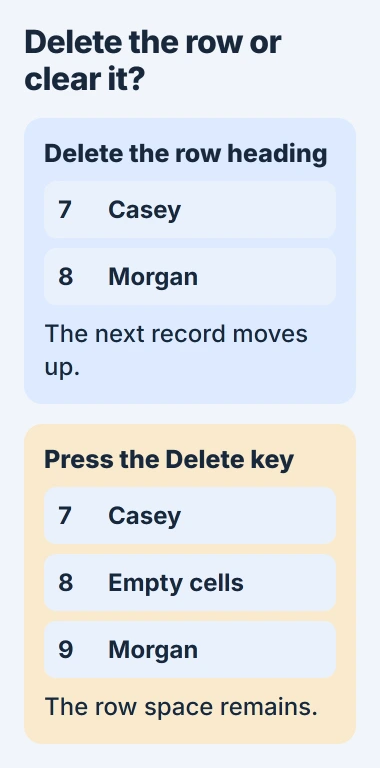
Watch the record that followed the deleted row. It should move up, and the row numbers close the gap automatically. You don't need to renumber them or drag later records into the space.
Save a copy before a large cleanup, especially if other people use the workbook. Deleting worksheet rows removes their cells far to the right of the visible data too, so check for another table first.
For example, deleting row 8 removes its customer record and any calculation on that row elsewhere in the sheet. If only the customer table should shrink, use the table-specific command later in this guide.
Remove several rows with one selection
For consecutive rows, drag across their row numbers. To remove rows 8 through 12, start at the 8 heading and continue to 12. Check the first and last selected numbers, then use the heading's Delete command.
Count the highlighted row headings to check how many rows you're removing. Selecting one cell in each record isn't the same as selecting the full worksheet rows.
For separate rows on Windows, hold Ctrl while clicking each row number. Release Ctrl and right-click a highlighted row number. Choose Delete there. Check that only the rows you want are still selected.
On a Mac, hold Command to add separate selections with the mouse. Open the right-click menu and check that the command deletes rows, rather than clearing cells or shifting only the cells you've selected.
I'd delete a small group and check the result before selecting hundreds of records. As row numbers change after deletion, use each record's name or ID to find the next one instead of relying on its old number.
If you need to reposition a record, the Excel row-moving procedure keeps the data together. Deleting the original before moving its contents can lose the record you're trying to keep.
Use the keyboard shortcut on a complete row
Select a cell in your target row. On Windows, press Shift + Space to select the whole row, then Ctrl + Minus to delete it.
The Excel keyboard reference lists both shortcuts. Use the minus key without adding Shift, which turns it into an underscore.
If Excel asks whether to shift cells or remove an entire row, choose Entire row for a worksheet row. That dialog appears when your selection hasn't already told Excel to act on full rows.
Check the selected cells before confirming. Shift cells up moves cells only within the selected columns, which can separate a name from its phone number or an amount from its date.
The plain Delete key has a different job. It clears values or formulas from the selected cells but keeps the cells themselves. Use it to empty a reusable input row without shrinking the sheet.
Formatting can stay after you press that key. If the row is empty but still shaded, Delete cleared its contents instead of removing it.
Delete a table row when neighboring cells must stay
Click inside the table record you want to remove. An Excel table shows a Table Design tab when selected. Colored headings alone don't mean a range is an Excel table.
Right-click a cell in that record, open Delete, then choose Table Rows. On the ribbon, the command may be Delete Table Rows. Read the full name so you remove only the table row.
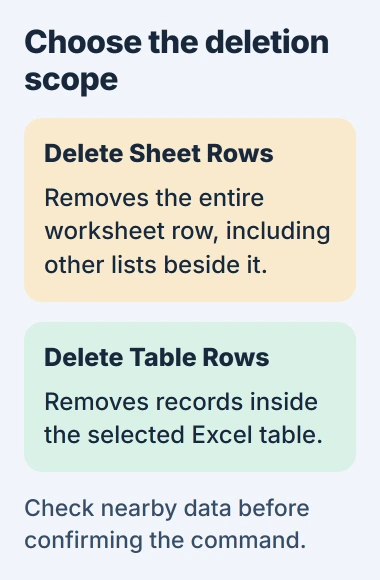
The table resizing instructions explain that difference. Use the table-row command when data beside your list needs to stay in place.
For several table records, select the cells across those records inside the table, then use its row-deletion command. Check the table and the data beside it before making another change.
One blank field doesn't make a whole record empty. The blank-row cleanup guide explains how to filter and check those records before deleting them.
Check hidden records and repair an incorrect deletion
If the sheet has filters or hidden rows, check before dragging across a long run of row numbers. You can select records you can't currently see. Use a copy and show the records you want to remove first.
For a simple manual edit, clear the filter, find the records by their contents and delete a small group. Use the separate blank-row workflow if you need to keep the filter as part of that cleanup.
Check important formulas after deleting rows. Removing a cell or record they use can change a result or produce #REF!, which means a formula has lost a reference it needs.
If the wrong records disappear, immediately press Ctrl + Z on Windows or Command + Z on Mac. Check that the original records return before trying a smaller selection.
If row deletion is grayed out, ask the owner about sheet protection and your editing access. A shortcut can't give you access the workbook or shared file doesn't allow.
If deletion still fails, tell support your Excel version, whether you're selecting inside a table and the exact error. Keep your saved copy until you've checked the remaining records and totals.
The Short Version
Select full row headings to delete worksheet rows. On Windows, use Shift + Space followed by Ctrl + Minus. Choose Table Rows to change only a table, then check the remaining records and undo if the wrong ones disappeared.
Checked November 5, 2026.

Isaac Smith is the founder and editor of PC Glance, a website that covers computers, laptops, and technology. He is a tech enthusiast and a computer geek who loves to share his insights and help his readers make smart choices when buying tech gadgets or laptops. He is always curious and updated about the latest tech trends.