
Google contacts appear on an iPhone when you add their Google account and turn on Contacts sync. An existing iPhone can do this without being erased. During initial iPhone setup, Move to iOS can copy contacts with other selected data.
The important difference is where the Android phone keeps the contacts. Names saved only on the phone or SIM won't appear through Google sync until you save them to that account.
Check which account holds the Android contacts
Open the Android phone's Contacts app and inspect the account shown for a few important entries. Look for a Google email address or a label such as Phone, Device, Local, or SIM. Check older entries as well as recent ones.
A phone can show contacts from several accounts in one list. Adding one Google account to the iPhone shows the contacts saved in that account. It won't bring over every address book you could see on Android.
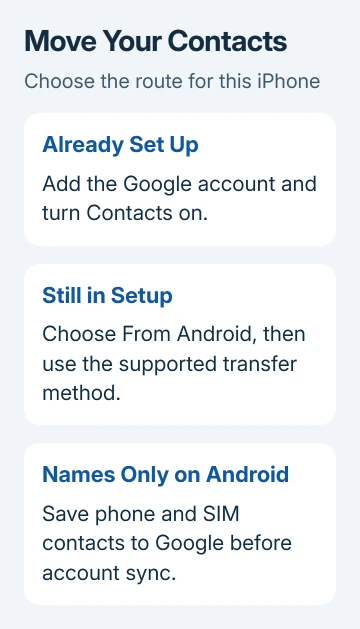
If several Google accounts hold contacts, decide which ones you need on the iPhone. Write down the email addresses before starting. It makes a missing work contact much easier to track than repeating the whole transfer.
I'd use account sync for contacts alone on an iPhone that's already in use. Save Move to iOS for setting up a new iPhone when you're also bringing over other supported content.
Add the Google account on the iPhone
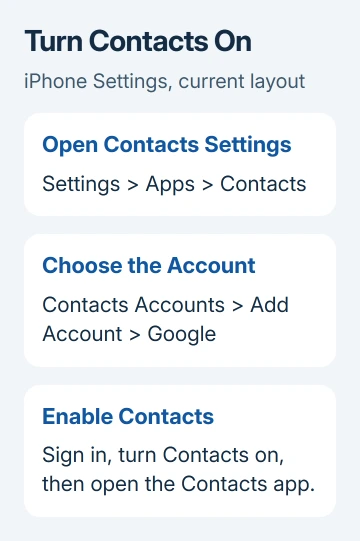
On current iOS versions, open Settings > Apps > Contacts > Contacts Accounts and tap Add Account. Choose Google, sign in with the account holding your Android contacts, and turn on Contacts when choosing what to sync.
If Contacts settings shows Add Account directly, use it. If the Google account is already listed, open that existing account and turn on its Contacts switch instead of adding it again.
On iOS 17 and earlier, the starting path is Settings > Contacts > Accounts. The Apps section was added to the newer Settings layout. After choosing the account, turn on Contacts and save if asked, just as you would in the newer layout.
Google says to open the iPhone Contacts app after account setup to start syncing. Keep the iPhone online, open the app, and look for the names from that account.
In Contacts, tap Lists and choose the Google account's list if several accounts appear. That lets you check which entries arrived from Google without mixing them with contacts already on the iPhone.
Sync keeps the address book connected to Google. Later changes can reach your other signed-in devices too. Don't delete contacts from the Android phone as a cleanup step while both phones still sync that same account.
Bring phone-only or SIM contacts into Google first
If the missing names are labeled Phone, Device, Local, or SIM, use the Android device's contact backup controls. These contacts need to become Google contacts before the iPhone's Google account can show them.
Open Android Settings > Google > All services. Under Backup and restore, open Google Contacts sync. Choose the destination account, tap View settings, and turn on Back up device-only and SIM contacts automatically under Sync options.
Some phones show the profile icon at the top of Settings as the route to All services. Older layouts use Also sync device and SIM contacts, followed by Sync device and SIM contacts automatically. The wording depends on the device.
The device and SIM backup options depend on the phone's make and model. They save contacts to one Google account and don't support a child's account or a Google Workspace account.
Let the Android account sync before checking the iPhone. Pull down on the list in Google's Contacts app to refresh it. Look for an entry that was missing, since a matching total count can hide a difference between the two lists.
Contacts already syncing with another cloud service, such as Exchange, aren't automatically converted by this option. Add their original account on the iPhone, or use that provider's export and import process.
Send a contact file for a one-time copy
For a separate copy, use Android contact export. In Google Contacts, open Fix & manage > Export to file, choose the accounts, then Export to .VCF file.
Send the saved file privately to an email address accessible on the iPhone. Open the .vcf attachment in an email or message and follow the contact-import prompts. Check the imported names afterward.
Importing the file gives you a separate copy. Later changes won't sync between the phones. If the destination already has those contacts, use account sync instead of importing the same file repeatedly.
Use Move to iOS while setting up a new iPhone
Keep both phones near each other and connected to power. Turn on Wi-Fi on Android. On the iPhone's Transfer Your Apps & Data screen, choose From Android, then Transfer with App if that choice appears.
On Android, launch Move to iOS and complete the initial prompts. Continue on the iPhone until a six-digit or ten-digit code appears. Enter that code on Android and accept the request to join the iPhone's temporary Wi-Fi network.
On the Android Transfer Data screen, select Contacts along with any other content you want. Continue and leave both phones alone until the loading bar on the iPhone finishes, even if Android says it has completed its part.
Keep Move to iOS on the Android screen throughout the transfer. Using another app or taking a call there can interrupt it. After the iPhone's progress finishes, tap Done on Android and finish setup on the iPhone.
This route is part of setup. If the iPhone already contains data, don't erase it just for the contacts; use account sync instead. Move to iOS requires starting setup again on an already configured iPhone.
Use Transfer without App only when both devices support it
The current Android migration instructions include Transfer without App on iOS 26.5 or later, with a supported phone running compatible Android 17 or later. Not every Android phone supports it.
On a compatible iPhone setup screen, choose From Android > Transfer without App. Place Android next to the iPhone, continue, and scan the iPhone's QR code using the Android camera. Select the contacts and other data to transfer.
Once the transfer finishes, continue on the iPhone to complete setup. If your Android model doesn't support this method or the choice isn't offered, use the Move to iOS app route rather than searching for a hidden switch.
The contact transfer and SIM or eSIM activation are separate tasks. Moving the phone number doesn't by itself move the address book. Check your phone number and your contacts separately on the new phone.
Check the result before retiring Android
Open several contacts on the iPhone and compare each number and email address with its Android entry. Include a contact saved recently and one that was previously phone-only. Keep the old phone until the address book you need is present.
For repeated entries, the iPhone duplicate-contact checks distinguish duplicates from the same person appearing through two accounts. Don't start mass deletion before checking Lists.
If your next move is between Apple phones, transferring contacts from iPhone to iPhone covers that separate process. For a failed Android migration, give Apple Support both phone models and the last completed transfer step.
The Short Version
For an existing iPhone, sync the Google account holding the contacts, including any phone or SIM entries saved there first. During new iPhone setup, use Move to iOS or supported app-free transfer. Check individual cards afterward.
Checked November 8, 2026.

Isaac Smith is the founder and editor of PC Glance, a website that covers computers, laptops, and technology. He is a tech enthusiast and a computer geek who loves to share his insights and help his readers make smart choices when buying tech gadgets or laptops. He is always curious and updated about the latest tech trends.