
To connect your laptop to the University at Buffalo's eduroam Wi-Fi, start at connect.buffalo.edu. Run the connection wizard to install your computer's Wi-Fi settings, and sign in with your UBIT account when asked.
If your laptop already connects, check when you set it up. Personal devices set up before August 10, 2026 need the new settings because the old security certificate stops working during November 2026.
Start with the right UB network and account
These steps are for your personal Windows laptop or Mac with a UB account. UBIT's current Wi-Fi setup page has the wizard and the notice about replacing the security certificate used to connect.
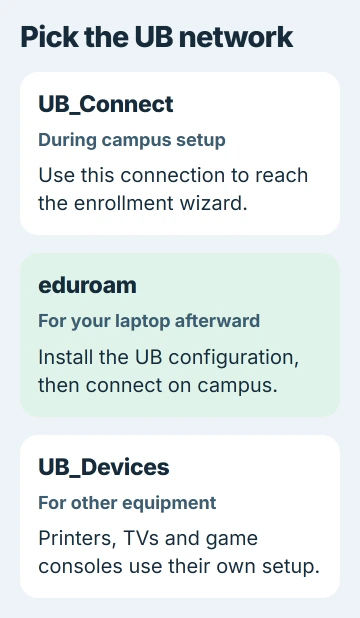
On campus, join UB_Connect to get online for setup. Off campus, use your existing internet connection and open https://connect.buffalo.edu. Disconnect UBVPN or your department's VPN before starting the wizard.
UB_Connect gets you through setup; eduroam is the secure network to use afterward. UB_Devices is for equipment such as printers and gaming consoles. Your personal laptop should normally use eduroam.
On Windows 11, the network connection controls open from the taskbar's network, sound or battery area. Expand the available Wi-Fi networks and choose the setup network.
If your laptop has no Wi-Fi control or can't see any networks, start with the missing Wi-Fi adapter checks. The wizard needs a working connection; it can't add missing Wi-Fi hardware to your laptop.
Remove an old configuration before enrolling again
Follow this section if your personal laptop connected to eduroam before August 10, 2026. If you're setting it up for the first time, skip to the Windows or Mac installation section.
In Windows, open Settings > Network & internet > Wi-Fi > Manage known networks. Find eduroam and select Forget. You'll need another connection to download the new settings.
On Mac, open System Settings > Wi-Fi > Advanced. Open the menu beside eduroam, choose Remove From List, then confirm Forget. That clears the saved network before the new setup.
The Mac setup guide still shows the older System Preferences menus. Use the current Wi-Fi settings on your Mac to remove the old network, then return to the wizard to replace its settings.
Leave unrelated workplace profiles and saved networks alone. Only the old eduroam setup needs replacing here.
Install the Windows configuration
Open the wizard and select Start Connection Wizard, then Configure and Connect. Download the Windows setup file offered for your laptop. Your browser's save prompt may look different from the one in the guide.
Find WiFi_University_at_Buffalo.exe in Downloads and open it. This should be the file you just downloaded through the official university wizard.
The Windows instructions use More info > Run anyway if Windows shows its protection warning. If the file's name or source doesn't match, including an unexpected email attachment, stop and ask UBIT.
Choose Next in the installer, then enter your UBITName and UBITName Password in their fields. Wait for setup to finish, then choose Done.
Restart your laptop after setup. On campus, check that it joined eduroam once the installer finished. If you completed setup off campus, the laptop can connect when you next reach UB coverage.
Use Safari and approve the Mac configuration
Open the setup page in Safari on your Mac. Select Start Connection Wizard, then Configure and Connect, and allow the download. The downloaded disk image contains the WiFi_University_at_Buffalo setup app.
Open the downloaded disk image and run that app. Choose Open when asked, select Next, and follow the sign-in prompts. The Mac instructions show each stage.
Use your UBIT account for university sign-in. To approve settings or keychain access in macOS, use your Mac account name and password. The keychain stores passwords. The two accounts are separate even if their passwords match.
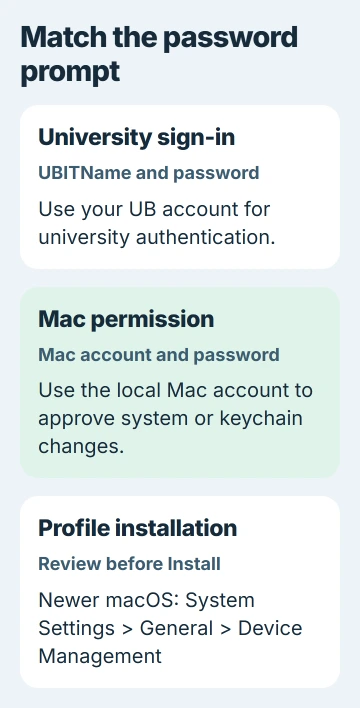
On newer macOS versions, open System Settings > General > Device Management to review the downloaded configuration profile, a file containing setup settings. Open the profile, review it, choose Install, and approve it when asked.
Apple's profile installation instructions show the current System Settings path. Older macOS versions use System Preferences > Profiles, the menu still shown in the university guide.
Finish the remaining installer and keychain prompts, choose Done, and restart your Mac. Use your Mac password for its system permission prompts; your UBIT password won't work in those boxes.
Verify eduroam and handle a failed enrollment
Back on campus, check that you're connected to eduroam, then open a new webpage. I'd try both before a class or meeting so you have time to finish setup if needed.
If home Wi-Fi works but your UB login is rejected, that's different from seeing no networks at all. Note where setup stopped: downloading, UBIT sign-in, profile approval or joining eduroam.
If your laptop stays on UB_Connect, check whether the installer is waiting for you to finish a prompt. The Wi-Fi and internet distinction explains why joining a network doesn't always mean you can get online.
A UB-owned Windows PC can switch automatically between eduroam-USER and eduroam-DEVICE. That's expected. Ask UBIT or your department's IT team about its managed setup instead of replacing it with these personal-device settings.
If setup still fails, call the UBIT Help Center at 716-645-3542. Give your operating system, exact error, campus location and the step that failed. Keep your password out of screenshots and support messages.
The Short Version
Join UB_Connect for on-campus setup, then run the official Windows or Mac wizard. Replace settings from before August 10, use the right password for each Mac prompt, and check that eduroam connects after you restart.
Checked November 5, 2026.

Isaac Smith is the founder and editor of PC Glance, a website that covers computers, laptops, and technology. He is a tech enthusiast and a computer geek who loves to share his insights and help his readers make smart choices when buying tech gadgets or laptops. He is always curious and updated about the latest tech trends.