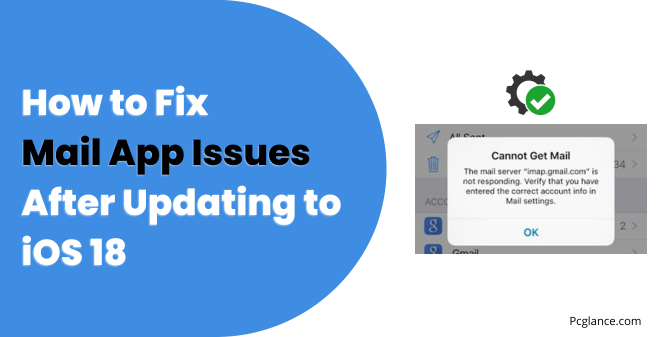
Many users have reported encountering issues with the Mail app after upgrading to iOS 18, particularly with syncing emails from their IMAP servers.
If you find that the Mail app is not retrieving incoming emails, even though sending emails works, you’re not alone.
This guide will walk you through various solutions, starting from the simplest to the more advanced, ensuring that you can effectively resolve these issues.
What’s Happening Behind the Scenes?
A lot of users have pointed out that the problem seems to stem from how Apple Mail handles connections with IMAP servers after the iOS 18 update.
The heart of the issue? It looks like iOS 18 has become a bit pickier with security certificates — especially if you’re using a self-signed certificate.
Essentially, the system may no longer trust these certificates, even though they worked just fine in iOS 17.
The strange part is that it’s not only the self-signed certificates causing trouble. Even users with legitimate SSL certificates (the kind you expect to work without issues) are facing the same syncing errors.
The Mail app seems to have difficulty “talking” to the IMAP servers, and in some cases, it’s flat-out refusing to fetch new messages.
Meanwhile, if you’re using a Mac running macOS Sequoia, everything seems to work perfectly, adding to the frustration of iPhone users.
This isn’t the first time Apple’s Mail app has run into bugs like this. However, in the past, they’ve been patched during beta testing.
For iOS 18, though, it seems this issue has slipped through the cracks and landed in the final release, leaving many users waiting anxiously for a fix.
Possible Culprits
While Apple hasn’t officially commented on the situation, there are a few things that could be contributing to this glitch:
Stricter Security Requirements: iOS 18 may have tightened its policies on how it handles email server connections, particularly with certificates.
This could explain why previously accepted certificates are now getting rejected.
TLS Version Issues: Some users have speculated that the issue might relate to TLS (Transport Layer Security) protocols. If your email server is using an older TLS version, it might be incompatible with iOS 18’s updated standards.
IMAP Path Prefix: In some cases, adjusting the IMAP path prefix can help resolve syncing issues.
While it’s not clear if this directly ties into the iOS 18 bug, some users have reported success by tweaking this setting.
All in all, the Mail app’s struggle with IMAP connections is leaving many people stuck, with their email sitting in limbo until Apple rolls out a proper fix.
In the meantime, the best we can do is try workarounds and keep an eye out for any software updates that might patch things up.
Basic Troubleshooting Steps
First you need to try some basic troubleshooting steps:
1) Restart Your iPhone (The Classic Fix)
First things first: have you tried turning it off and on again? Restarting your iPhone can work wonders for fixing those annoying glitches, especially right after an update.
After it powers back up, check the Mail app to see if it’s back to normal!
2) Toggle Airplane Mode (Refresh Those Connections)
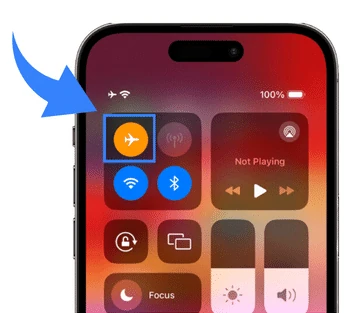
If the Mail app still isn’t syncing, try toggling Airplane Mode. It’s a quick way to reset your network connections.
How to Toggle Airplane Mode:
- Swipe down from the upper-right corner of your screen to open the Control Center.
- Tap the Airplane Mode icon (it’ll turn orange).
- Wait about 10 seconds.
- Tap the icon again to turn it off.

This should help refresh your internet and cellular connections. Now, check your Mail app again!
3) Reset Network Settings
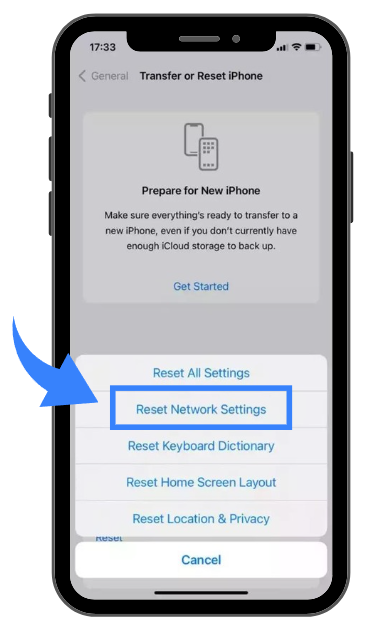
If all else fails, you can try resetting your network settings. This will wipe all your Wi-Fi passwords, so be ready to reconnect to your networks afterward.
Steps to Reset Network Settings:
- Open Settings and tap General.
- Scroll down and select Transfer or Reset iPhone.
- Tap Reset and then choose Reset Network Settings.
- Enter your passcode when asked and confirm.

Once done, reconnect to Wi-Fi and see if the Mail app has sorted itself out.
Honestly telling, these basic fixes may not fix your issue, but I suggested these because many software related issues on iPhone get resolved with these basic solutions however let’s move forward to more advanced ones.
Advanced Troubleshooting Steps
4) Delete and Re-Add Your Email Account (A Fresh Start)
Re-adding your email account can often resolve issues caused by corrupted settings that may have occurred during the update.
This process allows your iPhone to retrieve the latest server configurations.
Here’s How to Do It:
- Go to Settings and tap Mail.
- Select Accounts.
- Tap on the email account giving you trouble.
- Scroll down and hit Delete Account. Confirm when prompted.
Re-Adding Your Email Account:
- Restart your iPhone (yep, again!).
- Go back to Settings → Mail → Accounts.
- Tap Add Account, choose your email provider, and enter your credentials.
Once you’ve re-added your account, check if your Mail app is syncing properly.
5) Adjust IMAP Path Prefix Settings
If you’re still experiencing issues with your Mail app after updating to iOS 18, one potential fix is to adjust the IMAP Path Prefix.
This small adjustment can enhance the app’s ability to find and sync your emails correctly.
Steps to Adjust the IMAP Path Prefix:
1) Open the Settings app on your iPhone.
2) Scroll down to Apps and tap on Mail here.
3) Select Accounts, then choose the email account that’s giving you trouble.
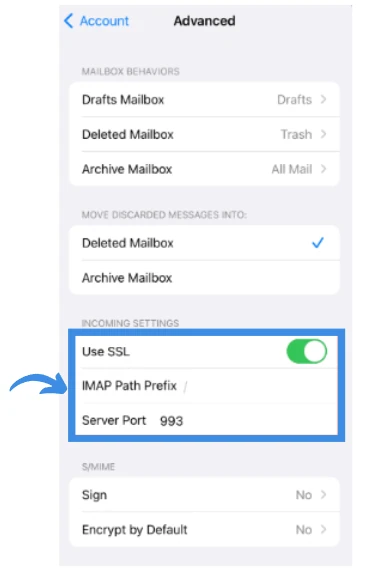
4) Tap on Account Settings, followed by Advanced.
5) Locate the IMAP Path Prefix field. Here, try entering either a forward slash (/) or the word INBOX.( there will already be a slash but that will be grey )
6) After making the change, back out of the settings and press Done.
7) Close the Settings app, then reopen your Mail app to see if the issue is resolved.

The IMAP Path Prefix serves as a guide for your Mail app, helping it understand where to find your emails on the server.
By adding a forward slash (/) or the term INBOX, you can help the Mail app correctly navigate the structure of your email server.
Some users have reported that entering a forward slash allowed their Mail app to access their inbox and other folders more efficiently.
In contrast, using “INBOX” might cause syncing issues with folders stored at the root of the IMAP server, as it may restrict access to other email folders.
This simple tweak has proven helpful for many frustrated users, so it’s definitely worth a shot if you’re still encountering difficulties!
6) Check TLS Version Compatibility (Secure Connections Matter)
After the update, you might want to check if your email provider is using the right TLS (Transport Layer Security) version, as this can affect syncing.
Steps to Check:
Reach out to your email provider’s support and ask about the TLS version they support. Ideally, it should be TLS 1.2 or higher.
Ensuring your Mail app connects securely is key to fixing those syncing issues.
7) Create an App-Specific Password (For Two-Factor Authentication Users)
If you’ve enabled two-factor authentication (2FA) for your email account, you may encounter issues with the Mail app after updating to iOS 18.
One effective solution is to create an app-specific password. This special password allows the Mail app to access your account securely without compromising your main login credentials.
Steps to Create an App-Specific Password:
Log into your email provider’s website: Use a web browser to access your email account.
Navigate to Security Settings: Look for options related to account security or privacy.
Find App-Specific Passwords: This section may be listed under “App Passwords” or “Manage App Passwords.”
Generate a new password: Follow the prompts to create a new app-specific password.
Enter this password in the Mail app settings: Open the Mail app on your iPhone, go to your account settings, and replace your usual password with the newly generated app-specific password.
Creating an app-specific password is crucial for users who have 2FA enabled. Regular passwords may not work in certain apps due to the added layer of security.
By generating an app-specific password, you ensure that the Mail app has the necessary access to your email account while maintaining the security benefits of 2FA.
This small but essential step can help restore email functionality, allowing your messages to flow smoothly again after the iOS 18 update.
8) Consider Using a Third-Party Email App (As a Temporary Solution)
If you need access to your emails urgently and the Mail app still isn’t cooperating, consider trying a third-party email app like Outlook, Gmail, or Spark.
These apps might just do the trick while you sort out the Mail app issues.
How to Get a Third-Party Email App:
- Open the App Store.
- Search for your preferred email app (like Outlook or Gmail).
- Download and set it up with your email account.
This way, you can keep up with your emails until the Mail app gets back on track.
Wrapping Up
Dealing with Mail app issues after the iOS 18 update can be frustrating, but don’t let it get you down! With these steps, you should be able to tackle the problem effectively.
Whether it’s a simple restart or a few adjustments to your settings, you have plenty of options.
If the problems persist, don’t hesitate to reach out to Apple Support here, they’re there to help!

Isaac Smith is the founder and editor of PC Glance, a website that covers computers, laptops, and technology. He is a tech enthusiast and a computer geek who loves to share his insights and help his readers make smart choices when buying tech gadgets or laptops. He is always curious and updated about the latest tech trends.


Thank you soooooo very much. I added INBOXs to Adjust the IMAP Path Prefix and my mail from comcast.net is now working. You saved me a trip to the Verizon store!! 🙂
Thank you very much…… your solution worked with / slash.
i started on number 5. as soon as i renentered password, mail started working again.