

AirPlay puts your iPad's screen on a compatible TV without a cable. If the TV doesn't support AirPlay, use HDMI with a video adapter that matches the iPad's USB-C or Lightning port.
For wireless viewing, check that your TV supports AirPlay and connect it and the iPad to the same Wi-Fi network. Bluetooth or an ordinary USB charging cable won't do the same job.
Choose wireless mirroring or a wired connection
For wireless viewing, use an AirPlay-compatible smart TV or an Apple TV plugged into your TV. Look for AirPlay in its specifications or settings. A TV described as smart doesn't always have it.
Use HDMI if your TV or receiver doesn't have AirPlay, or you'd prefer a cable. Check your iPad's charging port before choosing an adapter: USB-C and Lightning need different ones.
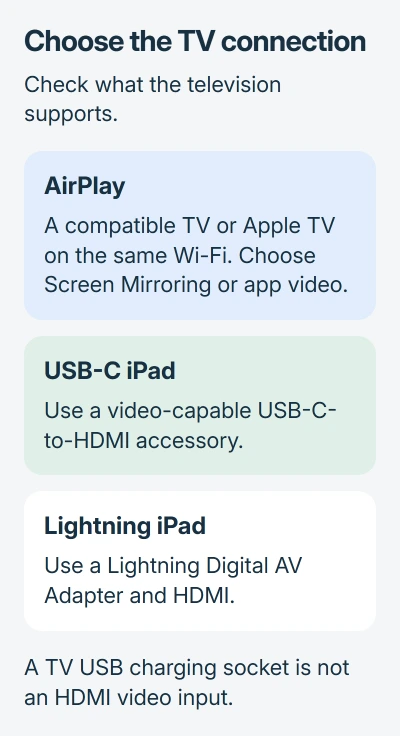
To show a presentation or demonstrate an app, use Screen Mirroring. To watch a supported movie, start with the app's AirPlay control. It sends the video without showing everything else you do on the iPad.
I'd check what you already have before buying an adapter. An AirPlay receiver lets you connect wirelessly. For a cable connection, your iPad's video output, adapter and TV input all need to work together.
Mirror the iPad screen over AirPlay
Connect your iPad and TV receiver to the same Wi-Fi network. Turn on the TV's AirPlay setting if needed, following its manual, and leave the receiver switched on.
Swipe down from the upper-right corner of the iPad to open Control Center. Tap Screen Mirroring, shown as two overlapping rectangles, then select the TV or Apple TV from the list.
If the TV shows a passcode, enter it on your iPad. Your iPad's screen should then appear on the TV. Open the photo or presentation you want to show and check both displays.
Apple describes the receiver, network and passcode steps in its AirPlay instructions. Pairing through the TV's Bluetooth device list won't start screen mirroring.
Close anything private before sharing your screen. Mirroring can show the apps and content you open next, so use the video app's AirPlay control when you only want people to see a movie.
To finish, open Control Center > Screen Mirroring > Stop Mirroring. Check that the TV has returned to its own screen before opening anything you don't intend to share.
Send a movie using its app's AirPlay control
Open your video app and start the video you want to watch. Find its AirPlay button, which may be inside the playback or sharing controls, then choose your TV or Apple TV.
The button's location depends on the app, and some apps don't support AirPlay. If yours has no supported way to send video to the TV, use the service's TV app. The missing option doesn't mean your iPad connection is broken.
To watch on your iPad again, select it from the AirPlay destination list. To end full-screen mirroring, use Stop Mirroring. The two ways of sharing have different controls.
If the receiver never appears, use the AirPlay discovery checks. If it appears but a particular file produces a format error, follow the AirPlay video-format checks.
Connect a USB-C iPad through HDMI
Use a USB-C-to-HDMI video adapter and an HDMI cable, or a suitable video-capable USB-C-to-HDMI cable. Connect the USB-C end to the iPad and the HDMI end to a TV HDMI input.
Use the TV remote's Input or Source control to select the socket you used. If you plugged into HDMI 2, choose HDMI 2. With HDMI 1 selected, you won't see the picture from another port.
The iPad USB-C connection page lists the models and limits. Resolution (picture detail) and refresh rate (how often the picture updates) depend on your iPad, adapter and display together.
For example, iPad Air 4, iPad mini 6 and iPad 10 support HDMI output up to 4K at 30 Hz. Supported newer models, including iPad A16, can reach 4K at 60 Hz with a suitable HDMI 2.0 adapter.
Those figures are the highest supported settings. You can still use a TV with a lower resolution. Through the same adapter, the Home Screen may also appear at a different resolution from a movie.
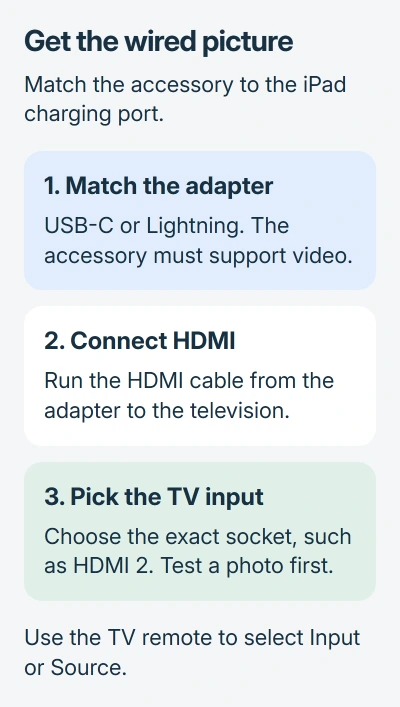
An ordinary USB connection to the TV may only charge your iPad. If you see a charging symbol but no picture, check that the accessory supports video before replacing the HDMI cable.
Use the Lightning Digital AV Adapter on older iPads
For a Lightning-equipped iPad, plug a Lightning Digital AV Adapter into the tablet. Connect HDMI between the adapter and TV, then select the matching TV input.
The iPad cable instructions describe both port types. A Lightning-to-USB charging lead isn't a substitute for the Digital AV Adapter's video connection.
To keep your iPad charged, connect its charger to the adapter's extra charging port if it has one. That lets you continue a long presentation or movie when the tablet's battery would otherwise run low.
Open a photo first to check the picture, then test your chosen app on the TV. If the photo appears but the app behaves differently, you've narrowed the problem to what happens when that app uses the TV.
Check the result before changing more settings
Depending on your app and iPad, the TV may copy the tablet's screen, show video separately or extend your workspace on supported models. A different layout doesn't automatically mean the connection failed.
If the wired display stays blank, check the TV input, then unplug and reconnect the iPad connection. If that doesn't help, the cable instructions also suggest disconnecting and reconnecting the display's power.
If it still won't work, tell Apple or the accessory maker your iPad model, adapter model and whether a photo appears. Contact the video service if the picture works until you start playback in its app.
The Short Version
Use Screen Mirroring for the whole iPad or an app's AirPlay control for supported video. For HDMI, match the adapter to USB-C or Lightning and choose the TV's correct input. Test a photo before troubleshooting one app's playback.
Checked November 5, 2026.

Isaac Smith is the founder and editor of PC Glance, a website that covers computers, laptops, and technology. He is a tech enthusiast and a computer geek who loves to share his insights and help his readers make smart choices when buying tech gadgets or laptops. He is always curious and updated about the latest tech trends.