
Two Windows PCs can transfer files over Ethernet using a router or a direct cable. A router supplies addresses automatically. For a direct link, give each PC a different address in the same local network range, then share a folder.
Plugging in the cable creates a network connection, not automatic access to the other computer's files. The instructions apply to Windows 10 and 11, including the difference between a router connection and a direct link.
Choose a router connection or a direct cable
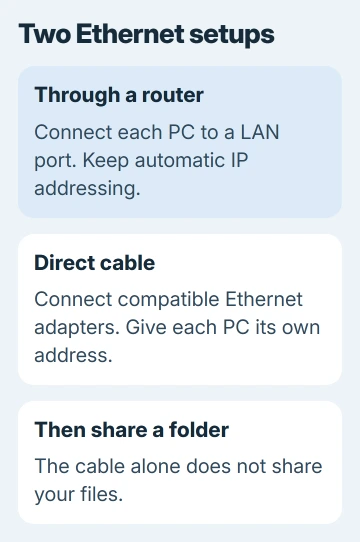
With a router, connect each PC's Ethernet port to a LAN port on that router. Use two cables, one per computer. The router normally assigns their addresses automatically, so you can leave the PCs on Automatic (DHCP).
For a direct link, connect one Ethernet cable between the computers' network ports. A laptop without that port needs a compatible USB Ethernet adapter. Confirm Windows recognizes the adapter before changing the network settings.
Your adapters determine which cable to use. Auto MDI-X means an adapter can adjust its connections for the cable automatically. Hardware without that support may need a crossover cable, which swaps the relevant wire pairs.
Check your adapter's specifications rather than buying a crossover cable automatically. Intel documents direct connections without a crossover cable for its gigabit copper adapters, which support automatic cable adjustment.
Keep this link between computers you own or trust. A wired connection doesn't make it sensible to share private folders with an unknown PC.
Confirm the cable connection before assigning addresses
Open Settings > Network & internet > Ethernet on Windows 11, or Settings > Network & Internet > Ethernet on Windows 10. Confirm Windows sees the wired connection rather than reporting the cable as unplugged.
A direct link can show No Internet even while it works for local file transfer. Neither computer becomes an internet provider simply because you connected them. Check access to the other PC separately from web access.
If Windows still reports an unplugged cable, reconnect both plugs and try another cable. The Ethernet connection checks help when the physical link never appears.
For a router setup, continue to sharing after both computers have connected. For a direct setup, give each Ethernet adapter an address on the same small network using the next steps.
Give a direct link two different local addresses
Microsoft describes manual addressing in its network settings instructions. A router usually supplies addresses; a cable between two PCs doesn't supply that service by itself.
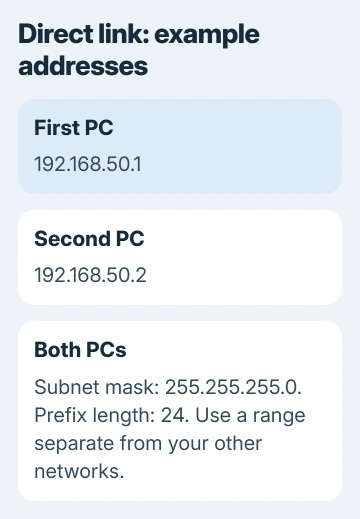
Record each Ethernet adapter's current IP settings before changing them. Use a private address range that doesn't overlap another network the PCs are using. The following pair is an example for an otherwise separate direct connection.
- First PC: 192.168.50.1
- Second PC: 192.168.50.2
- Both: subnet mask 255.255.255.0, or subnet prefix length 24 when that is the field shown.
On Windows 11, open Settings > Network & internet > Ethernet, select the connected Ethernet network if needed, and choose Edit beside IP assignment. Select Manual, enable IPv4, and enter the first PC's address and subnet.
On Windows 10, use Settings > Network & Internet > Ethernet, open the connected network, and look for IP settings > Edit. Select Manual, turn on IPv4, and enter that computer's address and subnet prefix.
Leave the gateway and DNS addresses blank for this separate direct link. Those fields aren't needed to open a share by its numeric address. Save the settings, then repeat on the second PC using its different address.
Don't put the same address on both computers. They need separate addresses inside the same subnet, the shared address range. If the network uses a router instead, follow the IP configuration checks for an address-assignment failure.
Share one folder from the computer holding the files
Create a folder named Transfer and put a small sample file in it. Start with that folder rather than an entire drive. I'd confirm a small copy works before sending a large collection overnight.
On a trusted connection, choose a Private profile in that Ethernet connection's settings. Private lets the PCs find each other and share files, while Public restricts those features. Apply it only to the connection you trust.
In Windows 11, right-click the Transfer folder in File Explorer and choose Show more options > Give access to > Specific people. In Windows 10, use Give access to > Specific people from the folder's right-click menu.
Choose an account on the computer holding the folder. Give it Read permission when the other PC only needs to copy files out. Use Read/Write only when it needs to add or change files in that folder, then complete the sharing dialog.
Keep password-protected sharing enabled and have that account's password ready. The other computer may ask for those credentials. A Windows Hello PIN used to unlock the PC isn't a substitute for the account password in a network sign-in.
Open the shared folder from the second PC
In File Explorer's address bar on the second PC, enter the first PC's address and share name. For the example setup, type \\192.168.50.1\Transfer and press Enter. Use your actual address if you chose a different range.
If Windows asks for credentials, sign in with the account permitted on the first PC. Select the appropriate account rather than assuming your current PC's login also exists on the other computer.
Copy the sample file and open the copy. Seeing the folder confirms access; opening the copied file confirms that the transfer completed. Then copy the rest, keeping the original files until you've checked the destination.
If access is denied, check the first PC's account and folder permissions. For an unreachable location, check the cable, addresses and sharing settings. Keep Windows Firewall on and allow its supported file-sharing feature.
For the other PC to appear in File Explorer's Network pane, you may also need Network discovery. Find the sharing controls here:
- Windows 11: Settings > Network & internet > Advanced network settings > Advanced sharing settings.
- Windows 10: Control Panel > Network and Sharing Center > Change advanced sharing settings.
In the Private section on each PC, switch on File and printer sharing. Enable Network discovery there too. Apply these controls only to the trusted link.
Finish the transfer and restore normal network settings
After checking your copies, stop sharing through Give access to > Remove access. Restore the Ethernet adapter's old IP settings before joining another network. A home router normally uses Automatic (DHCP).
If a work-managed PC refuses sharing, ask its administrator to approve a transfer method. Tell them whether you're using a direct cable or a router, and give them the error message.
For a personal PC, send Microsoft Support those details and whether the folder opens by numeric address.
The Short Version
Use a router for automatic addressing, or assign different addresses in one subnet for a direct link. Share one folder, open it on the other PC, and check a copied file. Remove the share and restore your IP settings afterward.
Checked November 9, 2026.

Isaac Smith is the founder and editor of PC Glance, a website that covers computers, laptops, and technology. He is a tech enthusiast and a computer geek who loves to share his insights and help his readers make smart choices when buying tech gadgets or laptops. He is always curious and updated about the latest tech trends.