
Laser printing problems often start with unsuitable paper, the wrong paper-type setting or toner saving that makes text pale. Try fresh laser-compatible paper and select its paper type in the print settings before replacing supplies.
Loose powder, faint text and repeated gray marks need different checks. If no sheet feeds, start with connection or paper-feed help. Keep a failed sheet beside you to compare its defect with each new print.
1. Match the paper and the print setting
Load a small stack of fresh paper approved for your printer's weight range. Use paper intended for laser printers. Inkjet-only coated paper isn't a substitute, even if it fits in the tray and looks suitable for a presentation.
Slide each tray guide against the paper, keeping the stack flat. Check the tray's paper-size and paper-type settings where your model offers them. A thick sheet marked as ordinary plain paper can need a different printing setting.
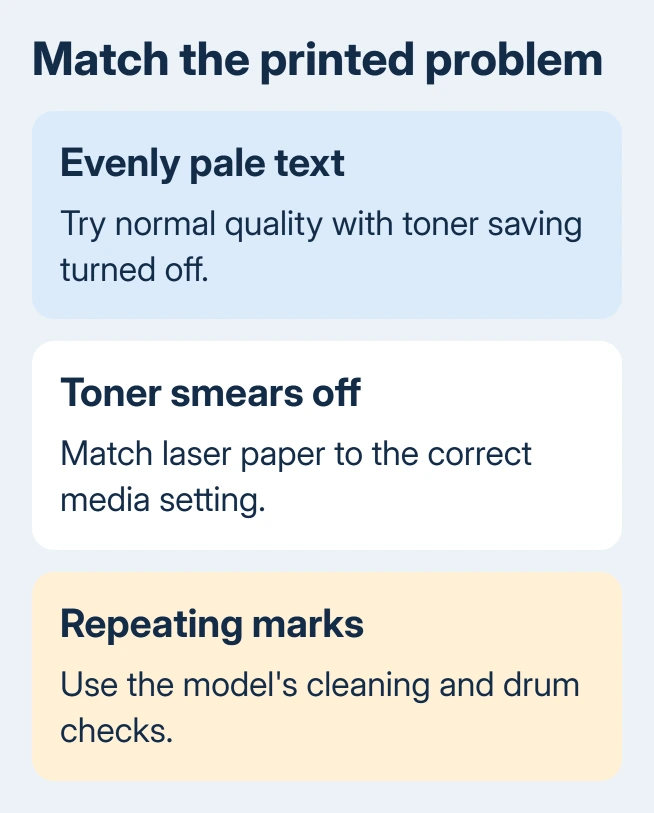
In the app's print window, select the actual laser printer, then open Properties, Preferences or the printer-specific settings. Choose the matching Paper Type or Media Type, such as Plain or Thick, using your model's supported choices.
On macOS, expand the print dialog with Show Details if offered. Look for the printer's paper or media settings. AirPrint and manufacturer drivers can show different controls, so don't expect an HP menu on a Brother printer.
Print the same page after the change. If the defect disappears with fresh paper and a matching type, keep that combination. If toner still rubs off or the page stays pale, use that problem's section instead of changing every quality option.
2. Compare a printer-made page with the computer's output
Print a configuration, supplies or test report from the printer's own controls. Find the report command in that model's manual, since the buttons vary. This page is made inside the printer rather than by your document app.
If that report looks bad too, check the paper, supplies or printer itself. If the report looks clean but your document doesn't, check that document's print settings, content or driver next.
For the computer connection, print a Windows test page. In Windows 11, open Settings > Bluetooth & devices > Printers & scanners, select the printer, then Printer properties > General > Print Test Page.
In Windows 10, use Settings > Devices > Printers & scanners, select the printer and Manage, then open Printer properties. Microsoft's printing troubleshooting covers the queue and connection checks too.
If no sheet emerges, use the printer-not-printing checks. If the printer feeds completely white sheets, use the blank-page troubleshooting rather than treating it as faint output.
3. Turn off toner saving when the entire page is pale
Look for Toner Save, Toner Save Mode or, on supported HP LaserJets, EconoMode. Disable that setting, then compare a fresh print. These modes reduce toner use, so a pale page can be a selected economy setting rather than an empty cartridge.
Check both the printer menu and driver when your model offers the setting in both places. A saved preset can restore the economy choice on the next job. Save a normal-quality preset after the result looks right.
Read the supplies message. Toner Low is different from Replace Toner, and the wording varies by maker. When replacement is required, match the cartridge to the full model and region before ordering it.
I'd change the economy setting before buying toner when every character is evenly pale. If only one strip is missing or the defect repeats at intervals, check the parts that can cause that pattern instead.
For a newly installed cartridge, check that the protective packing shown in its instructions was removed and the assembly is seated correctly. Don't pull unfamiliar parts because a different model uses a removable sealing strip.
4. Follow the loose-toner check before blaming a cartridge
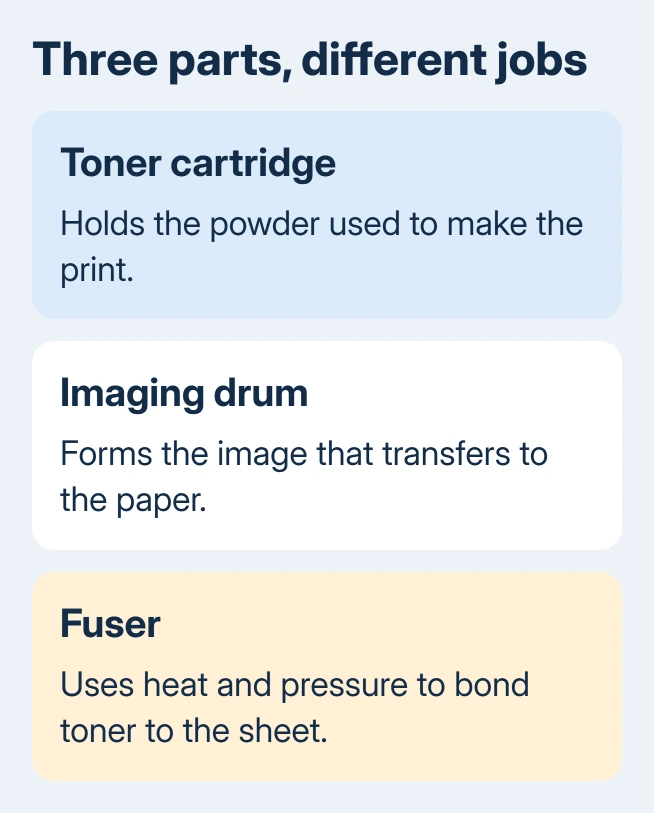
Let the printed sheet cool, then check whether the image smears during normal handling. Loose toner is different from text that is simply too light. The printer's fuser uses heat and pressure to bond toner to the sheet.
Return to the model's supported paper type and weight. Use its recommended setting for that stock, then compare a new print. A paper mismatch can affect how well the toner bonds, so another cartridge isn't automatically the answer.
Some Brother models offer Improve Toner Fixing in the driver. Use it only when the manual for your printer lists it. Other models have their own thick-paper or fixing controls; the names and available choices aren't universal.
Keep your hands out of the hot fuser area. If supported paper and the recommended setting still leave loose powder, ask the manufacturer about a fixing or fuser fault, with a photo of the failed print.
5. Use model-specific cleaning for marks and gray shading
Check the manual for a Cleaning Page or cleaning procedure. On the HP LaserJet Pro M402/M403 family, the control-panel route is OK > Service > Cleaning Page. Follow the paper-loading prompt and let the cycle finish.
That menu path applies to the M402/M403 family. A different HP or Brother printer can use a different cleaning process, so search its manual by the full model. An inkjet's head-cleaning cycle isn't a cleaning method for a laser printer.
On supported Brother models, the drum and toner cartridge are separate parts. The drum forms the image; the toner cartridge supplies its powder. Replacing one doesn't replace the other.
For narrow white or black stripes, the printer streak guide explains the drum and corona-wire checks. After using a drum's cleaning tab, put it back at the home mark shown in its instructions.
For a gray background or repeated shadow images, also check the operating temperature and humidity range in the model's specifications. Brother recommends checking the operating environment for these print defects.
If cleaning makes no difference, keep the failed sheet. Don't keep repeating a cleaning cycle or replace the drum and toner together just to cover both possibilities. Ask which part matches that particular repeating defect.
6. Repair the computer side only when internal output is clean
Print a different short document from another app. If that looks normal, check the original document's print preview, selected pages and printer preset. The printer has already shown it can make a clean page.
When documents from every app look bad but the printer's own reports look clean, check that the driver supports your exact printer. Get the matching driver through the maker's model page, selecting your operating system there.
For defects that still appear on the printer's own reports, contact the maker's print-quality team. Give the model, supply messages, paper type and cleaning result. Ask about service before buying a fuser.
The Short Version
Match fresh laser paper to its media setting and compare an internal report. Check toner saving for pale prints and the model's fixing or cleaning steps for marks. If its own pages still look bad, ask support about supplies or hardware.
Checked November 10, 2026.

Isaac Smith is the founder and editor of PC Glance, a website that covers computers, laptops, and technology. He is a tech enthusiast and a computer geek who loves to share his insights and help his readers make smart choices when buying tech gadgets or laptops. He is always curious and updated about the latest tech trends.