
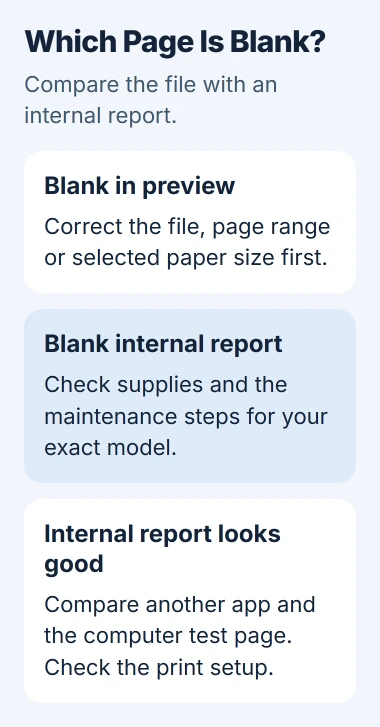
Blank pages can come from the document, empty supplies or an inkjet head that isn't delivering ink. Check print preview, then print the printer's own diagnostic report to see whether the problem starts in the file or the printer.
Check that internal report before buying supplies. If it prints correctly but one document comes out blank, start with the document and its print settings rather than cleaning the printhead.
1. Check whether the selected page is blank in preview
Open the document's print view and check the page you're sending. Make sure the page range, paper size and physical printer are right. If preview is blank, correct the file or page selection first.
Check whether every sheet is blank or extra blank sheets appear between printed pages. An occasional empty page needs different checks from a printer that makes no marks at all.
If the document contains an unwanted blank page, remove it or choose a range that leaves it out. Skip Blank Page can help when your printer software offers it, but it won't fix a printer that isn't putting ink on the page.
Match the driver's paper setting to the paper in the tray. Epson says to compare paper size, printer selection, ink and the nozzle pattern in its blank-page checks.
For Word, follow the document print settings to inspect the page range and preview. Print one known nonblank page before sending another complete document.
2. Print a report made by the printer itself
Use the printer's control panel to print its internal quality report or test pattern. Find the report in your model's manual. An inkjet nozzle check and a laser printer's configuration page have different names and purposes.
On an Epson ET-3850U, load plain paper, extend the output tray and clear any displayed error. From the Home screen, select Maintenance > Print Head Nozzle Check, then Print.
Look at the printed pattern. If it's complete, the printer can print its own test. If it's faint, broken or empty, check whether ink is reaching the paper and follow your model's maintenance steps.
If the internal report looks normal, go to the computer checks in step 6. I'd keep that report beside the failed printout; it gives you a useful comparison without spending ink on repeated cleaning.
A blank photocopy doesn't give the same comparison. Copying also depends on the scanner and where you placed the original. Use the printer's own report before deciding it has a printing fault.
3. Check the supplies and any recent cartridge change
Read the ink or toner status on the printer or in its own software. On a tank inkjet, look at the actual tank levels too. Compare the displayed estimate with the ink you can see through the tank.
For the Epson example, refill a tank that has reached its lower line before cleaning. Use the correct ink and your model's refill instructions. Running maintenance with too little ink can damage the printer.
The printer ink-level guide explains where those estimates come from. A full-looking status bar doesn't rule out a blocked nozzle or a cartridge that isn't delivering ink.
If this started right after a cartridge change, check your model's installation steps. Make sure you've fitted the correct cartridge firmly and removed the shipping tape or seal named in its instructions.
On a laser printer, check the toner rather than looking for an inkjet cleaning menu. Some toner cartridges have a shipping seal you need to remove. Follow the cartridge's instructions before deciding the new toner is faulty.
For an HP ink cartridge, the installation procedure covers the model-specific seating and tape checks. Avoid pulling off other labels just because the printer is blank.
4. Clean an inkjet head only when its pattern needs it
For the ET-3850U, a faint pattern or missing segments calls for Maintenance > Print Head Cleaning. Load plain paper, make sure no error is displayed and follow the panel's cleaning instructions.
Let the cycle finish, then print a fresh nozzle check. Compare it with the earlier sheet to see whether the missing areas have improved before spending more ink on the original full-page document.
The ET-3850U manual limits ordinary cleaning attempts. After up to three cleanings without improvement, turn the printer off and wait at least twelve hours before the next check and cleaning.
Those timings apply to this model. Another printer can have a different waiting period or cleaning sequence. Follow its own instructions instead of using this cycle on every inkjet.
Alignment fixes a different problem, such as printing that lands in the wrong place. If the whole nozzle pattern is missing, changing alignment or choosing a darker font won't get the ink flowing.
5. Use Power Cleaning only for the supported model
If almost the whole pattern is missing on an ET-3850U, its manual calls for Power Cleaning. It's also an option when normal cleaning and the required wait haven't improved the print.
Before starting, check that every ink tank is at least one-third full and the maintenance box has enough space left. This cycle uses a lot of ink, so check both conditions first.
Open Maintenance > Power Cleaning and follow the panel's instructions. Once it finishes, follow the confirmation and nozzle-check prompts to see the result before deciding whether it needs another Power Cleaning.
The same model requires at least twelve hours with the printer off before another Power Cleaning. If the pattern stays blank after those steps, contact support with the earlier and later reports.
This Power Cleaning procedure isn't for laser printers. If your laser's internal page stays blank after its toner checks, ask the maker what to check next or whether it needs service, rather than buying an inkjet cleaning kit.
6. Check the app and driver when internal output is good
Print a simple nonblank file from another app, using the same physical printer. If that works, return to the original document's preview, page selection and app settings.
On Windows 11, open Settings > Bluetooth & devices > Printers & scanners. Select the printer, open Printer properties, and use Print Test Page on its General tab.
Microsoft's app-printing checks use this comparison. A blank or failed test page means you should check the printer setup or driver too.
If several apps fail but the printer's own report prints correctly, check the installed driver and selected printer entry. If only one app fails, check how it sends the job before replacing working supplies.
Give support the printer model, supply status, failed app and both test results. Include whether every sheet is blank or only extra sheets, and any cartridge replacement or software update that happened just before the failure.
The Short Version
Check preview and an internal report. If both computer jobs and the report are blank, check supplies and the model's maintenance steps. If the report is good, check the app or driver. Keep the reports for support.
Checked November 5, 2026.

Isaac Smith is the founder and editor of PC Glance, a website that covers computers, laptops, and technology. He is a tech enthusiast and a computer geek who loves to share his insights and help his readers make smart choices when buying tech gadgets or laptops. He is always curious and updated about the latest tech trends.