
A privacy key or switch can turn off your HP laptop camera. On models with a camera privacy key light, a lit key means the camera is off. Check that control and the lens cover before reinstalling anything.
Then open the Windows Camera app. If the preview works, check your meeting app's settings. If the camera is missing there too, check Windows permissions, the device and its hardware.
1. Open the shutter and enable the camera
Look along the frame around your screen for a sliding lens cover. Open it so you can see the lens. Then check the laptop's sides and the area beside the camera for a separate electronic privacy switch, if fitted.
Some HP laptops instead use a key with a camera symbol in the keyboard's top row. Press it once. If it doesn't turn the camera on or off, try Fn with that same marked key; the combination depends on your model.
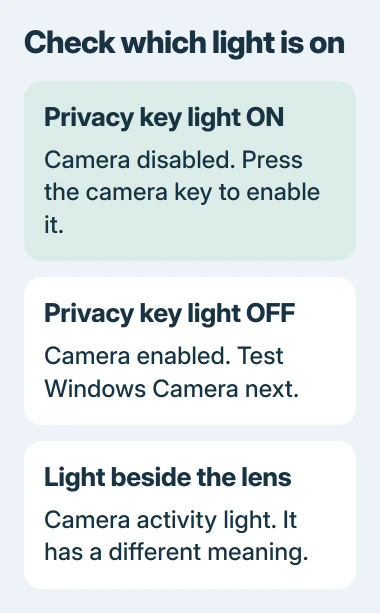
HP says in its webcam troubleshooting instructions to check the privacy switch, shutter key and lens cover. The key's position varies, so look for its camera symbol rather than a particular function-key number.
The privacy key light and camera-in-use light mean different things. On HP models with this privacy-key design, a lit key means the camera is off. The small light beside the lens normally means the camera is in use.
A lens cover can block the picture while Windows still detects the camera. An electronic privacy control can make the camera disappear from apps. Check both, since a black picture and a missing camera can have different causes.
2. Test Camera with other video apps closed
Close Teams, Zoom and any other app or browser tab using the camera. Open Start, type Camera, then launch the Windows app. Allow access if Windows asks and check whether you see a live picture.
If more than one camera is connected, use Change camera to select the built-in one. An external USB camera can show a working picture even when your laptop's own camera isn't working.
Move a hand in front of the built-in lens to check that it's the camera you're seeing. If the preview works, close Camera before returning to your meeting app. Choose the camera you just checked in that app's video settings.
Your camera may appear as HP HD Camera, HP Webcam, USB Video Device or a name specific to your model. Check the live preview instead of guessing from the name.
If Windows Camera works but your meeting app doesn't, check that app's permissions and selected camera. If Camera also fails, copy the exact error message and continue with the Windows checks.
3. Allow camera access for the app you use
On Windows 11, open Settings > Privacy & security > Camera. Enable Camera access. In the Store-app access list, enable the app you need.
On Windows 10, open Settings > Privacy > Camera. That page has separate controls for device access and app permissions, even though the labels differ. Check both.
For a desktop meeting app or browser, also turn on the separate desktop apps access switch. These programs don't all get their own switches in the Microsoft Store app list.
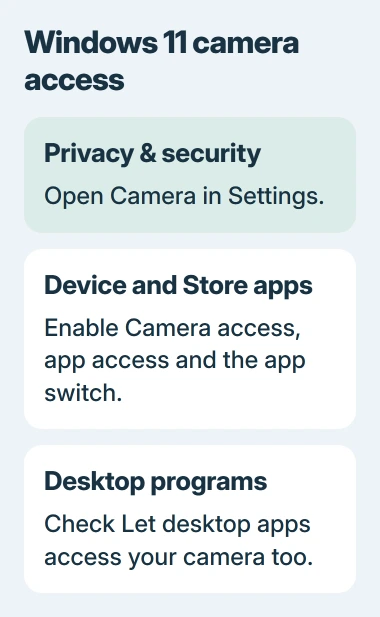
The Windows camera repair guide explains these separate permissions. Even if a desktop app works, Windows Camera still needs its own access.
Reopen the affected app after changing access and try its preview. For a browser meeting, accept the site's camera request too, then choose the camera you want in the meeting's settings.
If a permission switch is gray or managed by an organization, ask your administrator to change it. Reinstalling the camera driver won't change a permission your account isn't allowed to edit.
4. Run the Windows camera diagnostic
On Windows 11, open Get Help from Start and search for camera troubleshooter. Follow its prompts, then test Camera again. The camera diagnostic walkthrough covers that process.
If Camera works afterward, return to your original app and check its preview too. The meeting app still needs to use the correct camera.
If Camera is still unavailable, open Device Manager from Start's right-click menu. Look for the webcam under Cameras, Imaging devices, or Sound, video and game controllers.
Open its Properties and read Device status. Record any error code. If the menu offers Enable device, choose it and test again. If it offers Disable device, it's already enabled.
If no camera appears, choose Action > Scan for hardware changes. Restart Windows and look again. Check the electronic privacy control again before assuming a damaged internal cable is why Windows can't find the camera.
5. Repair a driver problem after an update
If the camera stopped working immediately after a driver update, open its Properties > Driver tab. Select Roll Back Driver if available, confirm, then restart and check the preview.
If you can't roll back, check Settings > Windows Update for a camera or system update. Look for driver updates under Advanced options > Optional updates too. Install a matching update and restart if asked.
Use a camera driver that matches your HP model. A generic driver may install but remove features that your camera supports, such as Windows Hello face recognition.
If support recommends reinstalling the device, have the matching driver ready to restore it. Choose Uninstall device in Device Manager, then restart or scan for hardware changes. Let Windows try reinstalling it and check the preview.
For 0xA00F4244, use the camera detection error checks. With that message, check whether Windows can detect the camera and whether privacy controls block it; brightness and the photo button won't help.
6. Check the hardware when the webcam stays missing
The Webcam Connection Test runs in HP PC Hardware Diagnostics UEFI, the tool you open before Windows starts. Save your documents and shut down the laptop. Turn it on while tapping Esc, then press F2 at the startup menu.
Choose Component Tests > Webcam Connection > Run once where available, then follow the prompts. The hardware diagnostic instructions describe that test and its results.
Keep any failure identifier the test gives you. If the test isn't available, or the camera is still missing, send HP your product number and Windows check results. Ask whether the webcam needs repair.
I'd include a photo if you're unsure which privacy control your laptop has. Showing whether the light is on the keyboard's privacy key or beside the lens can save another round of driver changes.
The Short Version
Check the lens cover and privacy control; a lit privacy key can mean camera off. Compare Windows Camera with the meeting app, allow access and read device status. Use the UEFI test result when arranging HP service.
Checked November 5, 2026.

Isaac Smith is the founder and editor of PC Glance, a website that covers computers, laptops, and technology. He is a tech enthusiast and a computer geek who loves to share his insights and help his readers make smart choices when buying tech gadgets or laptops. He is always curious and updated about the latest tech trends.