
"Not enough space" is the lie that wastes most of your afternoon. When a macOS Tahoe install fails, the error message usually points at the wrong thing.
"Not enough space" is often hidden System Data, not your files. "Failed to prepare" is usually a wrong clock or a security setting buried in Recovery.
And one entire category of failure was an Apple bug, fixed in a later build.
So do not just hit retry and hope. Check the real causes in the right order, before you re-download the installer for the fifth time or, worse, erase your drive.
Two Quick Checks Before You Touch Anything
Thirty seconds here can end the whole problem.
- Is your Mac even supported? Tahoe dropped almost every Intel Mac. It runs on all Apple Silicon Macs (M1 from 2020 onward) and only four Intel models: the Mac Pro 2019, MacBook Pro 16-inch 2019, MacBook Pro 13-inch 2020 with four Thunderbolt ports, and the iMac 27-inch 5K 2020. If your Mac is not on Apple's compatibility list, Software Update will simply never offer Tahoe, and no fix changes that.
- Do you have a Mac Studio M3 Ultra? If so, jump to the special note near the end first. Your failure is a known Apple bug, and the usual troubleshooting will not touch it.
Everyone else, start here.
Free Up Real Space and Hunt the Hidden System Data
This is the most common cause, and the installer lies about how much you need. It might say "updating requires 17.74 GB," but Tahoe realistically needs 35 to 50 GB free to stage and move files safely.
The twist: people delete files, see plenty of free space in Finder, and still get "disk full." That is because Tahoe's System Data (a runaway Spotlight index, Time Machine local snapshots, and caches) quietly eats tens or even hundreds of gigabytes.
One user said it straight: "turns out the reason is that half of my drive is full of System Data."
So check it like this:
- Open System Settings, General, then Storage, and look at how big System Data is.
- Empty the Trash and your Downloads folder, and delete old iPhone backups (in Finder, choose Go to Folder and paste `~/Library/Application Support/MobileSync/Backup/`).
- To clear the hidden snapshot bloat, the reliable fix is to delete Time Machine local snapshots. If you are comfortable in Terminal, run this one line, then reboot:
`tmutil listlocalsnapshots / | cut -d "." -f 4 | while read s; do sudo tmutil deletelocalsnapshots "$s"; done`
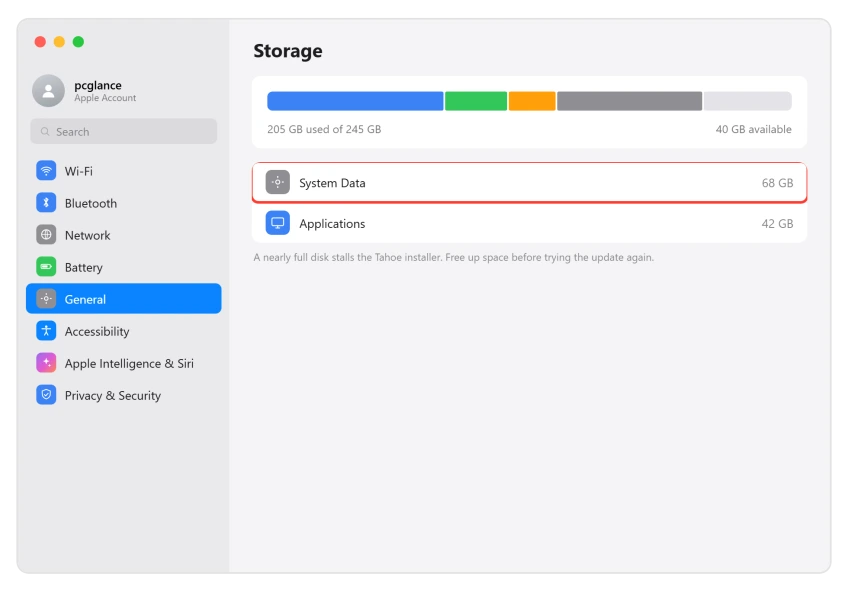
Important: Aim for 35 to 50 GB free, not the smaller number the installer quotes. People recovered 90 to 100 GB or more just by clearing snapshots, with no files lost.
Fix Your Mac's Clock
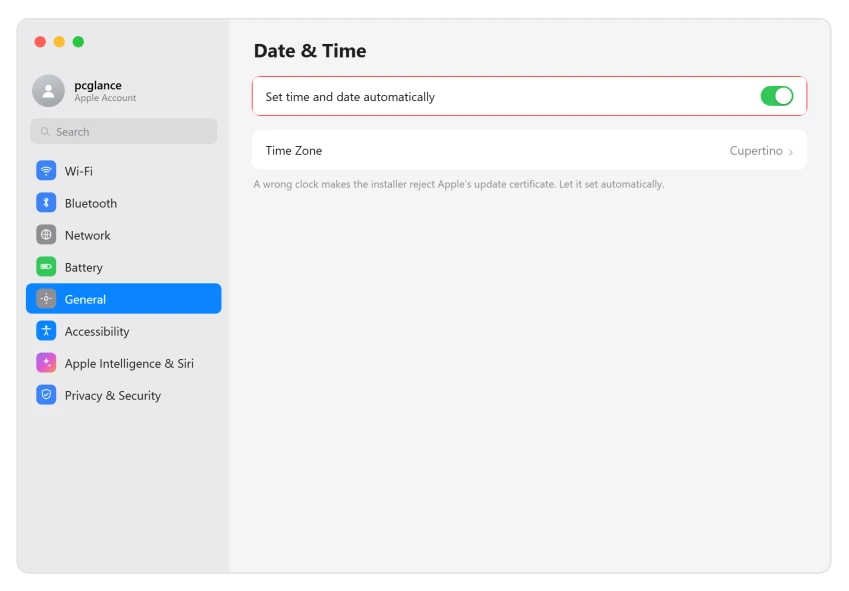
If you are seeing "Failed to personalize the software update," "this copy can't be verified," or "payload failed signature check," the cause is very often a wrong system clock.
The installer's security certificates look expired or not yet valid when the date is off, so it refuses to continue.
The fix takes two clicks:
- Open System Settings, General, then Date & Time.
- Turn on Set time and date automatically.
Pro tip: If you are stuck in the installer or Recovery with no normal desktop, open Utilities, then Terminal, and type `date` to check it (it shows UTC time, which can look wrong).
To set it by hand, use `sudo date` followed by month, day, hour, minute, year, like `sudo date 0405120026` for April 5, 12:00, 2026. Then retry the install.
Delete the Damaged Installer and Re-Download Cleanly
If you get "This copy of the Install macOS Tahoe.app is damaged" or a download error, the file itself is corrupt, usually from an interrupted download or Apple's servers being hammered on launch week.
Re-running the same broken file just fails again.
Start clean instead:
- Drag Install macOS Tahoe from your Applications folder to the Trash, empty it, and restart.
- Re-download a clean copy. The most reliable way is in Terminal: `softwareupdate –fetch-full-installer –full-installer-version 26.0.1` (swap in the version you want). The fresh installer lands in your Applications folder.
Important: If it fails the first time, try once more before giving up.
As one user put it, "didn't work at first, but the second time it ran ok." Apple's servers, not your Mac, are often the reason a download dies midway.
Sort Out Your Connection
A weak or interrupted connection causes "gateway timed out," "bad gateway," or "an error occurred while downloading." Apple Silicon Macs also have to reach Apple's servers mid-install to authorize the build, so a flaky link breaks the whole thing.
Shore up the link first:
- Switch from Wi-Fi to wired Ethernet if you can (a USB-C adapter is fine), and restart your router. If you are already on 26.0 and your MacBook's Wi-Fi keeps dropping, going wired sidesteps that too.
- Stop other downloads and streaming on your network while it installs.
- If it keeps timing out on launch day, check Apple's System Status page and just wait a few hours. These errors are usually on Apple's end during a big release.
Install From Safe Mode
If a normal install keeps failing, a background app is often interfering.
VPNs, antivirus (Norton came up by name), firewalls like Little Snitch, and cleaner apps all interrupt the installer's verification.
Safe Mode loads none of them, which is why it so often succeeds where a normal boot fails.
Boot in clean:
- Shut down. On Apple Silicon, hold the power button until "Loading startup options" appears, select your disk while holding Shift, and click Continue in Safe Mode. On Intel, hold Shift during startup.
- Temporarily uninstall or disable any VPN, antivirus, firewall, and cleaner apps, and unplug nonessential accessories.
- Run the update again from Safe Mode.
Flip Startup Security Back to Full
This one is sneaky, because the error never names the real cause.
If you get "Failed to prepare the software update" and it dies around the "5 minutes remaining" mark, the culprit is often a lowered security setting from past tinkering.
Put it back to Full:
- Boot into Recovery (Apple Silicon: hold the power button until "Loading startup options," then Options, Continue; Intel: hold Command + R).
- Open Startup Security Utility, and set your disk back to Full Security (and re-enable System Integrity Protection if you ever turned it off).
- Restart and try the install again.
Several people confirmed "switching to Full Security worked," even though the error message never once mentioned security. If re-downloading has not helped, check this before anything heavier.
Repair the Disk, Then Reinstall From Recovery
If the install says it "cannot be installed on Macintosh HD," your disk may have errors blocking it. Repairing it and reinstalling from Recovery pulls a fresh, properly signed copy without erasing your data.
Repair, then reinstall:
- In Recovery, open Disk Utility, select your startup volume, and run First Aid.
- Then go back and choose Reinstall macOS Tahoe. Apple's Recovery reinstall installs over your existing system, keeps your files, and avoids the live-update path that may be failing.
One more thing once it is genuinely installing: the progress display on Tahoe is wildly unreliable.
It can sit at "5 minutes remaining" or "52 minutes remaining" for ages, reboot a couple of times, and look completely frozen while it is actually working.
Walk away for 90 minutes to 2 hours, do not run other internet apps, and do not force restart because it "looks stuck." A real install reboots more than once.
As one experienced user advised, "be patient, walk away, and do not run other applications that require internet connections." Only after a couple of hours with no movement at all should you treat it as failed and move on.
The Heavy Last Resorts
If you have genuinely worked the list and Tahoe still will not install, two options remain. Both ask a little more of you.
Pick whichever you can manage:
- DFU revive from a second Mac. This rebuilds the firmware and is what finally fixed stubborn cases, even ones the Apple Store could not. Connect your Mac to a second Apple Silicon Mac with a proper USB-C data cable (a Thunderbolt-to-Thunderbolt cable or the bare charging port will not work), open Apple Configurator 2, put your Mac in DFU mode, and choose Advanced, then Revive Device. Revive keeps your data. One user reported, "after trying the DFU approach from a MacBook Pro to a Mac Studio, it worked."
- Bootable USB installer or clean install. Back up with Time Machine first, because this can erase the drive. Format a 16 GB or larger USB stick, then build the installer with the `createinstallmedia` command, boot from it, run First Aid, and reinstall.
Special Note: Mac Studio M3 Ultra
If you have a Mac Studio with the M3 Ultra chip and Tahoe keeps installing for about 15 minutes, counting down to "less than a minute," then rebooting straight back to Sequoia with no error at all, stop troubleshooting.
This is not you.
Apple's launch build of Tahoe (26.0) shipped missing key system files for the M3 Ultra's Neural Engine, so the install failed a hardware check every single time.
No amount of Safe Mode, Recovery, or re-downloading fixed it, and people tried more than twenty times.
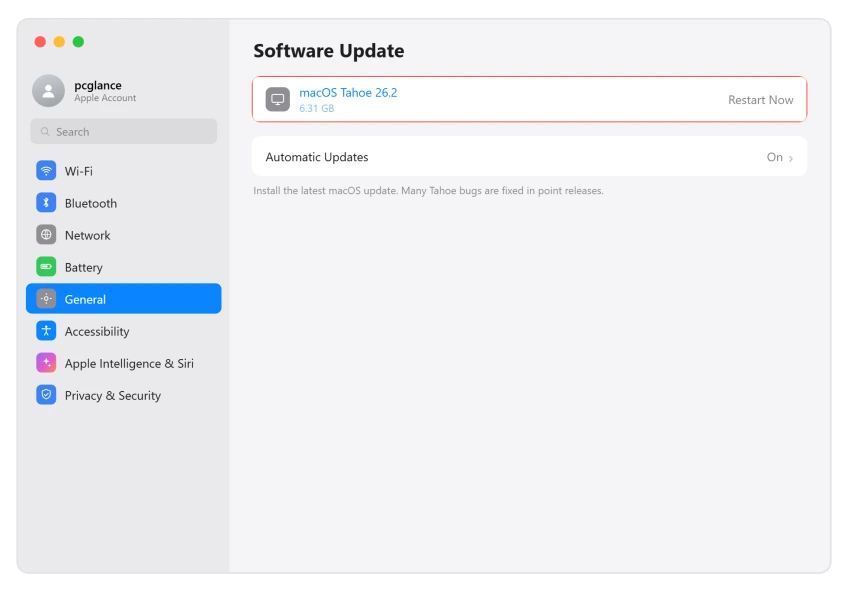
The real fix: first fully update Sequoia (to 15.7.1 or later) in Software Update, then install macOS Tahoe 26.0.1 or newer, which contains Apple's patch.
A relieved user confirmed, "updated to 15.7.1, then to Tahoe 26.0.1, no issues at all." If even that fails, the DFU revive above is your path.
The Short Version
Do not trust the error message, and do not erase anything yet. Most "not enough space" failures are hidden System Data, so clear your snapshots and aim for 35 to 50 GB free.
Most "failed to personalize" failures are a wrong clock, so set it automatically.
If the install still chokes, re-download a clean copy, use wired internet, try Safe Mode to rule out VPNs and antivirus, set Startup Security back to Full, and run First Aid before reinstalling from Recovery.
The Mac Studio M3 Ultra failure was Apple's own bug, fixed in 26.0.1. Check the real cause in order, and the install almost always goes through.
Where to Next
More macOS Tahoe help: This fix is part of our macOS Tahoe problems and fixes guide, a single place that rounds up every common Tahoe issue.
If something else on your Mac is acting up after the update, start there.

Isaac Smith is the founder and editor of PC Glance, a website that covers computers, laptops, and technology. He is a tech enthusiast and a computer geek who loves to share his insights and help his readers make smart choices when buying tech gadgets or laptops. He is always curious and updated about the latest tech trends.