
A USB cable can transfer documents from your computer to an iPad through an app that supports File Sharing. Use Apple Devices on a Windows PC or Finder on a Mac, select the destination app, and copy the file into it.
Choose the app that will open your document first. An iPad doesn't show all its storage as an ordinary USB drive, and this method doesn't put every file into Photos or a single shared Downloads folder.
Choose the app before connecting the cable
Start with a document the iPad app can open, such as a PDF for a reader or a project file for its matching editor. Check that app's instructions for File Sharing, because support varies between apps.
For Windows, install or update Apple Devices using the Microsoft Store app. This file-sharing method works on Windows 10 or later. On a Mac, use Finder with macOS Catalina (10.15) or later.
A Mac on Mojave or earlier uses iTunes, whose controls differ from Finder's. On a PC using Apple Devices, follow that app's labels rather than an old iTunes screenshot.
Have the iPad's passcode ready. You'll need to unlock it and approve the computer when asked. Connect a USB-C or Lightning data cable that fits this iPad and your computer without forcing either connector.
For files already on a removable drive, connect that drive to the iPad instead. That's a different route through Files and doesn't require Apple Devices or Finder.
Copy a document from Windows with Apple Devices
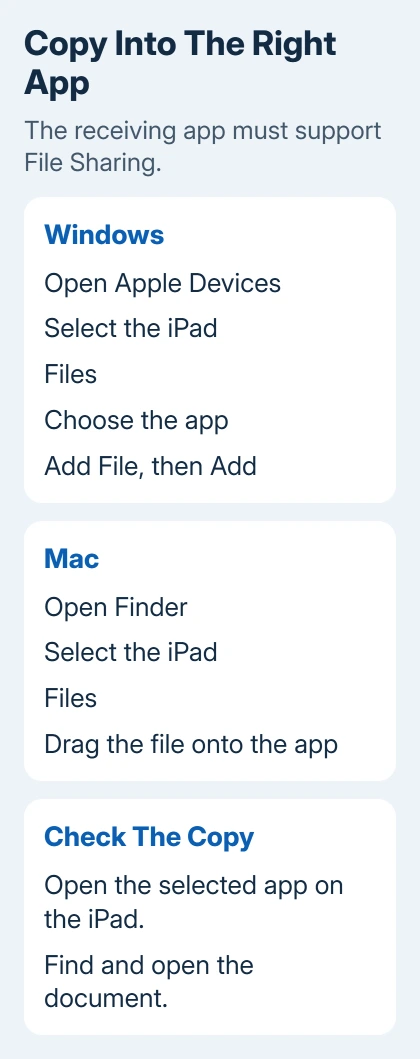
Open Apple Devices, connect the iPad, then unlock its screen. Tap Trust if the iPad asks whether to trust the computer, then enter its passcode. Select the iPad in Apple Devices if needed.
- Select Files in Apple Devices.
- Choose the receiving app from the list.
- Click Add File, then select the document on your PC.
- Choose Add and let Apple Devices complete the transfer.
Apple's Windows file-sharing instructions explain that a missing Files section means the iPad has no apps supporting this type of sharing. Replacing the cable won't add that missing app feature.
If Files appears but your app isn't listed, use an app that supports File Sharing or your app's own import method. Copying a file successfully won't make it readable by an app that doesn't support its format.
Try one small document first. Once it appears in the app's file list, open the receiving app on the iPad and find its documents or import screen. Confirm the document opens before sending the rest of the folder.
I'd check that first file before copying a large collection. If you've picked the wrong app, you'll only have one document to sort out.
Use Finder when the computer is a Mac
Connect and unlock the iPad, then open Finder. Select the iPad under Locations in the sidebar. If either device asks you to trust or approve the connection, finish that prompt before looking for the iPad's documents.
Choose Files in the iPad's Finder window. Apps that support File Sharing appear there. Drag the document from a Finder window onto the receiving app's name, then let Finder finish copying it.
Expand the app's entry to see its shared documents when needed. Follow the Finder sharing procedure to copy into an app or copy its shared documents back to a Mac.
Open the destination app on the iPad and check the result. The file is stored with that app. Seeing it in Finder doesn't mean every other iPad app can open it automatically.
When you're finished, use the eject control beside the iPad in Finder before disconnecting its cable. Keep the original on the Mac until you've checked the transferred document.
Find the copied document on the iPad
Open the same app you selected on the computer. Look in its document list, library or import controls, depending on the app. Check the app's instructions if you can't find how to open files sent through File Sharing.
Some apps also show their folder in Files > Browse > On My iPad. If the app offers that access, choose its folder there. Other apps keep their shared files inside the app itself.
If Files opens the document with an unexpected app, the iPad document-opening controls cover the separate choice of which app handles a file.
Don't delete the receiving app to tidy up an unsuccessful import. Removing an app also removes its shared files from the device and its device backup. Copy anything needed back to the computer before removing the app.
For photos or music that should appear in those libraries, use the matching transfer method. File Sharing copies documents into apps that support it; it doesn't replace every kind of media syncing.
Handle a missing iPad or an unsuccessful copy
When the iPad doesn't appear at all, unlock it, check for a trust prompt, and reconnect it directly to the computer. Test with a different data cable and USB port. Charging alone doesn't confirm that the data connection works.
When the iPad appears but Files is missing, return to the app-support check. When the document appears on the computer's file list but won't open on the iPad, check the app's supported formats and its import instructions.
When asking for help, say which stage failed: finding the iPad, showing the app, copying the document or opening it. Include your computer's system, app version, iPadOS version and file extension.
Ask the app developer about an unsupported document or missing import control. If the computer still can't detect the iPad with a working cable and port, contact Apple Support. Keep your originals on the computer while you get help.
The Short Version
Choose an iPad app with File Sharing, connect and unlock the tablet, then copy with the Windows Apple Devices app or your Mac's Finder. Open the receiving app to check the result before removing any originals.
Checked November 6, 2026.

Isaac Smith is the founder and editor of PC Glance, a website that covers computers, laptops, and technology. He is a tech enthusiast and a computer geek who loves to share his insights and help his readers make smart choices when buying tech gadgets or laptops. He is always curious and updated about the latest tech trends.