

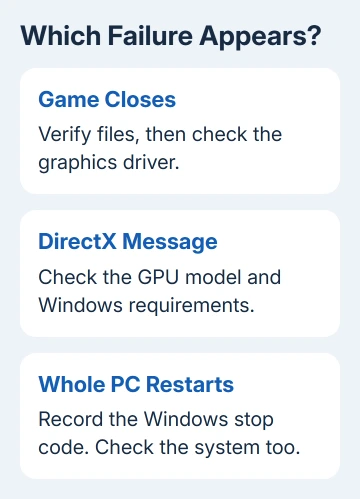
Marvel Rivals crashes can come from the graphics driver or damaged game files. Check the game files first, then check your graphics driver. DirectX errors, video-memory messages and whole-PC restarts need different follow-up steps.
Keep the exact error message. Note whether the game closes to the desktop or Windows restarts. If you get disconnected from a server but the game stays open, check the connection instead.
1. Repair the installed game before changing Windows
Close Marvel Rivals. In Steam, right-click it in Library, select Properties > Installed Files, then choose Verify integrity of game files. Let the check finish and allow Steam to download anything it needs to replace.
The check repairs missing or damaged files without asking you to guess which file broke. Test the game afterward. If it still closes at the same point, move on to the graphics checks. A second file check adds little to that result.
In the legacy Epic launcher, use the game's three-dot menu in Library, then Manage > Verify. In Launcher Preview, select the game in Library and use the menu beside Play, then Manage > Verify.
If the game remains open but login fails with error code 10, use the launcher and account checks for code 10. That problem doesn't call for the same graphics work as an Unreal crash report.
2. Update the graphics driver and check the GPU
Open Device Manager > Display adapters to identify the graphics hardware. Download its driver from NVIDIA, AMD, Intel or your laptop maker. On a laptop with two adapters, record both names; don't assume the integrated one runs the game.
The game's launch FAQ recommends updated graphics drivers and a clean installation option for relevant driver problems. Follow the current installer's choices for your hardware. Finish any requested restart before testing the game again.
A clean driver installation can change profiles, so record custom settings first. Get the package from the hardware maker and match your GPU. The correct model matters more than the biggest version number.
For DirectX 12 is not supported, check the hardware and Windows version as well as the driver. The official FAQ lists Windows 10 64-bit version 1909 or later and GTX 1060, RX 580 or Arc A380 as minimum examples.
Those were the minimums at launch, so don't take them as a reason to keep an old Windows build. Check the current store requirements too. A software switch can't turn an unsupported graphics chip into one with the required capabilities.
Some integrated GPUs, including Intel Iris Xe and UHD models, may not run the game properly. Confirm compatibility before reinstalling everything. The DirectX version Windows shows doesn't tell you everything your graphics card can do.
3. Use GPU Debug Mode for a repeating graphics crash
In the PC launcher, look for Start With GPU Debug Mode. Enable it and launch the game. This collects extra crash information for the support team; it doesn't just set all graphics options to Low.
The GPU Debug Mode instructions warn that this mode may affect performance. If a match becomes slower, don't treat that alone as a new hardware fault. Collecting that extra information can slow the game down.
Note whether it crashes during shader preparation, loading a match or actual play. Tell support when it happens to show which part fails. Keep the same driver for this check rather than changing several things between attempts.
If your launcher doesn't show the option, note its version and ask support where that mode is available in your current client. Don't substitute a random command copied into Steam's launch options.
4. Clear NVIDIA's shader cache only for that driver route
Shaders are small programs the graphics card uses to draw the game. A saved shader cache helps avoid rebuilding them repeatedly. The official graphics-crash guide includes clearing that cache when a driver update hasn't solved the problem.
Its NVIDIA sequence starts in NVIDIA Control Panel > Manage 3D settings > Shader Cache Size. Record the current choice, set it to Disabled, apply the change and restart the PC.
Open %USERPROFILE%\AppData\LocalLow\NVIDIA\PerDriverVersion\ and remove its DXCache folder if that exact folder exists. Then return to Shader Cache Size, restore the previous enabled choice, apply and restart again before playing.
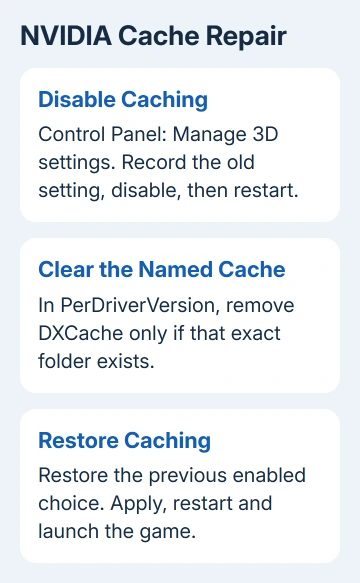
Leave other folders alone. Driver versions can use different locations or menu choices; if the named path isn't present, stop this branch and give support that detail. The NVIDIA procedure doesn't apply to AMD or Intel folders.
The first launch after clearing cached shaders may involve rebuilding them. Let that preparation finish before checking whether the original crash returns. The extra work on the first launch doesn't mean the repair failed.
5. Treat memory errors and whole-PC crashes separately
For a video-memory message, close other GPU-heavy programs, such as another game or a video editor. The launch FAQ calls for sufficient video memory, with 6 GB stated in that guidance. Compare your actual card with the current requirements.
An out-of-video-memory message can also appear on an unstable system. For unlocked 13th- or 14th-generation Intel processors, the FAQ points to BIOS instructions from your computer or motherboard maker, plus Intel's processor support.
Use only the BIOS for your exact computer or board, and follow its maker's update procedure. Don't use that Intel-specific branch as a reason to flash an unrelated AMD system or change processor voltages.
If Windows itself crashes or restarts, record its stop code and check whether other demanding games do the same. The Windows crash-message checks help you check a Windows failure separately from a game that closes on its own.
Send a useful crash package when the game still fails
Close the game. Open its installation through the launcher; the game-directory steps cover that route. The official diagnostic guide says to run client_diagnose.exe there and select Analyze.
When analysis finishes, it opens the output folder containing a diagnose_yyyy_mm_dd_xx_xx_xx.zip file. Send it to Marvel Rivals Support through the official Discord support route, along with the error, GPU, CPU and driver version.
The Short Version
Repair the game files, update the matching driver and match the error to its branch. Use GPU Debug Mode to collect details of repeated crashes. NVIDIA cache trouble, Intel processor instability and whole-PC restarts need separate checks.
Checked November 10, 2026.

Isaac Smith is the founder and editor of PC Glance, a website that covers computers, laptops, and technology. He is a tech enthusiast and a computer geek who loves to share his insights and help his readers make smart choices when buying tech gadgets or laptops. He is always curious and updated about the latest tech trends.