
Flickering, blurred text and odd colored marks on an ASUS laptop need different checks from a machine that never starts. First reset the graphics driver with Windows + Ctrl + Shift + B, then check whether the fault appears outside Windows.
If the picture looks wrong in BIOS, the setup screen that opens before Windows, arrange a hardware check. If it's clear there, work through Windows settings, graphics drivers and the affected app first.
1. Check when the picture goes wrong
Save your work, press Windows + Ctrl + Shift + B, and watch for a brief flicker or beep. This asks Windows to reset its graphics driver without making you reinstall software.
Open another app afterward. If the picture stays clear, keep working and watch for it to happen again. If it breaks up again, note whether the whole desktop changes or only one window does.
ASUS says its internal-display guide covers flicker, blur and odd marks. If your laptop never shows a usable picture, follow the ASUS startup black-screen checks instead.
A brief flash when the lock screen appears or the laptop wakes can differ from ongoing flicker. Describe what happens once the desktop settles; a momentary change doesn't always mean the panel is broken.
If only an attached monitor has the problem, check its input and cable first. It uses a different connection from the laptop's built-in screen, even when both show your Windows desktop.
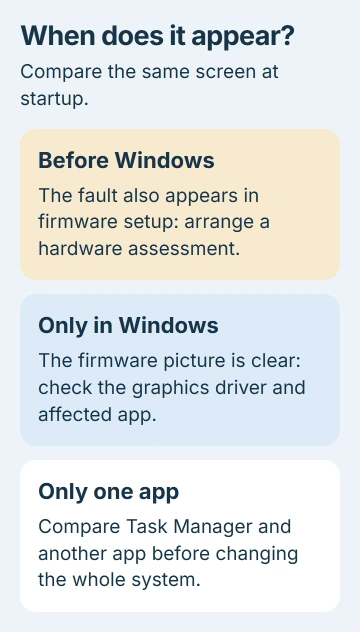
2. Look at the screen before Windows loads
Shut the laptop down normally. Hold F2, press the power button, and keep holding F2 until the BIOS setup screen appears. The ASUS BIOS-entry instructions describe this method.
Look for the same flickering, lines or broken colors you saw in Windows. Leave the settings unchanged; you're using this screen to compare the picture before Windows and its graphics driver take over.
If you see the fault there too, arrange an ASUS hardware check. I'd stop installing drivers at that point. Changing a Windows driver can't repair a panel fault you can already see before Windows runs.
If the setup screen looks normal, exit without saving changes and let Windows start. Try the software checks next. A display fault that comes and goes may still need a longer check by a technician.
If you recently upgraded the memory, tell support when and which memory you installed. Don't open a sealed laptop or one you're unfamiliar with just to troubleshoot a screen setting.
3. Use Task Manager to choose the flicker fix
Press Ctrl + Shift + Esc while the screen is flickering. Watch Task Manager itself as well as the desktop behind it. The important comparison is whether both areas flicker together.
Microsoft's flickering-screen instructions use this check to tell a driver problem from an app that isn't working properly with Windows.
If Task Manager flickers with everything else, try the driver steps in the next section. If it stays steady while other windows flicker, start with an app installed or updated shortly before the flicker began.
Update that app, restart it and check again. On Windows 11, uninstalling an app uses Settings > Apps > Installed apps. On Windows 10, the list is under Apps > Apps & features.
Check the screen after each app change to see whether it helped. The Windows screen-flicker guide covers the broader driver-versus-app problem if it affects more than this laptop's built-in screen.
4. Reverse a bad driver update or use the model's update
If the fault began just after a graphics update, open Device Manager from Start. Expand Display adapters, open the affected adapter's Properties, then select the Driver tab.
Choose Roll Back Driver if it's available, follow the prompt and restart Windows. If it's grayed out, Windows has no earlier driver available through that button. Repeated clicks won't download one.
You need administrator access for driver rollback. On a work laptop, give IT the adapter name, current driver version and the date the picture changed so they can choose the matching package.
To check for newer updates for your model, open MyASUS > System Update. Select the update you need and choose Update selected items. After it finishes, check Update History to see what was installed.
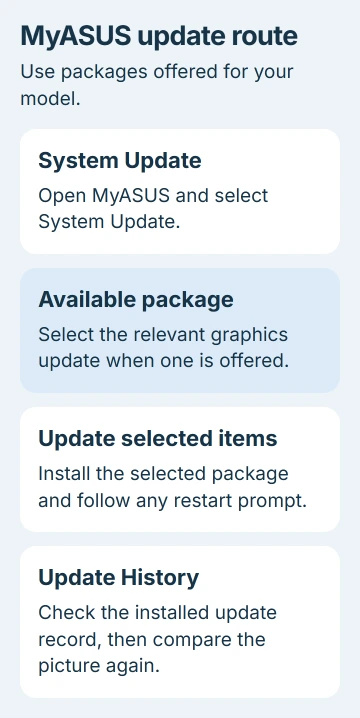
The MyASUS update page lists packages newer than those already installed. An empty list means it has no newer package to offer; it doesn't tell you whether your display hardware is healthy.
Some ASUS laptops list both integrated graphics (built-in graphics) and a separate, dedicated graphics chip under Display adapters. Record both names for support. Matching a driver's brand to just one chip can overlook the other.
5. Correct blur separately from flicker
For steady but fuzzy text, open Settings > System > Display. If several displays are connected, select the laptop display before changing anything. Otherwise you may adjust the external monitor while judging the built-in panel.
Under Display resolution, choose the option marked Recommended. Check Scale separately for a comfortable text size. The resolution and layout controls explain both adjustments.
A lower resolution can make text and edges look less sharp. Use scaling to make text larger; don't lower the resolution just because menus look small at the screen's normal setting.
Reopen the app that looked blurry and compare it with Settings. If only that app stays fuzzy, report its name and version to its developer. When the desktop looks clear, keep troubleshooting the one app that's blurry.
6. Arrange repair when the fault survives these checks
Tell ASUS your model, Windows version, what you saw in BIOS and whether Task Manager flickered too. Say whether a directly connected external screen has the same fault and whether it started after driver or memory changes.
If the laptop screen is too unreliable to finish a backup, use the external-display access method. Back up your files before leaving it for service, especially if a system recovery may be needed.
The Short Version
Reset the graphics driver, then compare the picture in BIOS and Windows. Use Task Manager to choose between driver and app fixes. For blur, check the recommended resolution. Arrange repair if the fault appears in BIOS too.
Checked November 5, 2026.

Isaac Smith is the founder and editor of PC Glance, a website that covers computers, laptops, and technology. He is a tech enthusiast and a computer geek who loves to share his insights and help his readers make smart choices when buying tech gadgets or laptops. He is always curious and updated about the latest tech trends.