
Automatic email forwarding lives in Settings > Mail > Forwarding in the new Windows Outlook app and browser-based Outlook. Turn it on, enter the destination address and save.
Classic Outlook uses a rule, which can forward selected mail or redirect incoming messages.
Choose whether you want every new message or only certain messages sent onward. Work accounts can block external forwarding even when the setting or rule is available.
Forward new mail using the account setting
Open the mailbox that should forward mail. For the new Windows app, or when using your mailbox in a browser, choose Settings, then Mail > Forwarding. For a personal Microsoft mailbox, sign in to Outlook.com and use its Forwarding settings.
A new sign-in prompt may appear before Outlook shows the controls. Sign in to the mailbox you're forwarding from. That sign-in prompt isn't asking for the destination mailbox's password.
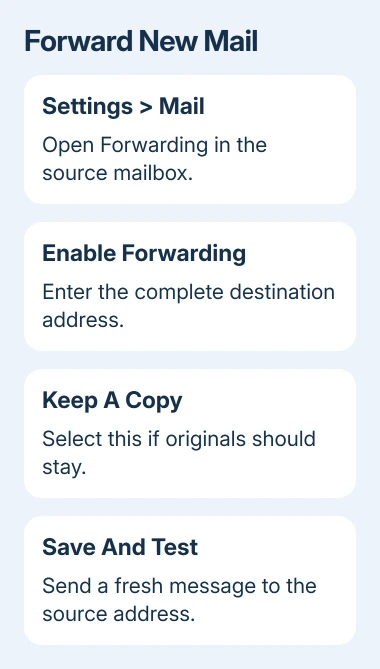
Turn on Enable forwarding, enter the complete forwarding email address, and choose Save. Select Keep a copy of forwarded messages if incoming mail should remain available in the original mailbox too.
I'd keep a copy while setting this up. It gives you the original message to compare with the destination, and a mistyped address is easier to spot before you depend on forwarding.
Microsoft says to choose the matching version tab in its forwarding instructions. Outlook.com, browser-based work mail and the new Windows app have separate tabs.
If the menu doesn't appear in Outlook for Mac, open that Microsoft mailbox in its web version and check there. The iPhone and Android apps aren't the place to follow the desktop rule wizard described later.
Forward only messages that match a rule
To match a particular sender, subject or other condition in the new app or browser, open Settings > Mail > Rules. Choose Add new rule, give it a useful name and add the condition that describes the mail you want sent onward.
Under the action, choose Forward to and enter the destination. Add any exceptions, then save.
Choose a sender condition to forward only one person's messages. A subject condition can also catch unrelated mail that uses the same words.
Read the completed condition and action together before saving. A rule that forwards every message has a much wider effect than a rule limited to one sender.
Don't turn on both whole-mailbox forwarding and a rule for the same messages unless you want them forwarded twice.
The Stop processing more rules choice prevents later rules from acting on matching messages. Use it when that is the behavior you need, rather than checking it automatically and then wondering why another rule stopped moving mail.
The rules instructions also offer Forward as attachment. That sends the original message as an attached item rather than placing its content into an ordinary forwarded message.
Choose forwarding or redirection intentionally
Forwarding and redirection don't present the sender in the same way. A forwarded message appears to come from the forwarding mailbox.
A redirected message appears to come from the original sender, which matters when someone replies from the destination.
Choose Redirect to in a new Outlook or web rule when preserving that original-sender behavior is the goal. Enter the recipient address and save the rule just as carefully as you would a forwarding rule.
If someone is covering your inbox, tell them which method you're using. Have them check the reply destination in the test message. That avoids a reply returning to you when they meant to answer the original sender.
An automatic absence message is a separate feature. Use the Outlook out-of-office settings if senders also need to know when you'll return or whom to contact during your absence.
Set up the rule in classic Outlook for Windows
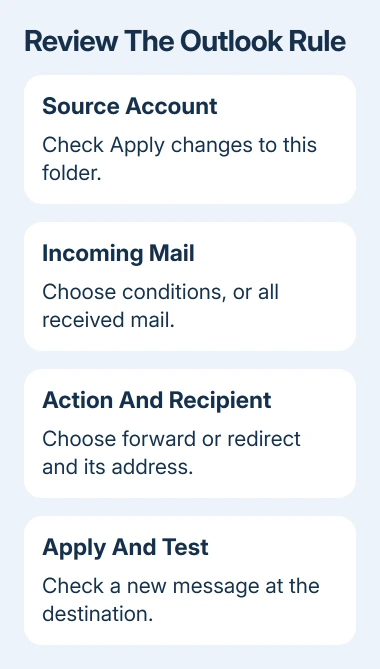
Classic Outlook's rule wizard starts from the ribbon. Open Home > Rules > Manage Rules & Alerts; a simplified ribbon may put Rules under the extra commands. Check Apply changes to this folder if more than one account is configured.
- Choose New Rule.
- Under Start from a blank rule, select Apply rule on messages I receive, then Next.
- For all incoming mail, leave the conditions unselected, select Next and accept the warning that the rule applies to every received message.
- Choose redirect it to people or public group, and stop processing more rules if following the vendor's all-mail redirection procedure.
- In the description, select people or public group, enter the destination in To, and choose OK.
- Finish the wizard, then select Apply > OK.
For selective forwarding, choose the relevant conditions instead of leaving them blank, and use the forwarding action offered in the wizard. Review the final description so it names the right source, action and recipient.
Some classic Outlook rules run only while the desktop app is open. If the finished rule is marked client-only, it can't reliably forward with the computer shut down.
Use your mailbox's forwarding setting if it's available, or ask IT to set up forwarding that runs without your computer.
Test delivery with a fresh message
Send a new test email to the source address from another account, then check the forwarding destination. Use a recognizable subject.
A new incoming message tests the rule you just created; an old message already in the Inbox doesn't do that.
For a selective rule, also send a message that shouldn't match. It should stay out of the forwarding destination. Compare both results before relying on the rule for everyday mail.
Check Junk or Spam at the destination if the forwarded test doesn't appear in its Inbox. If mail isn't reaching the source either, use the Outlook receiving-mail checks before changing a rule that hasn't received anything to process.
Don't forward two mailboxes to each other. That arrangement can create a mail loop and delivery failures. Choose one direction and check the destination's existing rules before testing.
Fix a blocked forwarding request or turn it off
With an organizational mailbox, ask your Microsoft 365 administrator whether external automatic forwarding is allowed for your account and destination. Include the exact delivery-failure message, both addresses and the time of the test.
An organization can restrict forwarding outside its system. Recreating the same rule won't override that policy. Ask for an approved coverage mailbox or another permitted way to share incoming mail if external forwarding isn't allowed.
To stop whole-mailbox forwarding, return to Mail > Forwarding, switch forwarding off and save. To stop a rule, open Mail > Rules or classic Outlook's Manage Rules & Alerts, disable the matching rule and apply the change.
Send another test after disabling it. The source should receive the message without a new forwarded copy. This matters when an absence ends or a colleague no longer needs access to incoming mail.
The Short Version
Use Forwarding for all new mail, or a rule for selected messages. Check the difference between Forward to and Redirect to, keep a copy if needed, and test with new mail.
Ask IT about external-forwarding policy when a work mailbox blocks delivery.
Checked November 10, 2026.

Isaac Smith is the founder and editor of PC Glance, a website that covers computers, laptops, and technology. He is a tech enthusiast and a computer geek who loves to share his insights and help his readers make smart choices when buying tech gadgets or laptops. He is always curious and updated about the latest tech trends.