
A DVD player's picture can appear on your computer through a compatible USB capture device. Connect the player to the card's video input, plug the card into your computer's USB port, then open its capture software.
HDMI copy protection can block a DVD even when every cable is connected correctly. Check what the card accepts before buying it or spending time changing Windows display settings.
1. Check the player output and the capture input
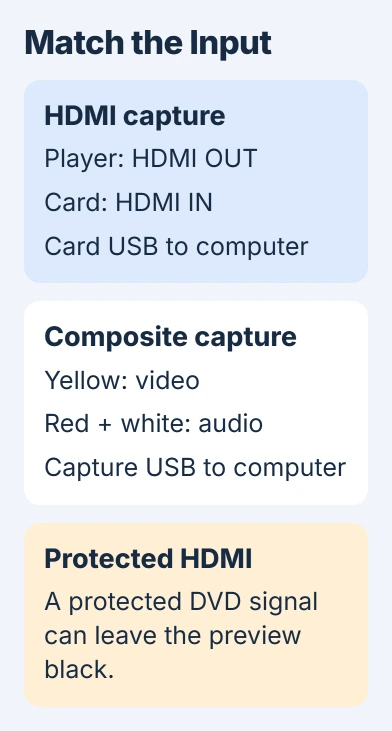
Read the labels on both devices. An HDMI OUT socket on the player needs HDMI IN on the capture card. A computer's HDMI socket usually sends the desktop picture to another screen; check its manual before treating it as an input.
For an older player, a yellow RCA socket carries composite video. Red and white sockets beside it carry right and left audio. Those need a capture device that accepts composite video and stereo audio, rather than an HDMI-only card.
Elgato's Video Capture manual lists composite RCA and S-Video inputs. This model has no HDMI input, so check the connectors even when two products have similar names.
I'd read the input list before shopping. A cable with matching plugs can't add a video input your device doesn't have. Check that the device accepts the player's video signal as well as its plug.
2. Check copy protection before chasing a black picture
HDCP is copy protection used on HDMI video. A protected signal can produce a black preview or an error instead of the movie. Installing another capture application doesn't remove that restriction.
The HDCP compatibility page says these capture devices can't display or record protected HDMI. HDMI disc playback is one of the sources it lists as blocked.
To watch a commercial DVD, connect the player straight to a TV or monitor. To play the disc on your computer, use a compatible computer DVD drive and licensed playback software instead.
Seeing the player's menu doesn't mean the movie will play through the card. Try the disc you want to watch. If copy protection blocks playback, stop there; changing the USB port or Windows driver won't remove that restriction.
3. Connect the hardware in the right direction
If the card supports your HDMI source, connect player HDMI OUT to capture HDMI IN. Connect the card's USB port to your computer with the cable and USB speed its manual requires.
If the card also has HDMI OUT, that usually passes the source to a separate display. It isn't the socket for the DVD player's output. The computer receives captured video through USB.
For composite capture, connect yellow video and red/white audio to their matching inputs. With S-Video, connect audio separately too. An S-Video cable carries the picture, so connecting only that cable leaves the preview silent.
Turn on the player and start a known playable source. Use a direct computer USB connection for the first setup. Add a hub later, once the same source works through the direct connection.
The Windows HDMI settings guide covers sending your desktop to another display. A USB capture preview stays inside its app rather than becoming a second desktop in Display settings.
4. Open the software intended for that capture device
Install the capture maker's software and any driver your operating system needs. For the Video Capture model with analog inputs, the official manual's download section lists Windows software and a separate driver.
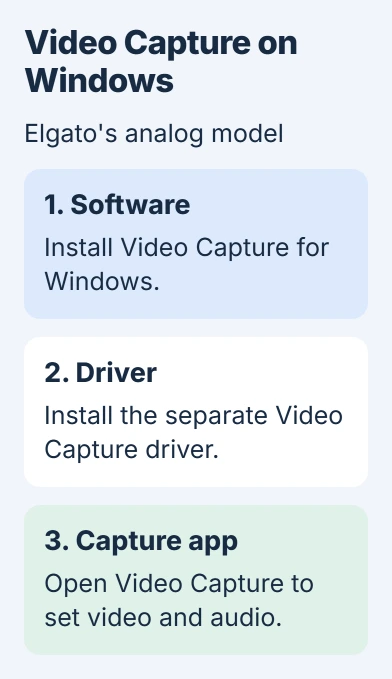
That analog device doesn't work as a standard USB webcam, so use its own app. Other capture cards may work with ordinary camera apps; check your card's manual to see which software it supports.
On Windows, a capture device that uses camera access may need permission through the camera privacy controls. Check those if the app reports that access is blocked.
If your capture app offers a source list, choose your card. Seeing your laptop's webcam means you've selected the wrong source. Close any other app using the card, then select the card again.
5. Match the video input and picture shape
At the Connect Video step in the analog Video Capture app, choose Composite RCA or S-Video to match your cable. Start playback on the player and look for its picture in the preview.
Select 4:3 or 16:9 to match the player's output. If faces look stretched, correct this picture shape before recording. Resizing the preview window won't fix the shape of the video inside it.
If the preview stays black, connect the player directly to a TV. A working TV picture confirms that the player sends video. Next, check the card's selected input, the video signals it accepts and its copy-protection limits.
While trying another capture input, keep the player on the same disc and output mode. If the picture returns, you'll know which change helped.
6. Check audio separately from the picture
Continue to Connect Audio in the analog app and listen through your computer's selected speakers or headphones. If composite or S-Video gives you a picture without sound, recheck the separate red and white audio leads.
Watch the level meter during speech or music. Red means the incoming audio is too loud in this application. Adjust the source level, if available, until the meter stays out of red, then listen again.
For HDMI capture, compare the player's selected audio format with the formats in the card's manual. A card can show a picture without accepting the sound format the player sends.
7. Use the preview, or record supported material
Once picture and sound work, you can watch the supported source in the computer's preview. The device and app can add delay; connect the player directly to a display if that delay makes viewing uncomfortable.
For material your device can record, start recording in the app, play a short sample and stop. Open the saved file and check its sound and picture together before starting a long recording.
Video Capture saves movies in Videos on Windows or Movies on a Mac by default. If the preview works but the saved file stutters, try the video playback checks for that file.
If a supported source still fails, send the capture maker your player model, card model, connection type and software version. Include whether direct TV playback works and whether the failure starts only when the disc begins.
The Short Version
Match the player's output to the card's input, then attach its USB connection and choose the device in the capture app. Check video and audio separately. Protected HDMI DVD playback needs a direct display or another supported viewing route.
Checked November 5, 2026.

Isaac Smith is the founder and editor of PC Glance, a website that covers computers, laptops, and technology. He is a tech enthusiast and a computer geek who loves to share his insights and help his readers make smart choices when buying tech gadgets or laptops. He is always curious and updated about the latest tech trends.