Your external SSD or hard drive used to pop up on the desktop the second you plugged it in. After installing macOS Tahoe, nothing. The drive might be silent, or it might whir to life while Finder pretends it isn't there.
In macOS Tahoe 26.3, the drive can appear in System Information yet be completely missing from Finder, the desktop, and even Disk Utility. People started calling it the "ghost drive."
Most of these cases are fixable, and many have nothing to do with a broken drive. The fixes below run easiest and safest first, then escalate, and the early steps never touch your data.
First, Rule Out the Cable, Port, and Power
This sounds basic, but a shocking number of "dead drive" cases are a dead cable. Plenty of cables that ship with phones and accessories are charge-only and carry no data, which makes a healthy drive look like a corpse.
- Swap to a cable you know carries data, not a charge-only one.
- Plug the drive directly into the Mac, into a different port, with no hub or dock in between.
- If you have a 3.5-inch desktop drive with its own power brick, confirm the brick is plugged in and the drive actually spins up. A dead adapter mimics a dead drive perfectly.
Skip unpowered USB hubs for now. Bus-powered hubs pull their current from the Mac's port, and that is often not enough for a hungry external drive.
Portable bus-powered drives can be flaky even on a powered hub, so connect direct while troubleshooting.
If you can, plug the same drive into a second Mac or a Windows PC. This single test tells you the most: if it fails everywhere, the problem is the drive or its enclosure, not Tahoe.
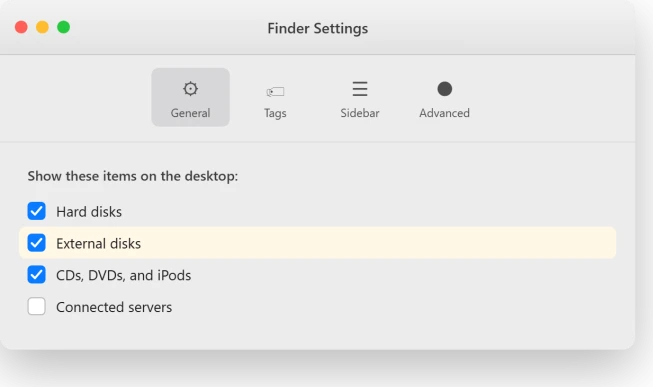
Make Sure It Isn't Just Hidden in Finder
A mounted, working drive can still be invisible if Finder is set not to show it. That is not a mount failure at all, just a visibility switch flipped off.
Open Finder, then from the menu bar choose Finder > Settings (Apple renamed Preferences to Settings a few releases back).
- On the General tab, under "Show these items on the desktop," tick External disks and Hard disks.
- Click the Sidebar tab, scroll to Locations, and tick External disks there too.
These two checkboxes are independent, so set both if you want the drive on the desktop and in the sidebar. Neither touches your files. If the drive reappears here, you were finished before you started.
Check the Accessory Permission on Apple Silicon Laptops
This is the single most-confirmed fix for the Tahoe mounting bug, and it only exists on Apple Silicon MacBook Air and MacBook Pro models.
Desktops like the Mac mini, Mac Studio, and iMac do not have this setting, so its absence there is normal.
Apple Silicon laptops require approval before a new wired accessory can talk to the Mac.
After upgrading, that approval can get stuck and silently block your drive. Toggling it forces a clean reset.
- Go to System Settings > Privacy & Security, scroll to the bottom to Accessories (the control titled "Allow accessories to connect").
- Set it to Ask for new accessories (older builds label this "Always Ask").
- Unplug and replug the drive, then click Allow on the "Allow Accessory" prompt.
- Set it back to your normal choice and restart. Depending on your build, that option reads "Always," "Automatically when unlocked," or "Always Allow."
One affected owner described the same toggle working for them. They flipped Accessories from its allow setting to ask, replugged, approved the prompt, and the drives finally mounted.
If your Mac was locked when you plugged the drive in, unlock it first and replug, since a locked Mac can refuse the accessory outright.
Wake the Drive in Disk Utility
If the drive still isn't in Finder, open Disk Utility from Spotlight or Applications > Utilities. By default it hides physical devices, so first choose View > Show All Devices from the menu bar.
Apple's wording is exact: "The sidebar in Disk Utility should now show each available disk or other storage device, beginning with your startup disk." You will see the physical drive, its model name, with the volumes indented beneath it.
If your drive's volume appears but is greyed out, it is detected but not mounted. Select the indented volume and click Mount in the toolbar.
When it works, the text turns from grey to black and the drive shows in Finder.
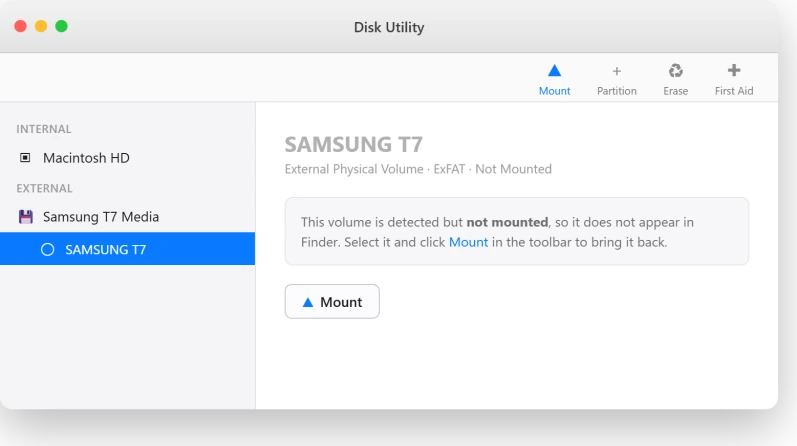
In the Tahoe bug, the volume stays greyed out and clicking Mount does nothing.
A MacRumors poster described their whole set of drives: "all show in Disk Utility as unmounted, if I right click on any and select Mount, nothing happens." If that is you, the Terminal step is next.
Mount It Manually in Terminal
When Disk Utility's Mount button refuses to do anything, the command line usually still works. This is Apple's own recommended workaround for the Tahoe mounting bug, and it does not modify any data on the drive.
Open Terminal from Applications > Utilities, and list every connected disk:
diskutil listFind your drive in the output by matching its size and name. Note its identifier, like `disk4` for the whole drive or `disk4s2` for a single volume, then mount it.
To mount every volume on the drive at once:
diskutil mountDisk /dev/disk4Or to mount one specific volume:
diskutil mount /dev/disk4s2Replace the numbers with what you actually see. If the drive mounts but still doesn't show on the desktop, run `killall Finder`. Finder relaunches in a second or two and re-reads your mounted volumes.
Apple documented the cause in the macOS 26.4 beta release notes as a Known Issue: "HFS external media might fail to mount automatically," with the workaround being exactly this `diskutil mount` command.
Although Apple's note says HFS, owners have reported APFS drives hitting the same wall, so it is worth trying regardless of format.
The auto-mount regression was reportedly fixed in a macOS 26.4 beta, so updating to the latest build may resolve it outright.
If the Tahoe installer stalls or fails, sort that out first. Until then, the manual mount keeps your drive usable.
If an older Mac-formatted (HFS+) drive mounts but is stuck read-only when it used to be writable, you can force read-write on the mounted volume:
sudo mount -u -w /Volumes/YourDriveNameRule Out Security Software Blocking the Drive
This one is sneaky and very real. Third-party security tools with USB "Device Control" can silently block external drives, and the symptoms look identical to the OS bug.
ESET Cyber Security is the repeat offender, with Device Control on by default.
After switching it off, one user reported the drives "all appear instantly, all file formats, even ex-fat." Another traced it straight back: "my security software Eset, blocks access."
In ESET, go to Protections > Device Control and turn the slider off. Other security suites can do the same, so check whatever you have installed.
The cleanest way to test for any software interference is Safe Mode, which loads almost nothing extra. One affected user confirmed it: "The drive works in safe mode. It mounts correctly."
To boot into Safe Mode on Apple Silicon, hold the power button at startup until Startup Options appears, then hold Shift and choose Start in Safe Mode. On Intel, hold Shift while booting.
If the drive mounts there, third-party software is your culprit.
Try Shorter, Better Cables and a Direct Connection
Tahoe tightened up USB and Thunderbolt timing, and the side effect is that marginal cables and long daisy chains that used to scrape by now drop the link.
This won't fix the core bug, but it resolves a real subset of cases.
Forum guidance on this is consistent: a number of owners reported drive problems that "disappear once replacing their current cables with higher quality cables." Daisy-chained drives on long cables were especially prone to dropping.
Swap to a shorter, certified USB-C or Thunderbolt cable, and connect the drive straight to the Mac rather than through a long chain or a video hub.
A few people had better luck through a powered hub, but direct and short is the reliable default.
The same flaky docks sit behind plenty of cases of an external monitor not detected after Tahoe.
Repair the File System with First Aid
If the drive mounts but acts strange, or mounts then drops, the file system may be corrupted. Disk Utility's First Aid checks and repairs this.
Apple's repair guide lists "external devices not working properly" among the problems it fixes.
A serious caution first.
If the data on the drive matters and isn't backed up, recover it before running First Aid. Recovery specialists warn that First Aid can cause permanent data loss because it relocates or removes data in damaged sectors.
Get your files off first, then repair.
With View > Show All Devices on, run First Aid in Apple's recommended order, innermost out:
- Select each volume, click First Aid, then Run.
- Then select each container and run First Aid.
- Finally select the physical device and run First Aid.
If First Aid succeeds, the drive should mount normally again.
If it reports it cannot repair the disk, run it once more, since some corruption clears on a second pass.
If it still fails, follow Apple's path: back up as much data as you can, then reformat the drive in the destructive step below.
If First Aid says the disk is about to fail, stop. Apple is clear that you cannot repair it. Back up whatever you can reach and replace the drive.
When It's the Drive or Enclosure, Not macOS
Some signs point squarely at hardware, and chasing those with software only wastes time or makes things worse.
Stop immediately if the drive clicks, beeps, or grinds. Those are mechanical failure sounds. Do not run First Aid or erase it.
Power it down and, if the data matters, take it to a professional recovery service. Repeated power cycles and DIY repairs make the damage worse.
Check SMART status. In Disk Utility, select the physical drive, not the volume, and read the SMART field. Verified is healthy; Failing means it is dying.
If SMART reads Failing, back up now and replace the drive, because no software repairs a SMART failure. Many USB enclosures cannot report SMART at all, so a blank status proves nothing either way.
Test the bare drive in another enclosure. The USB-to-SATA bridge chip inside an enclosure often fails while the drive itself is perfectly fine.
Pull the bare drive, put it in a known-good enclosure or dock, and if it mounts, the old enclosure was the problem. This is frequently the cheap fix.
If the drive fails on multiple ports and cables and on a second computer, and never appears in Disk Utility even with Show All Devices, it is the drive or enclosure.
Apple's line is blunt: "If your disk still does not appear in Disk Utility, your Mac might need service."
A few format situations look like failure but aren't:
- NTFS drives are read-only on Macs by design, so a drive you can read but not write to is probably NTFS, not broken. Add a third-party NTFS driver instead of reformatting.
- Linux formats like EXT4 and XFS will not mount on macOS at all.
- FireWire support was dropped in Tahoe, so drives on Thunderbolt-to-FireWire adapters no longer work, with no software fix.
The Last Resort: Erase and Reformat (Destructive)
This permanently deletes everything on the drive. Only do it once your data is safely copied elsewhere, or if the drive is empty or expendable.
If First Aid failed and you still need the files, recover them with data-recovery software first.
In Disk Utility with View > Show All Devices on, select the physical device, the top-level entry rather than a volume, click Erase, then:
- Set Scheme to GUID Partition Map first, which is what makes APFS available.
- Set Format to APFS for a Mac-only drive, or ExFAT to share with Windows.
- Name it, click Erase, then Done.
After a clean reformat the drive should mount normally. If even a freshly erased drive will not mount or throws errors, you are back in hardware territory, and replacement is the answer.
The Short Version
- Cable and port first. Use a known-good data cable, plug direct, skip hubs. Test on a second computer.
- Check Finder visibility. Finder > Settings, General and Sidebar, tick External disks.
- Apple Silicon laptops: toggle System Settings > Privacy & Security > Accessories, replug, allow, set back.
- Disk Utility: View > Show All Devices, then select the greyed-out volume and click Mount.
- If Mount does nothing: Terminal `diskutil list`, then `diskutil mountDisk /dev/diskN`. This is Apple's own workaround for the 26.3 and 26.4 bug.
- Security software: disable ESET Device Control, and test in Safe Mode.
- Drive misbehaving: run First Aid, but back up first if the data matters.
- Clicking, beeping, or SMART Failing: hardware failure. Stop, recover, replace.
- Erase is last and destructive. Back up before reformatting to APFS or ExFAT.
Where to Next
More Apple fixes: This guide is part of pcglance.
See the full macOS Tahoe problems and fixes hub, or head to the pcglance homepage and pick your device.

Isaac Smith is the founder and editor of PC Glance, a website that covers computers, laptops, and technology. He is a tech enthusiast and a computer geek who loves to share his insights and help his readers make smart choices when buying tech gadgets or laptops. He is always curious and updated about the latest tech trends.