
You start the upgrade to Windows 11 24H2 or 25H2. Setup stops with "We couldn't update the system reserved partition". That is all it says. Your files are fine, but the update will not go on until the partition has room.
I would clear space on that partition first. It takes two commands in an elevated window. The partition is small and hidden, and on some PCs it fills up.
On Super User the question has 29,642 views since December 2024, and its asker accepted the fix the same day it was posted. On Microsoft Q&A, owners on HP and Dell laptops confirmed it.
What fills the partition
The partition holds the files your PC needs to start Windows. It is tiny. Setup needs free room on it to finish an upgrade, and it stops with this message when that room is missing.
The accepted answer names the usual culprit: "Some third-party anti-virus and security apps write to the SRP, and can fill it up." PC makers do it too.
One owner wrote: "On my Lenovo laptop it appears that Lenovo is saving some large file in that partition."
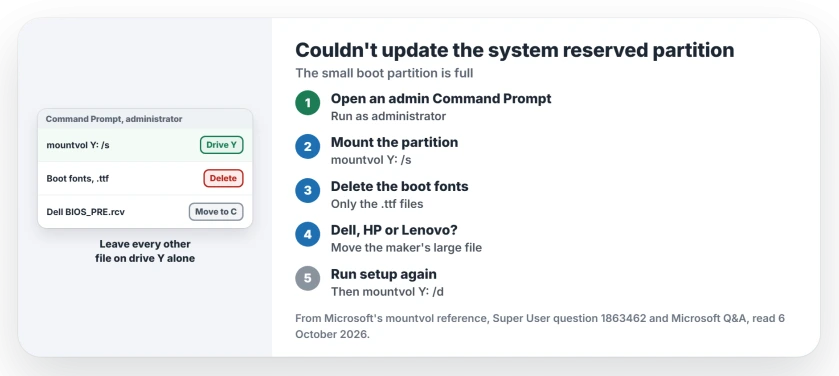
Status: checked 6 October 2026. The error stops a 24H2 or 25H2 upgrade. Deleting the partition's boot font files freed space for owners. A Dell owner also moved a BIOS file off it.
Disk Management, the usual tool for partitions, will not help you here. It shows the partition but cannot look inside it. You need an elevated Command Prompt for every step.
1. Mount the partition
Search for cmd. Then right-click Command Prompt and pick Run as administrator from the menu that opens. Then enter this line:
mountvol Y: /sMicrosoft documents the switch in one line. It "Mounts the EFI system partition on the specified drive." Microsoft's mountvol reference has the rest. Your partition now shows up as drive Y for the next two steps.
2. Delete the boot font files
Owners report this step as the fix, and it removes the font files Windows keeps on that partition for its boot screens. A volunteer moderator gave this one line:
del /q Y:\EFI\Microsoft\Boot\Fonts\*.ttfThen run the upgrade again. An owner on an HP laptop came back with one line: "Thanks, this worked for me on a HP laptop."
Ours: I would delete only the .ttf files in that folder. Leave everything else on drive Y alone. The other folders there are what start your PC each time you turn it on.
3. Dell, HP or Lenovo? Look for the maker's files
On a Dell laptop in November 2025, the fonts alone were not enough to free the space setup wanted. The moderator had the owner move a BIOS recovery file off the partition:
cd /d Y:\EFI\Dell\bios\recovery
move BIOS_PRE.rcv C:\
dir Y:\
The last line shows the free space. The owner's answer: "Yes now exceeds 20mb". Minutes later they added: "Now downloading update. I believe this is fixed."
The file goes to drive C, not the bin. So you still have it. On a Lenovo or HP, look through the folders on drive Y for a large file under your maker's name. I would move it rather than delete it.
4. Expect it back with a later update
The same Dell owner returned in February 2026. The error was back "again when trying to use latest MS update." The same fonts line from the moderator got them through a second time.
Ours: whatever filled your partition before can fill it again. Keep these lines in a note. You may need them for the next update. When you finish, remove the drive letter with mountvol Y: /d.
Still too small?
Some partitions are simply too small. No amount of clearing gives setup the room it needs on them. One volunteer told an owner to grow it with a partitioning tool, which means moving the partitions next to it first. A clean install was the other answer.
Before that, our page on partition errors covers setup failing over extra drives. If your upgrade then fails with a code, our error code page explains what to try.
The Short Version
- The error means the small boot partition is out of space.
- Security apps and PC makers can fill it.
- In an elevated Command Prompt, run mountvol Y: /s.
- Delete the font files: del /q Y:\EFI\Microsoft\Boot\Fonts\*.ttf.
- On a Dell, move BIOS_PRE.rcv to drive C as well.
- Run setup again, and repeat if a later update hits it.
Where to Next
Mount the partition from an elevated Command Prompt, run the fonts line, and start the upgrade again.
Which PC maker and which upgrade gave you the error? Tell me in a comment, and say whether the fonts alone freed enough.

Isaac Smith is the founder and editor of PC Glance, a website that covers computers, laptops, and technology. He is a tech enthusiast and a computer geek who loves to share his insights and help his readers make smart choices when buying tech gadgets or laptops. He is always curious and updated about the latest tech trends.