
An Epson printer that isn't connecting to Wi-Fi can print a network report that tells you which part of the connection failed. Start with that report and the router's network name, especially if you've changed the router or Wi-Fi password.
The report is more useful than repeatedly sending the same print job. A printer that hasn't joined Wi-Fi needs network setup; one already connected but missing from Windows needs a different fix.
1. Print the network connection report
Use the printer's own control panel, so this check doesn't depend on the computer finding it. On the Epson ET-2850, press Home, then select Settings > Network Settings > Connection Check.
After the check finishes, press the Start button to print the connection report. Have plain paper loaded. Read the result and error code, and keep the page beside you while checking the router settings.
Other Epson models have different panels. Look for a network connection check in your model's network settings; don't hold an unmarked combination of Wi-Fi buttons based on instructions for another printer.
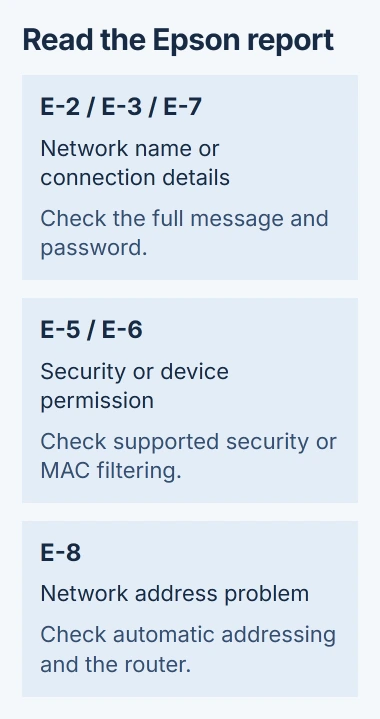
Epson's connection report code guide explains the ET-2850 results. For E-2, E-3 and E-7, check whether the printer can find your network and has the right connection details.
E-5 points to security modes that don't match, E-6 to MAC address filtering, and E-8 to the network address the printer has been given. Read the full message too; it can tell you more than the code alone.
If the report shows a successful connection, skip to the computer checks in section 6. Leave the working Wi-Fi settings alone while you check why the Windows print queue still says Offline.
2. Enter the current network name and password
On the ET-2850, press Home and select Wi-Fi Setup > Wi-Fi (Recommended). Press OK twice, then choose Wi-Fi Setup Wizard. Select your home network from the list.
If the name is hidden, Other SSIDs lets you enter it. SSID is simply the network name. Copy it exactly rather than selecting a similarly named neighbor's network or an old extender you no longer use.
Enter the Wi-Fi password, matching uppercase and lowercase letters. On this printer, the A1# control changes the type of character you enter. Finish the entry and confirm the settings with OK.
This is the password used to join Wi-Fi, not the password for the router's administration page or your Epson account. If your phone already connects automatically, that doesn't confirm you remember the current password correctly.
Wait for the result. A successful connection lets you leave setup; a failure offers the chance to print another report. Compare that result with the first one instead of starting the wizard again without changing anything.
After a router replacement, the printer still needs the new details even if your laptop reconnected by itself. Reusing the old network name only helps when the password and compatible security settings match too.
3. Check the Wi-Fi band your Epson model supports
The ET-2850 supports 2.4 GHz Wi-Fi and can't connect to a 5 GHz-only network. Other Epson models can differ, so check the specifications for your exact printer.
A dual-band router can provide both frequencies. Your computer can stay on 5 GHz while the printer uses 2.4 GHz, as long as your router lets devices on the two bands communicate with each other.
If setup fails while both bands share one name, try the router's separate 2.4 GHz network if it has one. If you manage the router, check its instructions to see whether you can give that band its own name.
Move the printer closer to the router for another setup attempt, away from metal cabinets and strong interference. If it joins there but drops out in its usual position, work on placement or coverage before reinstalling printer software.
I'd make this temporary move before buying a Wi-Fi extender. You can compare the connection reports from both positions to see whether the move helped.
4. Match security and router permissions
For an E-5 result, compare the router's security mode with the printer's supported modes. The ET-2850 specifications include WPA2 with AES and WPA3-SAE, so WPA3 isn't automatically the cause for this particular model.
Older Epson models can have different limits. Use the printer manual and router instructions together; don't switch the whole home network to an open connection just to see whether printing starts.
For E-6, ask whoever manages the router to check MAC address filtering. A MAC address is the ID for the printer's network adapter. If the router only accepts devices on an approved list, your printer may need adding to it.
Guest networks can also keep connected devices apart. If the printer joins but your computer can't find it, check whether both are on the normal home network rather than one being on an isolated guest connection.
On a work or school network, give the report to the network administrator. Knowing the password may not be enough if they control which devices can connect. Changing the printer's settings won't change those permissions.
5. Check a missing network address
E-8 points to a network address problem. If your printer is set to get its address automatically, your router supplies it through DHCP. That's the service that gives each device an address on your network.
Turn the router off, wait at least 10 seconds, then turn it on and let Wi-Fi return. Restart the printer and the computer afterward. This interrupts other devices using that router, so pick a suitable moment.
Run the connection check again. If the printer still has no usable address, check that it's set to get one automatically and that the router accepts new devices. Ask someone who knows the network to help with any manual address settings.
For E-10 through E-13, read the address, gateway (router address) and network messages on the report. Give that page to whoever manages the router so they can use your network's details, rather than an address copied from elsewhere.
6. Add the connected printer on the computer
Once the report shows a working network connection, add the printer from your computer. On Windows 11, open Settings > Bluetooth & devices > Printers & scanners, then choose Add device.
Follow the Windows printer installation steps if the printer needs to be added manually. On Windows 10, the printer list is under Settings > Devices > Printers & scanners.
If it's already listed but won't print, use the Windows printer Offline checks for the queue. Changing Wi-Fi again can add another problem when the connection report already passed.
To print without a router, Wi-Fi Direct setup connects you directly to the printer. Use it when you want that direct connection rather than one through your home Wi-Fi.
If setup still fails, send Epson the printer model, router model and latest report code. Include whether the network appears in the wizard and whether failure happens before or after entering the password.
The Short Version
Print the network report first. Correct the network details, check your model's Wi-Fi band and security support, then handle any address error. Once Wi-Fi passes, troubleshoot the computer's printer entry and queue.
Checked November 4, 2026.

Isaac Smith is the founder and editor of PC Glance, a website that covers computers, laptops, and technology. He is a tech enthusiast and a computer geek who loves to share his insights and help his readers make smart choices when buying tech gadgets or laptops. He is always curious and updated about the latest tech trends.