
To add a new text box in PowerPoint, choose Insert > Text Box, drag across the slide, and type. This gives you a separate caption or label outside the layout's existing text boxes, called placeholders.
For a slide title or main content, use the layout's ready-made boxes when they fit the job. Add a separate text box when you need words somewhere the layout doesn't provide one.
Draw the box on the slide you're editing
Open your presentation in desktop PowerPoint and select the slide's thumbnail. Use Normal view to add the box to that slide. The shared master layout controls elements used across slides.
On Windows, choose Insert > Text Box. In a full ribbon, Text Box sits in the Text group. Click and drag on the slide to give the box a starting width, then enter a short label.
Microsoft says to use this method for text outside slide placeholders. You can move the new box separately from a picture.
On Mac, choose Insert > Text Box too. Some ribbon layouts also offer Text Box in the Home tab's Insert group. Select the tool, click the slide, and type your text.
If the ribbon is narrow, expand its group menus to find Text Box. The button may be tucked into a menu. Check that the file allows editing before changing PowerPoint's settings.
Click inside for words, select the edge for the object
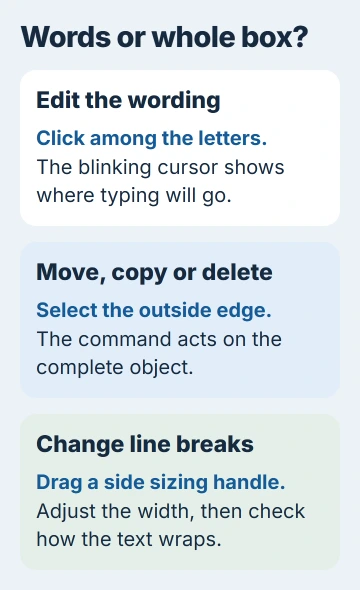
A blinking cursor among the letters means you're editing text. Select a few words to change only those words, or click the position where the next sentence should start.
To move the whole box, grab its outside edge and drag it where you want it. Starting the drag among the letters can select text instead.
To copy the whole box on Windows, select its edge and press Ctrl+C, then Ctrl+V. On Mac, use Command+C and Command+V.
If only the words were copied, you had selected the text instead of the box. Undo that paste, select the box itself, and try again. The copy should keep the original text and formatting.
I'd copy a finished caption when several labels need the same style. That saves choosing the font and size again. Each copy can still have its own words and position.
A comparison of four points needs paired row and column alignment so copied boxes form a readable two-by-two layout.
For help with layouts and placeholders, use the first PowerPoint presentation guide. A separate caption and the layout's main content box do different jobs.
Set readable text and adjust the box width
Select the text and use Home to choose its font, size, color and alignment. Pick a size your audience can read from where they'll sit, then decide how much text will fit.
If a line breaks in the wrong place, select the box and drag a sizing handle on its side to change the width. Check the line breaks again before making the font smaller.
A text box can grow as you type, depending on its fit settings. Watch the bottom of the box when adding a sentence. It can grow into a picture or another label while the first line stays in place.
On Mac, Control-click the box's edge and choose Format Shape. Under Text Options, Resize shape to fit text lets the box grow taller to hold its text.
The same pane has Wrap text in shape. Leave it on for a normal caption with several lines. Turning it off changes how the words flow, so check the slide again if you change it.
If the font you need is missing, install the PowerPoint font before finishing the slide. A replacement font can change the line breaks even when the box stays the same size.
Decide whether the words belong to a shape
An existing rectangle, circle or other suitable shape can hold text. Select it and start typing. The words move with the shape, so this works well for a label inside it.
For a heading that bends around a circular image, apply a WordArt transformation after choosing the wording.
Use a separate text box for a caption beside a picture or words you need to position on their own. Moving the picture won't move that caption with it, so check the spacing after changing either one.
To replace words in an editable placeholder, click inside it instead of adding a second box. Keeping the title in its title placeholder preserves the slide layout's structure.
Before sending the deck, run a slide accessibility review to catch missing titles and descriptions.
Keep repeated labels in the same style and check each slide after pasting. A box that fits a short name may put a longer one on two lines and crowd nearby content.
For words that belong to a table or chart, check whether it already has a suitable label. A separate text box can become misleading if the data or chart layout changes.
For milestone dates and labels that belong together, create a SmartArt timeline before adding any separate explanatory caption.
Remove the box or correct a master-level label
To erase a few words, click inside and edit them. To remove the whole box, select its outside edge and press Delete. Both the box and its words should disappear.
If Delete only removes letters, you're still editing text. Undo that change if needed, select the edge, and delete the box. Check the surrounding content to make sure you removed the right caption.
Text added in Slide Master view can appear on slides that use that master or layout. You can't edit it as an ordinary slide text box in Normal view.
If a label appears on several slides and you can't select it normally, open View > Slide Master. Select the master or layout those slides use and find the box there. Changes to it can affect several slides.
Save the template under another filename before editing the master. For a work presentation managed by your organization, ask the template owner about a fixed label instead of covering it with a new box on each slide.
Review the finished slide at presentation size
Start the slide show and check the caption against its background. Words that look clear while you're zoomed in can be hard to read when projected, especially over a busy photograph.
Leave space between the caption and what it describes. If a long caption needs a tiny font or touches other content, shorten it or give it more room.
If Text Box stays unavailable in a file you can edit, try a new blank presentation. If it works there, the problem points to the original file or template. If it fails in both, give support your PowerPoint version and those results.
The Short Version
Choose Insert > Text Box, draw the area and type. Click among the letters to edit text; select the edge to move, copy or delete the object. Adjust the width and review the caption in Slide Show before sharing.
Checked November 5, 2026.

Isaac Smith is the founder and editor of PC Glance, a website that covers computers, laptops, and technology. He is a tech enthusiast and a computer geek who loves to share his insights and help his readers make smart choices when buying tech gadgets or laptops. He is always curious and updated about the latest tech trends.