
Run Review > Check Accessibility when a PowerPoint file still shows accessibility as not checked. The Accessibility pane shows which parts of your slides need attention and explains how to fix them.
If you can't find the command, check your PowerPoint version and platform first. The checker is available on Windows, Mac and the web, while the iPhone and Android apps don't provide the same built-in checking tool.
1. Open the checker for the presentation you're editing
Open the affected presentation and select Review > Check Accessibility. On desktop, the Accessibility pane opens beside your slides. It lists content that someone using assistive technology may find difficult to use.
Assistive technology includes screen readers, which read a slide's text and descriptions aloud. A tidy slide can still be hard to follow if its text, pictures and other objects are read in the wrong order.
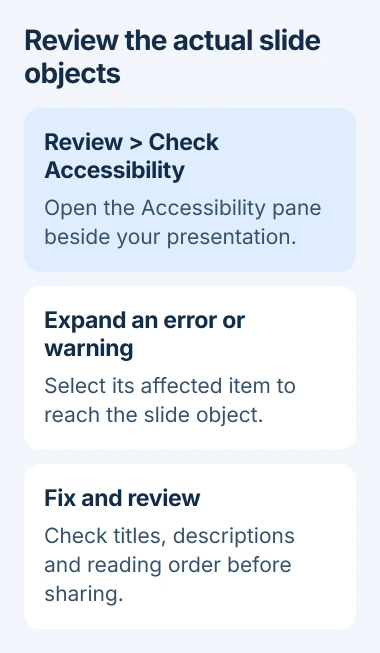
Microsoft says to use this route in its Accessibility Checker instructions. On desktop, the lower part of the Check Accessibility button may open extra options. Choose the check itself to see results.
If you came here because of a status message, open the pane and read its results. A check that hasn't run and a slide issue that hasn't been fixed are different problems; changing the status alone won't tell you what needs work.
If the pane opens, continue with its first reported item. If the command is missing, use the next step before changing your slide content or reinstalling Office.
2. Find the older command or use a supported platform
In an older Windows layout without the Review command, choose File > Info > Check for Issues > Check Accessibility. This opens the checking pane from the file information page.
On a Mac, begin with Review > Check Accessibility. Don't search for the Windows File > Info page in the Mac interface. Its menu layout differs even though it checks the same presentation content.
If you've been editing on your phone, open the presentation in a supported desktop version to check accessibility. PowerPoint for the web has the checker too, if you'd rather review the file in your browser.
Keep working on the same presentation when you switch devices. Fixing a copy with another filename won't change the original attachment you planned to send. Check which copy has your latest work before continuing.
If you still can't use the button in desktop PowerPoint, note your app version and check whether other presentations have the same problem. Try a new blank presentation too, so you can tell support whether the problem follows the file.
3. Select an issue to reach the object that needs work
In the Accessibility pane, expand an Error or Warning, then select an affected item. PowerPoint points you to the slide object and explains why the issue matters and how to fix it.
Errors flag content that's difficult or impossible for some people to use. Warnings point to possible difficulties, while tips suggest improvements. Use those categories to decide what to tackle first.
Start with an issue such as missing alternative text or a slide title. Alternative text is a short description explaining an image's purpose to someone who can't see it. A filename rarely gives that information.
Use the pane's suggested action when it fits the object. After making the change, return to the results and select the next affected item. Fixing one picture doesn't fix the others in your presentation.
I'd work through the pane's object list instead of scanning slide thumbnails for mistakes. A visual scan can miss a picture with no description or a title that looks present but isn't recognized as the slide's title.
4. Check titles, descriptions and reading order
Give slides meaningful titles so people can tell which slide they're on. Use a title placeholder from the slide layout where it fits. That's the box the layout sets aside for the slide's title.
An ordinary text box isn't automatically the same thing. The PowerPoint text box guide explains the difference between separate captions and layout placeholders, which matters when you're fixing a missing-title report.
For images, describe what your audience needs to know. Explain a chart's point rather than listing its colors. Read any automatically generated descriptions and correct anything that gets the slide wrong.
Check that a listener will hear the title, explanation and supporting objects in a sensible order. Their position on screen can differ from the order a screen reader reads them, especially after you've copied several objects onto a slide.
The Reading Order pane instructions show how to review that sequence. Open the affected slide and arrange its items so someone listening can follow the content without seeing the picture.
If the checker flags a video without captions, watch it and consider what your audience needs. It may already have visible captions. Check the content before deciding how to respond to the warning.
5. Review what an automatic check can miss
An empty results list doesn't mean every accessibility need is covered. The checker rules and limits include problems you'll need to check yourself.
If a slide uses color alone to explain something, give readers another way to understand it. Add a useful label or another clear distinction so they don't have to recognize a particular color to understand the result.
Check the smallest text at the size your audience will see. If fonts need changing across the deck, use the presentation font controls, then inspect line wrapping and captions after the change.
Read the image descriptions for accuracy too. Alternative text can pass an automatic check and still be unhelpful. Ask whether the description gives someone the information they'd otherwise get from the picture.
On Windows, press Ctrl+Windows+Enter to start Narrator and hear how a screen reader reads your slides. Press F6 until the blue focus rectangle sits on the slide content.
Press Tab to move through the slide's objects and listen to the order. Press Esc or F6 to move the focus off the slide, and use the same shortcut to turn Narrator off when you've finished checking.
6. Save the reviewed copy and escalate a missing tool
Save the changes to the presentation you intend to share. If you used the web version, its Accessibility pane provides Recheck after you fix the listed items. Review anything that remains.
If the checking pane won't open in a supported desktop app, tell Microsoft Support your version, platform and exactly what happens. Say whether it works in a new file, and keep the affected presentation for a private support request.
For help with accessibility, contact the Disability Answer Desk or your organization's accessibility team. Describe the slide issue or tool failure you still need help with, so they know what the automatic check hasn't resolved.
The Short Version
Run Review > Check Accessibility, use the older File > Info route when needed, and select each reported object to fix it. Review titles, descriptions and reading order yourself, then save the corrected presentation you intend to share.
Checked November 5, 2026.

Isaac Smith is the founder and editor of PC Glance, a website that covers computers, laptops, and technology. He is a tech enthusiast and a computer geek who loves to share his insights and help his readers make smart choices when buying tech gadgets or laptops. He is always curious and updated about the latest tech trends.