An Error configuring network message on a Chromebook can come from saved Wi-Fi details that no longer work. Forget that network and rejoin with its current password. School or office Wi-Fi may need a certificate or an IT setting.
A Chromebook already connected to Wi-Fi but waiting for a hotel's login page has reached a different stage. Check whether the failure happens when joining the network or after the connection shows as active.
In this guide
1. Replace the saved connection with current details
Confirm the exact network name and password with its owner before removing the saved entry. A changed router password can leave your Chromebook trying old details, even when the network name hasn't changed.
After signing into the Chromebook, open Settings > Network > Wi-Fi > Known networks. Beside the affected network, choose More > Forget. Go back to the available networks, choose the correct name and enter its current password.
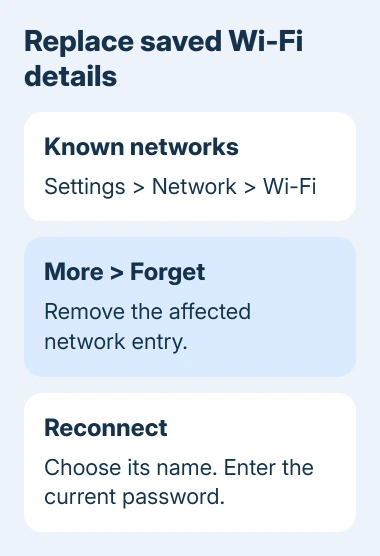
Google says to forget the saved entry through its Wi-Fi connection instructions, then join again. The expected result is a connected network name with signal strength, followed by a working webpage.
Enter the network password here. Your Google login belongs to account setup. For school Wi-Fi requesting an identity, domain or certificate, use IT's enterprise connection instructions instead of guessing.
If the same configuration error returns immediately, note whether it appears before or after entering credentials. Write that down before trying another network. Don't keep removing the connection without changing the rejected information.
2. Restart and compare a second usable network
Save anything unfinished, then use the Chromebook's power controls to restart. Try the affected connection again after startup. A restart is a quick check for a temporary system problem; it doesn't replace correcting an incorrect password.
If joining still fails, try your phone's hotspot or another connection you have permission to use. First confirm that this connection gets another device online, so you aren't comparing two networks with no internet service.
When the Chromebook joins the second network, focus on the first network's credentials, security requirements or router. When it fails to join both, check the Chromebook and any settings controlled by its administrator.
Also try joining the original Wi-Fi from a second device. If several devices fail there, involve the network owner. Your phone getting online doesn't rule out the router rejecting this Chromebook's settings.
For your own router, follow its maker's restart instructions and wait until its normal connection lights return before retesting. Restarting preserves settings; factory resetting erases them. Leave its reset button alone during this check.
I'd make this comparison before erasing the Chromebook. It can tell you which side needs attention while leaving your local files and sign-ins in place.
3. Correct hidden-network and enterprise settings
For a hidden network, get the exact network name and security type from its owner. Open Settings > Network > Add connection > Add Wi-Fi and enter those details. A similar visible network name isn't a substitute.
If the network is visible normally, select its listed name rather than adding it manually. Adding a hidden network supplies the details that don't appear in the usual Wi-Fi list.
For work or school Wi-Fi, ask IT for the required identity, authentication method and certificate settings. These networks can use a different sign-in process from a home router's single shared password.
If IT requires a server certificate, check the expected one in Chrome's certificate settings with them. Some EAP-TLS networks need a user certificate too. EAP-TLS signs in using certificates.
Use only the organization's certificate and connection instructions. Choosing a setting that skips certificate checks can remove a protection the network expects, without correcting the reason its configuration failed.
Ask the administrator about a managed-device notice or a network control you can't change. The managed Chromebook Wi-Fi guide covers an explicit policy block, which needs a policy change rather than another password attempt.
4. Complete a public network's access page after joining
For connected Wi-Fi with no browsing, look for a sign-in notification. Hotels and libraries can require an access agreement after joining. Finish that page, then check an ordinary secure website.
When the page doesn't appear, open a simple address beginning with http://, rather than https://. This gives the network a chance to direct the browser to its access page. Use the venue's own sign-in page.
If permitted, try a private window with Ctrl + Shift + N. An extension can also interfere with the access page; temporarily disable the relevant extension through More > Extensions > Manage extensions, then restore it after testing.
If other devices cannot complete that network's access process either, ask its operator whether internet service is working. A venue-wide failure needs the operator's help, rather than a ChromeOS reset.
For initial account setup that fails despite working Guest-mode browsing, use the Network not available setup guide. If Guest mode can browse, the Chromebook has already joined Wi-Fi; the failure is happening during account setup.
5. Save Diagnostics results before asking for help
On ChromeOS 90 or later, open Settings > About ChromeOS > Diagnostics. The launcher can also find Diagnostics by name. Open its connectivity information and let it test the current connection.
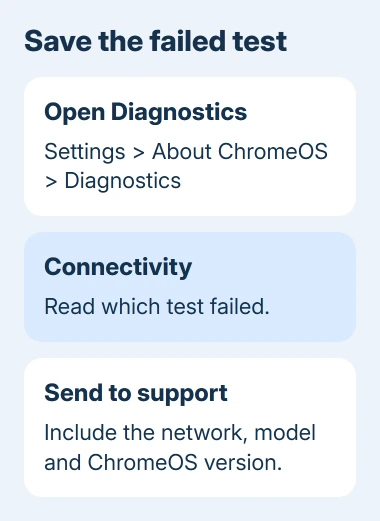
Read which test failed rather than treating every red result as the same network error. The tool checks the connection it can currently use; a successful hotspot test doesn't tell you whether the school network's settings are correct.
On a working connection, open Settings > About ChromeOS > Check for updates and install any available update. Restart when asked, then test the original network once more. Note whether it installed an update or was already current.
When the configuration error survives
Give IT or the network owner the exact error, network name, Chromebook model and second-network result. Include the failed Diagnostics test and whether the network uses a shared password or certificate-based sign-in.
For failure on several working networks, ask the manufacturer for your model's wireless troubleshooting steps. Back up Downloads and other local files before discussing Powerwash or recovery with support, since those erase local data.
The Short Version
Rejoin with verified network details, compare another connection and check enterprise settings with IT. A public login comes after Wi-Fi joins. Save Diagnostics results for support if the configuration error remains.
Checked November 13, 2026.
 If you have any business, I can build it online