
A stuck pixel can leave a fixed bright or colored point on a monitor; a dead pixel can leave a dark one. Start with cleaning, a restart and the monitor's internal display test. A lasting panel defect may need warranty replacement.
Flashing websites and pressure tricks aren't a dependable fix for a defective monitor. The checks that follow help you tell whether the dot comes from the panel or the image sent by the computer.
1. Clean the screen and check the mark at normal distance
Turn the monitor off and inspect the marked area with normal room lighting. Dust on the surface can resemble a pixel while the display is lit. Check whether the mark is still visible on the glass when the picture is gone.
Disconnect power before cleaning. Follow your model's cleaning instructions; for supported Dell LCD displays, a clean microfiber cloth lightly dampened with water is suitable. Keep liquid away from openings.
Turn the monitor on and check the same position again. If the mark vanished with cleaning, the display didn't need a pixel repair. If it remains, compare it across different pictures rather than judging it from one app.
A single pixel is a tiny fixed point. A broad dark patch, a crack, a vertical stripe or several spreading marks needs a different check. Describe the actual shape to support instead of calling every screen mark a dead pixel.
I'd check the retailer's return window now if the monitor is new. A short return period can end while you're trying online remedies that never change the dot.
2. Compare bright and dark backgrounds
Display a plain dark image, then a plain light image, and look at the same screen position. Use an existing full-screen image viewer or the monitor's built-in diagnostic colors if that feature is available.
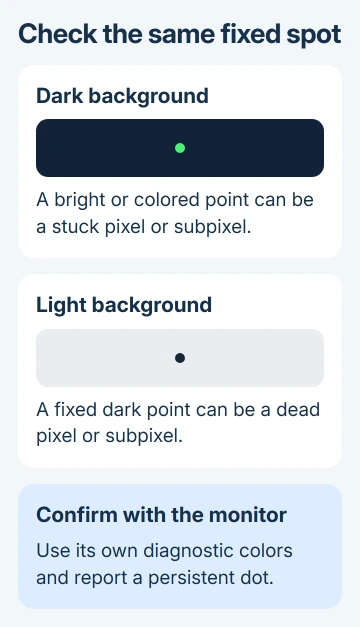
A bright white, red, green or blue point against black suggests a pixel or part of a pixel staying lit. A dark point against white suggests a pixel or part of a pixel that isn't lighting as it should.
Each LCD pixel contains red, green and blue parts called subpixels. A fault in one part can leave a colored point rather than a white or fully black dot. Write down what you see on each background.
Look from your normal sitting distance. You don't need a magnifying glass to count the dots. Warranty rules can treat tiny manufacturing variations differently from a stuck subpixel you can clearly see.
If the dot appears only inside one document, move that window. A dot that moves with the content belongs to the image or app. A panel defect stays at the same physical position on the monitor.
A screenshot is another useful comparison: view it on a different working display. If the mark appears in that file on the other screen, it was captured in the computer's image rather than created only by the original panel.
If the screenshot looks clean elsewhere, continue with the monitor's own diagnostic test. A clean screenshot by itself doesn't tell you which part of the display connection is at fault.
3. Run the monitor's own diagnostic colors
Read the monitor's label to identify the model, then open its user guide. Look for Built-in diagnostics, BIST, BID, Self-diagnostic or the model's equivalent display-test feature.
The buttons you need vary by model. A Dell monitor with a joystick can use a different procedure from a model with separate front buttons. Follow the exact guide instead of holding an arbitrary button combination.
Some tests require the video cable to be disconnected or the monitor to be in a particular state first. Follow those preparations, keep the monitor powered, and inspect each solid-color screen the test displays.
Note whether the same dot appears in the same position during the monitor's internally generated picture. The monitor makes that picture itself, so you're checking it without the Windows app or desktop.
The Dell monitor diagnostic instructions distinguish a standalone self-test from more thorough built-in diagnostics. A floating no-cable message isn't the same as examining a full set of solid colors.
If the dot remains on the monitor's internal colors, report it as a panel issue. If the internal test looks normal, compare another video cable or source before asking for a panel replacement.
4. Restart once, then stop if the defect persists
Turn the monitor off, then on again and repeat the relevant comparison. A restart is a reasonable first action, but a dot that remains fixed through the monitor's own test needs a warranty decision rather than endless power cycles.
Don't press, rub or tap the panel, and don't apply heat. Pressure can damage a display that otherwise has only one small defect. A repair attempt can also complicate a warranty claim.
Dell explains which defects qualify for replacement in its pixel policy. It doesn't offer an app or pressure treatment as a stuck-pixel repair.
Online flashing tools can make a page look active without changing defective hardware. That procedure has no confirmed software cure, so I wouldn't spend your return period running a flashing page overnight.
For a dot that appears only with the computer connected, check the Windows external-display troubleshooting and compare a known-working source. In that case, check the connection or graphics output before making a pixel warranty claim.
If the fault is a changing image trail rather than one fixed point, the monitor ghosting guide addresses a different problem. A trail behind motion doesn't count as a stuck pixel.
5. Check the exact model's replacement policy
Warranty coverage depends on the monitor model, warranty status and type of defect. The number of bright pixels allowed can differ from the number of dark pixels, even on the same display. Count them separately.
Eligible Dell displays with Premium Panel Exchange have coverage for even one qualifying bright pixel or bright subpixel during their warranty period. That benefit isn't a promise of zero dark pixels on every monitor.
Other Dell models use different limits, and another manufacturer's policy can be different again. Give support your full model and ask which current bright-pixel and dark-pixel rules apply to that display.
If the retailer still accepts returns, compare that option with the manufacturer's warranty service. A retailer's return conditions and the manufacturer's pixel policy are separate ways to address a newly purchased monitor.
Keep the receipt and serial number available. Take a photo of the dot against the test color that makes it visible, plus a wider photo showing its position. Report how many dots you can see without magnification.
6. Arrange assessment when the panel test confirms it
Tell the monitor maker that the mark remains during its built-in diagnostics, which colors reveal it and whether cleaning and a restart changed it. Ask for a pixel-policy assessment and replacement options for the serial number.
If the warranty doesn't cover the defect, ask about paid replacement and compare that cost with a new monitor. A small stable defect may be something you choose to live with; pressing on it can cause more damage.
For a fixed mark on an iPad rather than a separate monitor, use the iPad stuck-pixel checks. Its diagnostic and service route differs from a desktop monitor's buttons and warranty.
The Short Version
Clean the screen and compare light and dark backgrounds, then run its diagnostic colors. Ask for a pixel-policy assessment if a dot stays fixed in that test. Avoid pressure tricks and check return options promptly.
Checked November 8, 2026.

Isaac Smith is the founder and editor of PC Glance, a website that covers computers, laptops, and technology. He is a tech enthusiast and a computer geek who loves to share his insights and help his readers make smart choices when buying tech gadgets or laptops. He is always curious and updated about the latest tech trends.