
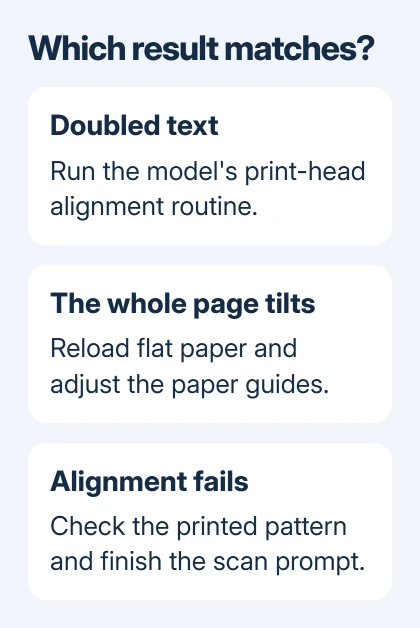
Doubled letters or uneven vertical lines usually need print-head alignment. A whole page printed at a tilt needs its paper feed checked first; Alignment failed means the printer couldn't finish calibrating.
Start by loading fresh plain paper squarely in the tray. If text is sharp but positioned wrongly, check the document's margins and paper size instead. For doubled text, run the model's alignment routine and finish any scan prompt.
1. Match the problem to the printed page
Look at a page with both text and straight lines. Doubled edges or lines that don't join cleanly point toward head alignment. If all the printing leans in the same direction relative to the paper, check loading and paper guides.
For sharp printing shifted to one side, compare the print preview. Match the paper size in both the app and printer software, then check the document's margins. A layout that's already wrong in preview needs correcting before printing.
White gaps, missing colors and streaks need a different check. Print a nozzle-check or print-quality report from the printer's Maintenance menu. Missing parts of that pattern call for print-head cleaning before alignment.
I'd check ink delivery before another alignment run. The printer needs a complete pattern to line up the print head.
For a laser printer, follow the model manual's registration or calibration procedure. An inkjet cartridge-alignment routine doesn't apply.
2. Reload paper when the entire page is crooked
Remove the paper stack and reload flat sheets of the size and type your printer supports. Set the paper guides against the edges without bending the stack. Match the paper-type setting to the paper you've loaded.
Make sure the printer sits level. A tilted shelf or loose paper guides can make the page crooked even when the print head is aligned.
Print another page. If the tilt is gone, the paper feed was the part that needed attention. If the whole page still feeds crookedly, check for scraps or a paper-feed obstruction using the model's paper-path instructions.
Epson recommends a higher quality setting and turning off high-speed printing for slanted output. On models offering Bidirectional Printing, try disabling it if head alignment hasn't improved the output.
If your software lacks those settings, check the model manual. If correctly loaded paper still feeds crookedly, ask the maker about servicing the feed mechanism or rollers.
3. Run the printer's own alignment utility
Load A4 or Letter plain paper as the model requests, and check that enough ink remains to print a complete pattern. Open the printer's Maintenance, Tools or print-quality menu and choose its alignment option.
For supported Epson EcoTank and Expression models on Windows 11, open Settings > Bluetooth & devices > Printers & scanners, select the printer, then Printing preferences > Maintenance > Print Head Alignment.
On Windows 10, open Control Panel > Hardware and Sound > Devices and Printers. Right-click your Epson printer, choose Printing preferences, and open Maintenance > Print Head Alignment.
On a Mac with the Epson utility available, open System Settings > Printers & Scanners, select the printer, then Options & Supplies > Utility > Open Printer Utility > Print Head Alignment. Older macOS calls the first app System Preferences.
If the utility isn't listed, use the printer's own Maintenance menu or its model manual. A general-purpose print driver may not show the maker's maintenance tools.
The Windows printer support steps cover driver replacement if you need the maker's full software.
Follow the alignment wizard through every pattern. When it asks you to choose a numbered sample, select the one whose lines line up best. Don't leave the default selected without comparing the printed choices.
After completing the routine, print the same document again. Lines that join cleanly and letters without doubled edges show the adjustment helped.
4. Finish the scan when the alignment sheet needs it
Some all-in-one printers print a sheet that must then be scanned. Printing that sheet is only the first half of alignment; follow the prompt to place it on the scanner glass.
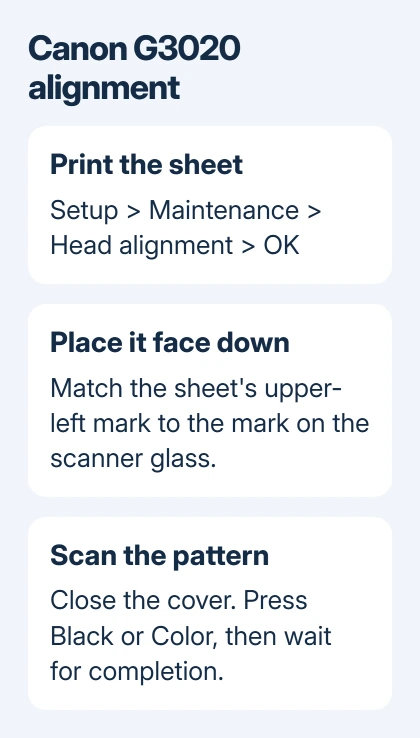
For a Canon G3020 series, press Setup, choose Maintenance, then Head alignment, confirming with OK. The printer produces the alignment sheet.
Place it printed side down on the glass, with the sheet's upper-left mark against the scanner's alignment mark. Close the cover gently, then press Black or Color to start the scan.
Keep the sheet clean, flat and still until adjustment finishes. Stains or wrinkles can stop the printer from reading the pattern.
That button sequence belongs to the G3020 family. Another Canon or HP model may use different controls or a different scanner corner, so follow the on-screen placement picture for yours.
5. Stop repeating a failed calibration
Keep a photo of the latest failed pattern and the exact on-screen error. Support can use those to tell whether the printer failed to read the sheet or printed it badly.
If automatic alignment hasn't helped on a G3020 series printer, try manual alignment from a Windows computer. Use the model's head-alignment instructions for that route.
For a printer that still produces doubled lines or rejects a complete alignment sheet, send the maker its model, error text and a photo of the pattern. Ask whether the print head, scanner reading or paper feed needs service.
The Short Version
Reload paper for a tilted page; check ink delivery for an incomplete pattern. Align doubled text using the model's utility, choose the best printed samples, and finish any scanner step. Persistent failures need service.
Checked November 7, 2026.

Isaac Smith is the founder and editor of PC Glance, a website that covers computers, laptops, and technology. He is a tech enthusiast and a computer geek who loves to share his insights and help his readers make smart choices when buying tech gadgets or laptops. He is always curious and updated about the latest tech trends.