If you have recently updated your Mac to macOS Sonoma, you may have noticed that your device is running slower than usual. This can be frustrating and impact productivity, especially if you use your Mac for work or education purposes.
Well, you are not the only one facing this issue, many Mac users have experience a significant decrease in system performance after upgrading to MacOS Sonoma 14.0 and they have reported this issue on various online forums.
So in this article, I will explore the reasons why a Mac may be running slow after a macOS Sonoma update and provide some solutions to address the issue.
Why does macOS Sonoma run slow after update: Reasons
Before, I can show you the solutions, it will be good if you first understand the reasons too:
New features and functionalities require more system resources:
One of the possible reasons why your Mac is slow is that the new update has added some new features and functionalities that require more system resources than the previous version of macOS.
This means that your Mac might need more memory, CPU, and disk space to run the new OS smoothly. If your Mac does not have enough of these resources, it might lag or freeze.
High usage of system resources:
Another main reason why your Mac might be slow is that there are some apps or processes that are using too much of your system resources. These can be background apps that you don’t need, or apps that have bugs or compatibility issues with macOS Sonoma.
Limited disk space:
Your Mac might be slow because of the limited disk space it has. macOS Sonoma requires at least 20 GB of free space to install, and more to run smoothly. If you have less than that, your Mac might struggle to perform well.
Too many startup items:
A fourth reason why your Mac might be slow is that you have too many startup items. These are the apps that automatically launch when you start your Mac.
Some of them might be useful, such as antivirus, cloud sync, etc. But some of them might be unnecessary, such as games, media players, etc. These apps can use up your Mac’s resources and slow down your startup time.
Other reasons include:
- You have too many browser tabs and extensions open.
- You have unnecessary apps installed on your Mac.
- Your Mac has a Hard Disk Drive (HDD) or Hybrid Hard Drive (HHD). These types of drives may not perform well with macOS Sonoma, which is optimized for Solid State Drives (SSD)
Well, these could be the reasons why your MacBook became slow, but now you might wonder what to do next. Will your MacBook be slow forever or are there some workarounds to make your MacBook faster again?
All I have to say is don’t worry, I am here to help you. I have found 6 solutions that can speed up your MacBook on the latest Sonoma MacOS and make your work easier as before updating to MacOS Sonoma 14.0. Let me show you how to apply these fixes.
You May Like to Read:
Updating to MacOS Sonoma Stuck at 5 minutes: How to Fix It
How to Remove Ask You Notification on Mac
M2 Max Mac Studio Vs 16 inch MacBook Pro ( Which is Best )
Is 8gb Ram Enough for MacBook Pro
1) Initial Troubleshooting Steps
Before going into detailed solution steps, I hope that you might have applied the initial troubleshooting steps mentioned below, if not please apply them before we can proceed with solutions:
Restart Your Mac:
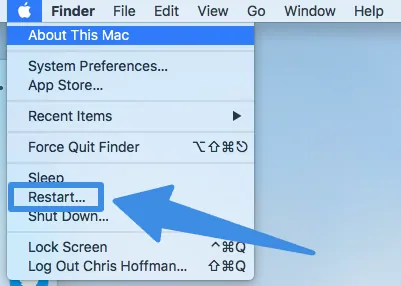
The first step you should take when experiencing performance issues after updating to macOS Sonoma is to restart your Mac.
This can help to clear out any temporary files or processes that may be causing issues. To restart your Mac, simply click on the Apple menu in the top left corner of your screen and select Restart.
Check Resource Usage and quit Resource hungry Applications:
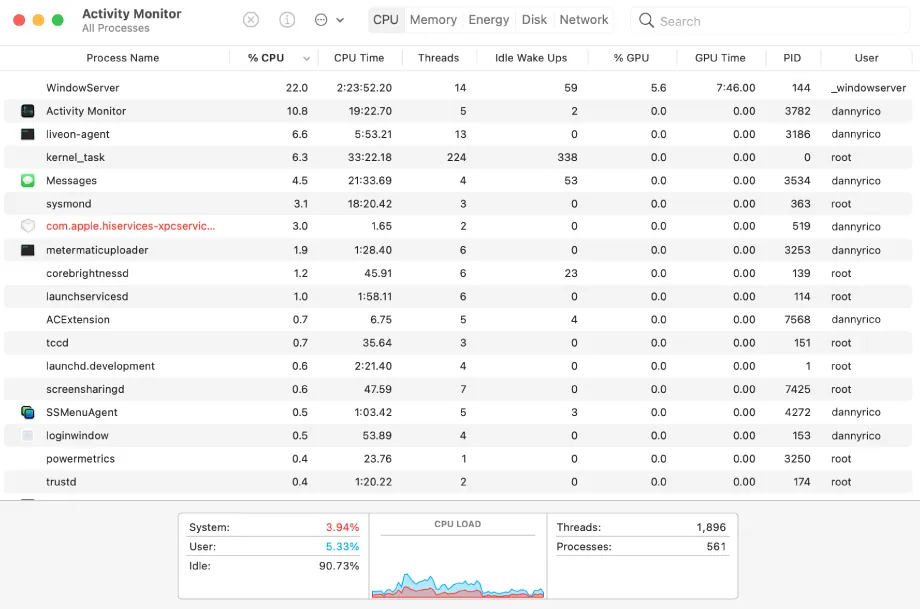
Another potential cause of slow performance after updating to macOS Sonoma is high resource usage. To check for high resource usage, you can use the built-in Activity Monitor app.
To open Activity Monitor, go to your Applications folder, then to the Utilities folder, and click on Activity Monitor. From there, you can see which processes are using the most CPU, memory, energy, disk, and network resources.
If you notice any processes using an unusually high amount of resources, you can try quitting them to see if it improves performance.
Update Your Apps:
If you’re still experiencing slow performance after restarting your Mac and checking for high resource usage, it’s possible that some of your apps may not be optimized for macOS Sonoma.
To check for app updates, click on the Apple menu in the top left corner of your screen and select App Store. From there, click on the Updates tab to see if there are any available updates for your installed apps.
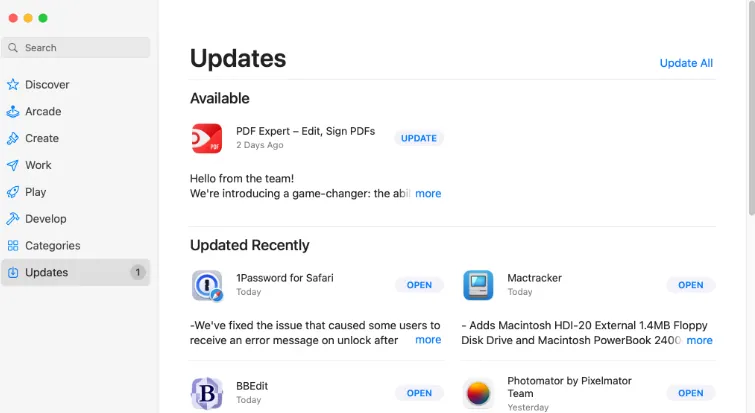
Installing updates can help ensure that your apps are optimized for the latest version of macOS and may improve performance.
2) Empty Trash Bin
Another possible solution to improve performance after updating to macOS Sonoma is to empty your trash bin. The trash bin is where your Mac stores files that you have deleted, but not permanently erased.
These files can take up valuable disk space and can be the culprit of slowing down your Mac after the update.
So to empty your trash bin, simply right-click on the trash icon in your dock and select Empty Trash. Alternatively, you can open the trash bin and click on the Empty button in the top right corner of the window.
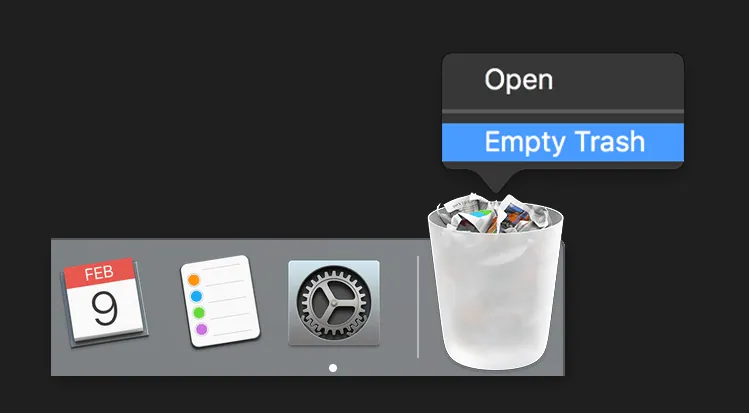
This will permanently delete all the files in your trash bin and free up some disk space. Emptying your trash bin can help your Mac run faster and smoother. However, be careful not to delete any files that you may need later, as they cannot be recovered once they are erased.
3) Adjust Startup Programs:
Some applications that you have installed on your Mac may launch automatically when you start up your Mac. This can affect your Mac’s performance and make it slower. I know this because I have experienced this issue myself.
For example, some apps like Slack, Antivirus Softwares, or Adobe Creative Apps( that I have installed ) may launch at startup and use up your Mac’s resources. You may not need these apps to run every time you start your Mac.
To improve your Mac’s performance, you can disable the automatic launch of these apps. This will make your Mac run faster and smoother. I have done this and I have seen a relief in my Mac’s performance.
To disable the automatic launch of these apps, you need to change your login items settings. Here are the steps to do that:
- Go to the Apple menu and select System Preferences.
- Then, go to Users & Groups and select your username.
- Next, go to the Login Items tab and uncheck the box next to any applications that you don’t want to launch at startup.
I hope, this fix will greatly increase you mac performance and you won’t notice any lag after this major fix.
4) Close Browser Tabs and Extensions:
Even if you have a high resource system, it does not mean you can have too many tabs open. This can make your Mac run slow and consume a lot of memory and CPU. To improve your Mac’s performance, you should close any browser tabs that you are not using.
Another thing you can do is to disable or remove any browser extensions that you don’t need. Browser extensions are small programs that add extra features to your browser, such as ad blockers, password managers, themes or many more other extra features.
However, some extensions may also slow down your browser or cause conflicts with other extensions. So to disable or remove browser extensions, you can go to your browser’s settings and look for the extensions or add-ons section.
From there, you can see which extensions are installed and enabled, and you can turn them off or delete them as you wish.
5) Clean Up Your Mac
Another way to improve your Mac’s performance after updating to macOS Sonoma is to clean up your system. This can help you free up some disk space and remove any unnecessary files or apps that may slow down your Mac.
As I mentioned earlier, macOS Sonoma can take up some space on your Mac, so cleaning up your system can make a difference in your Mac’s speed and efficiency. Here are some things you can do to clean up your Mac:
Clear Cache and Temporary Files:
Over time, your Mac accumulates cache and temporary files that can take up valuable space and slow down your system. To clear these files, follow these steps:
- Open Finder and click on the Go menu.
- Select Go to Folder and type in ~/Library/Caches.
- Delete the contents of the folder.
- Go back to the Go menu and select Go to Folder again.
- This time, type in /Library/Caches and delete the contents of the folder.
By clearing your cache and temporary files, you can free up space on your hard drive and improve your Mac’s performance.
Uninstall Unused Applications:
Sometimes, we download apps on our Mac that we don’t really need or use. These apps can take up a lot of space and make our Mac run slower. I know how it feels because I used to have the same problem.
I had so many apps that I didn’t bother to delete them. But then my Mac became so slow that I had to spend a lot of time uninstalling them, but this: I guarantee will work.
You might already know how to uninstall apps, but just in case you forgot, here are the steps:
If you got the app from the App Store, you can delete it from Launchpad or Finder. Just find the app icon and click the X button next to it. Then confirm that you want to delete it. You might need to type in your Mac password or cancel any subscription that comes with the app.
If you got the app from the internet or a disc, you can move it to the Trash. Just select the app and drag it to the Trash icon on the Dock. Or you can right-click the app and choose Move to Trash.
Then empty the Trash to get rid of the app for good. You might also need to delete some extra files or folders that the app left behind in your Library folder.
If the app has its own uninstaller, you can use it to remove the app and everything that goes with it. Just look for the app’s uninstaller in the same folder as the app, or in the Applications folder, or in the Utilities folder. Then follow the instructions on the screen to uninstall the app.
If the app is hard to uninstall or has a lot of components, you can use a third-party uninstaller app to help you. There are many uninstaller apps that you can download and install on your Mac, such as AppCleaner, AppZapper, CleanMyMac, and so on.
Just open one of them and select the app that you want to uninstall. The uninstaller app will find and delete all the files and settings that the app created on your Mac.
6) Reset SMC/PRAM/NVRAM on macOS Sonoma:
One of the possible causes of your Mac running slow after the macOS 14.0 Sonoma update is that some of the hardware functions or system settings are not working properly ( Since you just moved to Sonoma so its possible…! ).
To fix this, you can try resetting the SMC, PRAM, or NVRAM on your Mac.
SMC stands for System Management Controller, and it controls various hardware functions and power-related settings on your Mac, such as battery management, thermal management, keyboard backlight, and system performance.
PRAM stands for Parameter RAM, and NVRAM stands for Non-Volatile RAM. These are two types of memory that store certain system settings and configuration information, such as display resolution, audio volume, startup disk selection, and time zone settings.
Sometimes, resetting the SMC can fix serious issues and improve the performance of your Mac. It can also help with problems like fast battery consumption, slow operation in macOS Sonoma, and certain hardware malfunctions.
To reset SMC follow these steps:
- Shut down your MacBook.
- Hold down left Control, left Option (Alt), right Shift together.
- Keep holding them for 7 seconds.
- Then, also press and hold the Power button.
- Don’t let go of any of the four keys for another 7 seconds.
- Release the keys, and wait for half a minute, and turn on your MacBook.
This will reset SMC.
Follow this video tutorial to reset PRAM, NVRAM and SMC:
Seeking Professional Support
If you have tried all the troubleshooting steps and your Mac is still running slow after the macOS Sonoma update, it may be time to seek professional support. There are two channels for getting professional support: Apple Support Channels and Authorized Service Providers.
Apple Support Channels:
Apple offers various support channels to help you resolve issues with your Mac. You can contact Apple Support via phone, email, or chat. The support team can help you diagnose the issue and provide solutions to fix it.
Before contacting Apple Support, make sure you have the following information ready:
- Your Mac model and serial number
- The macOS version you are running
- A detailed description of the issue you are experiencing
You can find your Mac model and serial number by clicking on the Apple menu and selecting About This Mac. The macOS version can be found in the same window.
Authorized Service Providers:
If you want to physically visit an authorized service provider, you can do that too. To find an Authorized Service Provider near you, visit the Apple Support website here and enter your location.
You can also make an appointment at an Apple Store Genius Bar, where Apple technicians can diagnose and fix the slowness issues with your Mac.
Frequently Asked Questions
What my Mac become Slow after Sonoma Update?
It’s not that Sonoma macOS is slow, it’s that it needs more from your Mac than usual, which can slow down your Mac.
Are there known compatibility issues with older Mac models and the Sonoma update that could cause slowdowns?
Yes, there are known compatibility issues with older Mac models and the Sonoma update that could cause slowdowns. Apple dropped support for some older Macs with Sonoma, so if you have an older Mac, it may not be able to run the new OS smoothly.
You can check if your Mac is compatible with Sonoma by visiting Apple’s website here and scroll down below to this section where it says: macOS Sonoma is compatible with these devices and reviewing the system requirements.
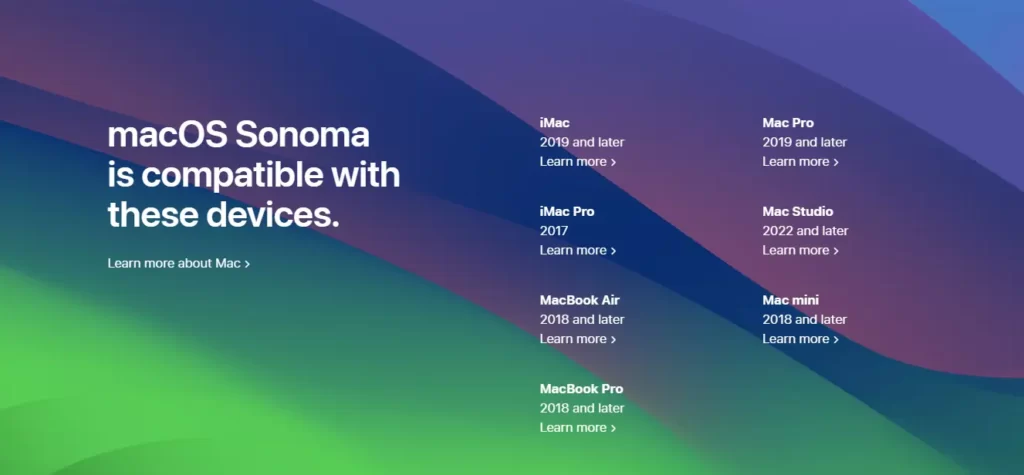
What are the recommended system requirements for macOS Sonoma to run smoothly?
The recommended system requirements for macOS Sonoma are a Mac with an Intel Core i3, i5, i7, i9, or M1 processor, at least 8GB of RAM, and at least 15GB of available disk space. However, keep in mind that these are minimum requirements, and your Mac may perform better with higher specifications.
Can a clean installation of macOS Sonoma improve system responsiveness?
Yes, a clean installation of macOS Sonoma can improve system responsiveness. If you’re experiencing significant slowdowns or other issues after updating to Sonoma, a clean installation can help resolve them.
However, be sure to back up your data before performing a clean installation, as it will erase all data on your Mac.
How does updating to macOS Sonoma impact resource allocation and can it be adjusted?
Updating to macOS Sonoma can impact resource allocation, as the new OS may require more CPU, memory, or disk space than your previous OS.
However, you can adjust resource allocation by optimizing your Mac’s settings and configurations, as well as by using third-party tools to manage system resources.
Additionally, you can adjust resource allocation manually by adjusting the settings of individual applications or processes in the Activity Monitor application.
Final Verdict
As you can see, I have shared with you 6 practical solutions that have worked for me and many other users who faced the same slowness issue.
These solutions are widely discussed( That they have worked for them ) on various platforms such as forums and YouTube videos, and I have explained them to you in detail above.
I hope that after applying them, your problem will be solved. Please let me know how it goes in the comments below.

Isaac Smith is the founder and editor of PC Glance, a website that covers computers, laptops, and technology. He is a tech enthusiast and a computer geek who loves to share his insights and help his readers make smart choices when buying tech gadgets or laptops. He is always curious and updated about the latest tech trends.

