
A Zoom recorder uses one USB mode to copy saved recordings and another to send live microphone audio. To copy a recording from its memory card, choose Card Reader on an H1n or File Transfer on an H1essential.
Choose the audio-interface or USB-mic mode to record directly into a computer app. Seeing the recorder as a microphone doesn't mean its saved files will also appear as a drive.
Choose files or live sound before connecting
Check the model name printed on your recorder. These steps cover the H1n and H1essential, which have different controls. For an H4, H5, H6 or another model, follow its own USB instructions.
For a saved interview, lecture or performance, copy the original recording file. Playing it through the recorder while recording it again on the computer adds an unnecessary second recording and can change its level or quality.
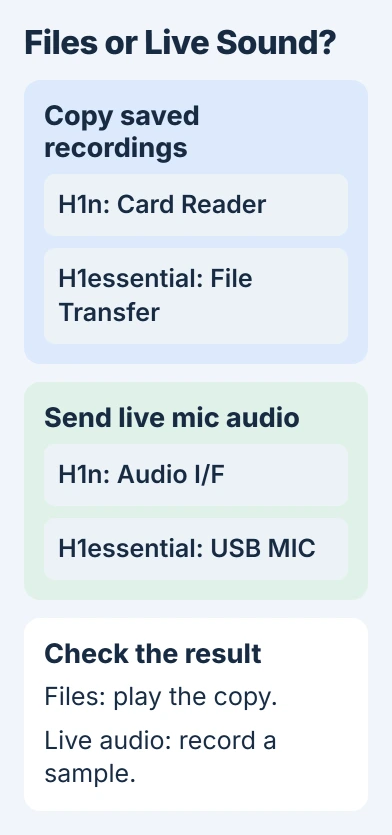
For a new voice recording, your computer needs the live microphone sound instead. An audio interface carries that sound into your recording app. This mode doesn't give you access to files on the recorder's card.
Choose a cable rated for USB data transfer. A cable can power your recorder without carrying files or sound, so seeing it turn on isn't enough. Connect directly to your computer for the first attempt.
Copy existing recordings from an H1n
Use the USB cable to attach the H1n to your computer. At the recorder's USB screen, select Card Reader using LOCUT or LIMITER, then press AUTOLEVEL to confirm.
Zoom describes this card-reader route in its H1n operation manual. Leave the recorder in that mode while working with its memory card on the computer.
Open File Explorer in Windows or Finder on a Mac and find the connected recorder or card. Open its recording folders, select the files you need and copy them into a named folder on your computer.
I'd copy first and keep the card unchanged until the copied audio plays. That leaves the original available if the transfer is interrupted or the wrong file was selected.
Open one recording from the folder you copied it into on your computer. Check the beginning, a later section and the duration. Make sure you're playing the copy rather than the original still on the card.
When you're done, eject H1n through Windows Safely Remove Hardware, or eject the recorder's drive in Finder. Follow the recorder's exit prompts, then unplug once the computer has finished using the card.
Copy existing recordings from an H1essential
On the H1essential Home Screen, press MENU. Select USB, then File Transfer, confirming each choice with ENTER. Choose PC/Mac for a computer connection.
Connect a USB-C data cable between the recorder and computer. The H1essential file-transfer instructions cover this mode separately from USB MIC. Look for the recorder's USB File Transfer screen.
Open the card in File Explorer or Finder. Copy the files you need into your computer folder, then open a copied recording to check it. Keep related recording folders together when moving a whole session.
Eject the H1essential before disconnecting it. If your computer says a file is in use, close the player or editor using it and try ejecting again. Unplug once the computer has finished using the card.
If your computer can't supply enough USB power in PC/Mac mode, use Mobile Device mode to run the recorder on batteries. Fit working batteries and follow the manual's connection steps for that mode.
Send live H1n microphone sound over USB
At the H1n USB screen, choose Audio I/F, then PC/Mac. Select Bus Power to use your computer's power, or Battery to use batteries. These menu names apply to the H1n; the H1essential uses different settings.
Choose H1n as your recording app's input. Record yourself speaking from the distance you'll use, then play the sample back on your computer. Hearing your voice through the recorder's headphones doesn't tell you whether the app recorded it.
For a Windows recording app that requires ASIO, use the model's support download page. Its Software section lists the H/F Series Stereo ASIO Driver for 64-bit Windows 10/11.
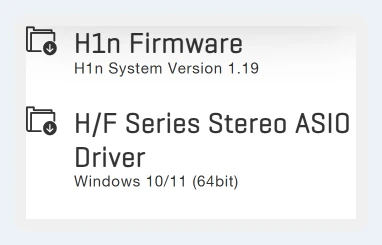
ASIO is a driver system that some recording apps use to receive audio. You don't need it to copy files in Card Reader mode. Check that the driver lists your recorder and operating system, then follow its installation guide.
Use the H1essential as a USB microphone
Open MENU > USB > USB MIC, then choose PC/Mac. Connect the recorder with a data-capable USB-C cable. Select H1essential as the input or audio device in your recording application.
USB-mic mode uses 48 kHz, 16-bit audio on this model. It can make 32-bit float recordings on its card, but that recording format doesn't carry over to the USB microphone connection.
The recorder can also record to its card while working as a USB mic. That card recording and the computer recording are separate files, so check which one you want to keep or edit.
If your voice is quiet in the app, adjust USB MIC Settings > Send Volume and make a short test recording. Receive Volume controls sound coming back from the computer, so it won't turn up your voice in the app.
Check the computer's selected input
On Windows 11, open Settings > System > Sound and find Input. Choose the recorder if it's listed. The Windows microphone setup procedure includes a recorded test in the selected input's properties.
Use the microphone test steps to play that sample, then check your recording app's own input. An app can keep using the laptop mic even after you've changed the Windows selection.
For a separate desktop USB microphone, the original Yeti setup explains input gain and headphone volume. Those controls have similar purposes, but its hardware buttons don't apply to a Zoom recorder.
If neither file transfer nor live audio works after trying a checked data cable and another USB port, contact the recorder maker. Include your model, USB mode, operating system and whether the computer detects a device at all.
The Short Version
Use Card Reader or File Transfer to copy saved recordings. Use Audio I/F or USB MIC for live audio, then select the recorder in your computer app. Play a copied file or a short test recording before starting a longer session.
Checked November 5, 2026.

Isaac Smith is the founder and editor of PC Glance, a website that covers computers, laptops, and technology. He is a tech enthusiast and a computer geek who loves to share his insights and help his readers make smart choices when buying tech gadgets or laptops. He is always curious and updated about the latest tech trends.