An Epson ET-2760 not printing can have a stalled job or poor ink delivery. Clear its screen error first, then run the built-in nozzle check. A silent printer and one feeding blank paper need different repairs.
A complete pattern sends you toward the queue and connection. Gaps or a blank pattern send you toward the print head. That distinction saves ink and avoids cleaning a printer that never received the document.
In this guide
1. Clear the screen and print the ET-2760's own pattern
Turn the printer on and read its LCD. Clear any paper jam, load paper if it's empty, or fix the other error shown before sending another job. Load plain paper into the rear feeder and extend the output tray.
If another Epson specifically names a maintenance box, check its model and access cover before treating it as an ink-pad repair.
For the built-in product check, unplug any attached USB cable. Press Home, select Maintenance, press OK, then choose Nozzle Check and press OK. Press Start to print the pattern.
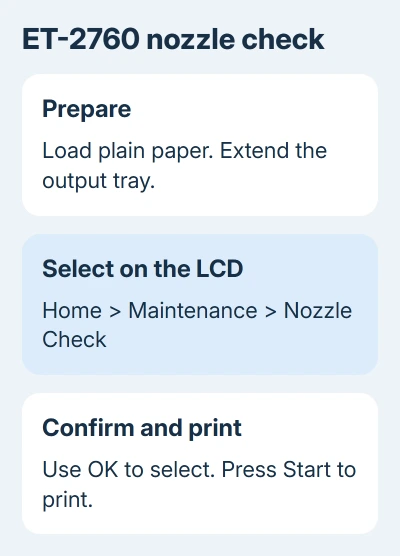
Epson says its ET-2760 product check runs without a computer print job. A complete pattern means the printer can put all its ink colors onto paper.
If that pattern prints normally, continue to the queue and connection checks. If it has gaps or is blank, go to the cleaning section. If it doesn't print at all, recheck the LCD and paper feed before changing computer settings.
Don't assume a tank containing ink means every nozzle is clear. Save the pattern to compare with later results. It shows whether cleaning brought the missing ink back, without relying on a document sent from your computer.
2. Remove stalled jobs and select the right printer
Open the application's print window and check which printer is selected. Choose the ET-2760, rather than a PDF printer, an old Epson entry or another printer on your network. Send one short document while checking the queue.
On Windows 11, open Settings > Bluetooth & devices > Printers & scanners, select your Epson and choose Open print queue. Cancel the failed jobs before trying again so a stalled document doesn't remain ahead of the new one.
On Windows 10, open Settings > Devices > Printers & scanners instead. Select the printer and choose Open queue. The name of the Settings category differs, but you're looking for the documents waiting for this Epson.
If jobs won't leave the queue, follow the Windows print-queue repair steps. Restarting Print Spooler through services.msc is the next step when cancellation alone fails.
On a Mac, open System Settings > Printers & Scanners, select the Epson and open its queue. If the printer is paused, resume it, then remove the failed job. In older macOS releases, find the printer list through System Preferences.
If a new document prints, stop there. If jobs still wait while the internal pattern prints correctly, check the actual connection next. More head cleaning won't move a document stuck on the computer.
3. Check the cable or the printer's Wi-Fi connection
For USB printing, reconnect the cable directly between the printer and computer. Skip the hub or dock for this test. A loose connection or a failing hub can prevent printing even though both devices are powered on.
For wireless printing, check which network your printer and computer are using. Guest Wi-Fi can prevent a computer reaching a printer on your main Wi-Fi, despite both having internet access.
For a connection report, press Home, then select Settings > Network Settings > Connection Check, confirming each menu with OK. Press Start to print the result.
Read the error codes and suggested solutions on that report. If the report says the printer is disconnected, reconnect it before sending another computer job. The printed message gives you more to act on than the Wi-Fi symbol alone.
This model uses 2.4 GHz Wi-Fi. A computer can use the router's 5 GHz band if both bands belong to the same accessible local network. The important check is that devices can reach each other, not just that their bands match.
If the router or network name changed, use the Epson Wi-Fi connection guide to reconnect the printer. Retry one document once its network connection is restored.
4. Clean missing nozzles without running endless cycles
For gaps or a faint nozzle pattern, visually check the ink tanks and refill as needed using the correct ink. Then press Home > Maintenance > Head Cleaning, confirming the menu choices with OK. Press Start to begin.
For the newer ET-2980, follow its Fill Ink refill sequence and reset only the colors actually topped up.
Leave the printer powered on throughout cleaning. When the completion message appears, select Nozzle Check, press OK, then Start. Compare the new pattern with the first one, particularly the color that was missing.
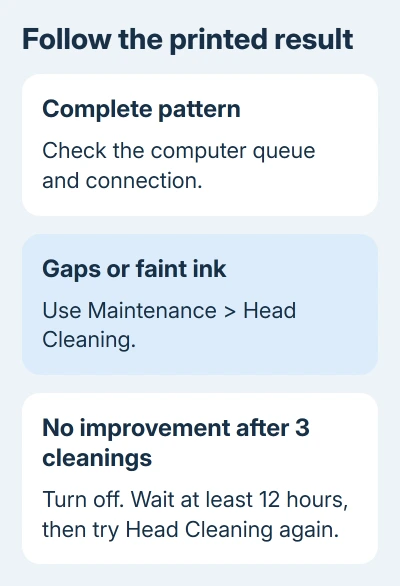
After up to three unsuccessful head cleanings, shut the ET-2760 down for at least 12 hours. Then try head cleaning again. The ET-2760 instructions call for this wait before you move on to Power Cleaning.
With a complete pattern and a blank document, return to the application. Check the visible content, paper size and selected printer. Cleaning won't add text to an empty document.
For a pattern missing only black ink, the Epson black-print troubleshooting helps you compare that result with print settings. I'd keep judging progress by the pattern, rather than repeatedly sending a full photo.
5. Use Power Cleaning only after ordinary cleaning fails
Power Cleaning uses much more ink. Before starting, turn the printer off and check that every tank is at least one-third full. Top up tanks short of that level before proceeding; insufficient ink during Power Cleaning risks printer damage.
On the ET-2760, hold Power and Help together until the Power Cleaning screen appears. Follow the LCD instructions. This model's button sequence matters; a Maintenance menu from another EcoTank model may show different choices.
Run a nozzle check afterward. If quality hasn't improved, leave it powered off for at least 12 hours before another Power Cleaning. Don't keep starting deep cleaning cycles back to back.
Contact Epson's ET-2760 support if its own check won't print or cleaning leaves a poor pattern. Tell them the LCD message, what the printed patterns show and which cleanings you've tried so they can advise on repairs.
The Short Version
Start by printing its internal nozzle pattern. Check the queue and connection when it's complete, or ink delivery when it's broken. Follow the cleaning sequence and 12-hour waits, then seek service if output doesn't improve.
Checked November 15, 2026.