A hidden item on a Windows laptop can be deleted after File Explorer is set to display it. Open the folder, turn on Hidden items, select the exact file, and use Delete. Changing the view doesn't delete anything by itself.
Check whether it's a personal file marked hidden or a protected Windows file. A faded icon isn't permission to remove it, and a permission error calls for access checks rather than a visibility switch.
In this guide
Locate the file before removing it
Press Windows + E to open File Explorer. Browse to the folder where the unwanted item belongs. If you know its full folder path, click the address bar, paste that path, and press Enter.
Browse to the file's folder instead of using a Recent or Home shortcut. That makes it easier to check the location and identify the exact item before deleting it. A familiar filename can exist in several folders.
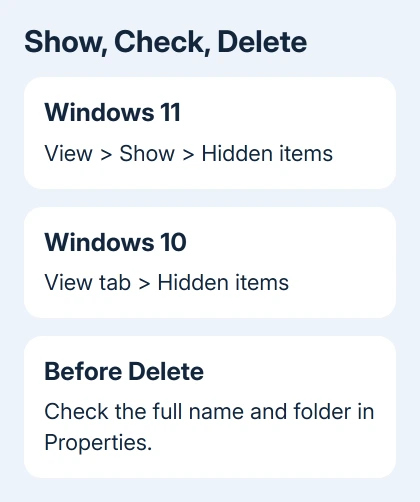
Right-click the file once it appears and choose Properties. Read its name, location, type, and size. These details help you tell an unwanted download or old document apart from a file an app still needs.
Stick to a folder whose contents you understand. Don't delete files from Windows, Program Files, or an unfamiliar AppData folder just because their names look strange. Hidden files often hold settings an app still uses.
If the aim is freeing storage, removing a known large personal file is more useful than deleting tiny hidden settings files. Look at the item's size before taking a risk for very little space.
Turn on the hidden-file view for your Windows version
In Windows 11, choose View > Show > Hidden items from the File Explorer toolbar. Hidden files and folders should appear with lighter, partly transparent icons in the folder you're viewing.
In Windows 10, open the View tab and select Hidden items in the Show/hide group. The layout differs from Windows 11, but the checkbox shows the same hidden items.
Microsoft says its Hidden items control displays hidden files. Showing a file doesn't remove its hidden setting or change its contents.
Turn on File name extensions too if several files have similar names. In Windows 11, it's under View > Show. In Windows 10, it's another checkbox on the View tab.
Now check the complete name, including the extension such as .txt or .pdf. Don't rename the extension to make the file easier to delete. That changes its name without solving a lock or permission problem.
For Folder Options and other ways to reach hidden locations, the separate Windows hidden-files guide goes further. This procedure only needs the ordinary Hidden items control.
Leave Hide protected operating system files enabled in Folder Options. Protected files are a separate category; you don't need to show them to remove a personal hidden document.
Delete the selected file, then check the Recycle Bin
Click the exact file so only that item is selected. Press Delete, or right-click it and choose Delete. Windows 11 may show a trash-can icon; hover over it to read the command name before clicking.
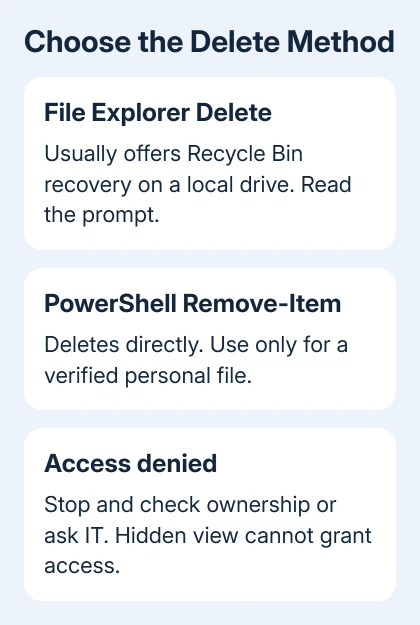
Read any confirmation carefully. Deletion from a normal local folder generally sends the item to the Recycle Bin. Some locations, removable storage, and settings can instead cause permanent deletion.
Use ordinary Delete rather than Shift + Delete when you want the chance to recover the file. If the prompt says it will be permanently deleted, cancel until you're certain you have the right item and a copy of anything needed.
Refresh the folder and check that the file has disappeared. Then open the desktop Recycle Bin, when that location uses it, and look for the filename. Sorting by deletion date can help find the recent item.
To undo a mistake there, right-click the file and choose Restore. Windows returns it to its original location. Don't empty the bin until you've checked that the removed file wasn't needed.
If a message says the Recycle Bin is corrupted, handle that specific error separately. Changing hidden-file visibility won't repair a faulty bin.
Deal with a file that's open or keeps returning
A message naming another program means the file is still open there. Close that document and the program. Try Delete again. A file can be visible in Explorer while an app prevents you from deleting it.
When the app isn't obvious, save open documents, then restart Windows. Return to the folder before opening your usual apps and try again. Restarting often releases files that apps kept open, without changing ownership or system permissions.
If the file returns after deletion, look at which app creates or uses that folder. A cache or settings file may be generated again when its app starts. Repeated deletion won't stop the app from needing that file.
For an unwanted application, use Settings > Apps to uninstall it through Windows. Don't try to uninstall software by deleting hidden files from its installation or settings folders.
For a folder inside a cloud-sync service, check what you intend to remove. Deleting a synced file can affect the online copy and other devices. Use the service's storage controls when the goal is only to remove a local download.
Use a precise PowerShell command only for a known file
File Explorer is the better first choice because it usually offers the Recycle Bin. Deleting through PowerShell skips the Recycle Bin. Keep this option for a personal file you've identified and backed up if necessary.
Open Start, type PowerShell, and open it normally. Replace the example path in this read-only check with the complete path to your file:
Get-Item -LiteralPath 'C:\Users\YourName\Downloads\old-note.txt' -ForceCheck that the result shows the file you meant to select. -LiteralPath uses the path exactly as written, which avoids treating characters in the filename as wildcard patterns. -Force allows the check to show a hidden item.
Once you've checked that single file, use this command to delete it:
Remove-Item -LiteralPath 'C:\Users\YourName\Downloads\old-note.txt' -Force -ConfirmRead the confirmation and approve only the intended path. The Remove-Item reference explains that Force can handle hidden or read-only items, but doesn't override security restrictions.
I'd stop at an Access denied message on an unfamiliar file. For a work laptop, give IT the path and error. For your own laptop, ask the app's support team what the file does before changing ownership or deleting protected content.
The Short Version
Show Hidden items, verify its complete filename and containing folder, then use ordinary Delete. Keep protected system files hidden. Close the owning app for a file-in-use error, and don't force past permissions on files you can't identify.
Checked November 16, 2026.