Freeform points don't snap to the grid in PowerPoint 2010 and later, even with Snap objects to grid ticked, and points you drag with Edit Points ignore it too. Owners still saw this in Microsoft 365, and no option restores it.
Two things do work. Hold Shift while you click, and each straight segment locks to horizontal, vertical or 45 degrees. For corners exactly on the grid, build the shape from rectangles and triangles, which do snap, then merge them.
In this guide
What snaps and what doesn't
Snap objects to grid works on shapes you draw or move by dragging: rectangles, lines, text boxes and pictures.
To turn it on, click the small arrow in the corner of the Show group on the View tab, then tick Snap objects to grid in the Grid and Guides box.
Freeform clicks aren't treated that way any more. PowerPoint 2002 snapped each point as you made it, but owners on 2010, 2013 and Microsoft 365 found their points landing between the grid dots.
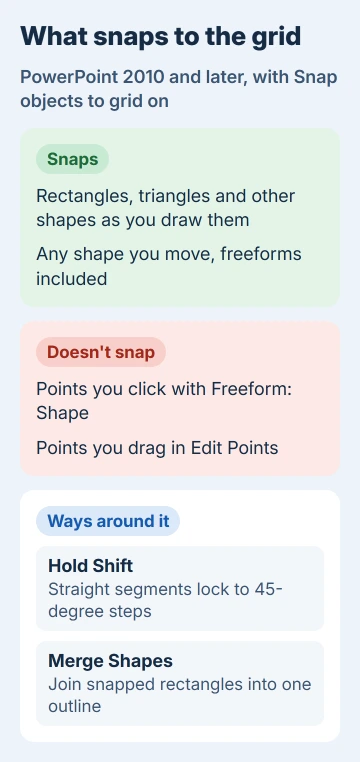
Microsoft's snap-to-grid page only says that with snapping on, you can draw straight lines with the Freeform tool. It doesn't say the points land on the grid, and in practice they don't.
Points you drag in Edit Points glide freely too. Owners on PowerPoint 2010 and 2013 confirmed points never jump to the grid there, whatever the setting.
Holding Alt doesn't help either. Alt turns snapping off for a moment while you drag something, so it works against you here.
Hold Shift for straight, square segments
Shift is the quickest fix when you need clean horizontal and vertical edges, such as an arrow, a floor plan or a staircase outline.
- On the View tab, tick Gridlines so you can see the grid while you draw.
- Go to Insert > Shapes and, under Lines, choose Freeform: Shape.
- Click where the first corner goes. Then hold Shift and click each next corner; every segment sticks to horizontal, vertical or a 45-degree diagonal.
- Finish by clicking on your first point to close the outline, or double-click to leave it open.
Shift fixes the angles, not the lengths, so zoom in with Ctrl and the mouse wheel and put each click on a grid dot by eye.
One owner who tried it on PowerPoint 2010 found lines held to 45-degree steps but still missed the grid, and another saw the same in 2013.
Build the shape from snapped pieces, then merge them
When corners have to sit exactly on grid points, stop drawing points at all. Ordinary shapes snap, so build the outline from them and join them up.
- Turn on Snap objects to grid as explained in the first section.
- Draw the pieces with ordinary shapes: rectangles for straight runs, right triangles for diagonals. Drag them so they overlap where they meet; each edge snaps to the grid as it moves.
- Click the first piece, then hold Ctrl and click the others.
- On the Shape Format tab, click Merge Shapes > Union.
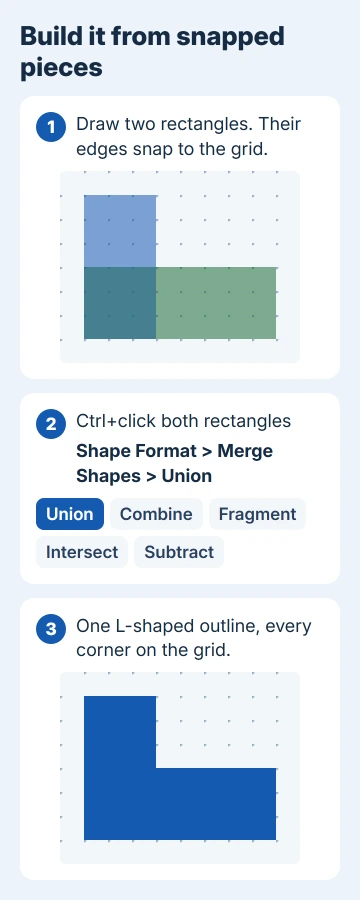
The pieces become one shape with no seams, ready for a fill and an outline. Subtract cuts the second shape out of the first, which is handy for notches and holes.
Merge Shapes sits on the Shape Format tab in PowerPoint 2016 and later, including Microsoft 365. On a Mac, hold Shift instead of Ctrl to select the pieces.
If Union gives you an odd result, undo it and pick a different piece first; the order you select them in can change the options you're offered.
This is how I'd build anything that has to line up with other shapes, because rectangles land on the grid every time.
Draw it in an older Word document, then paste it in
One owner on Word 2010 found a way to get the old behavior back. In a document saved in the older .doc format, Word's Freeform and Curve tools work the way they did in Word 2003.
- In Word, choose File > Save As and pick Word 97-2003 Document (*.doc) as the file type.
- Look for Compatibility Mode next to the file name at the top; reopen the file if it isn't there.
- Go to Insert > Shapes, choose the Freeform tool and draw your shape.
- Copy the finished shape and paste it onto your slide.
That owner makes a lot of technical drawings and said the frustration was gone once they drew this way. If you'd rather sketch by hand in Word, drawing on a Word document covers its pen tools.
Tidy single points with Edit Points
For a shape that's nearly right, fix the odd point by hand. Right-click the shape and choose Edit Points, or use Shape Format > Edit Shape > Edit Points.
- Drag a black point to move it.
- Hold Ctrl and click the outline to add a point; hold Ctrl and click a point to delete it.
- Zoom to 200 or 400 percent first; lining a point up with the gridlines by eye gets much easier.
Moving the whole shape is different: shapes you drag do snap. Smart guides (dashed lines that flash up when edges or centers match) also appear near other shapes, and PowerPoint's drawing guides give you fixed lines to line it up against.
When you need real point snapping
PowerPoint has no hidden switch for it. Owners have asked Microsoft to restore point snapping for years, and the request still stands, so add yours from Help > Feedback in PowerPoint for Microsoft 365.
Until then, Merge Shapes is the dependable route for exact outlines, and Shift covers simple straight-edged ones. A Word .doc file is the fallback when you need freehand points on a grid.
The Short Version
Freeform points and Edit Points drags don't snap to the grid in PowerPoint 2010 and later.
Hold Shift for straight 45-degree segments, or build the outline from snapped rectangles and triangles and join them with Merge Shapes > Union.
Checked November 20, 2026.
 If you have any business, I can build it online