A missing OneNote notebook has usually been closed, not deleted, and reopening it from File > Open brings it back with every page intact. Closing a notebook only takes it off your list, without moving its stored files.
If it really was deleted, or it lived on a PC that's since been reset, OneNote's own backups and the OneDrive recycle bin may still have a copy. Start with the quick reopen and work your way down.
In this guide
Work out what actually happened
A notebook can go missing in three different ways, and each one is fixed in a different place. Take a minute to figure out which one you're dealing with, so you don't restore the wrong thing.
If the notebook's name has simply dropped off the list, it was closed, and fix 1 reopens it. If it opens but whole sections or pages are gone, they were deleted, and fix 2 gets them back as long as it's been under 60 days.
If you can't find the notebook anywhere, it was deleted or went with an old PC. Fixes 3 to 5 cover OneNote's backups, the OneDrive recycle bin and any backup copy you kept yourself.
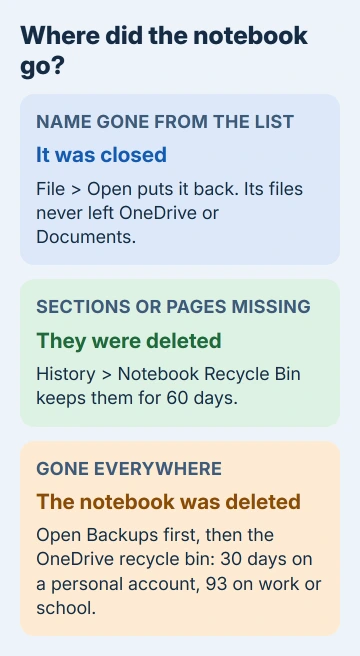
OneNote for Mac doesn't keep the automatic backups that fix 3 uses, so on a Mac go straight from fix 2 to fix 4.
1. Reopen a notebook that was closed
In OneNote for Windows, choose File > Open. Notebooks stored in OneDrive are listed under your account, and clicking the missing one puts it straight back in the notebook pane.
A notebook saved on the PC itself is just a folder. Choose Browse, go to Documents > OneNote Notebooks, open the folder with the notebook's name and select the file called Open Notebook.
In a long Microsoft forum thread about lost notebooks, reopening was all one owner needed. As an adviser there pointed out, a closed notebook stays in its folder until you open it again.
If a OneDrive notebook isn't in the list, go to onenote.com, sign in and open the notebook there. Then choose Open in Desktop App, and OneNote adds it back to your notebooks.
After you switch apps, notebooks from OneNote for Windows 10 can be missing from the new notebook list. Check that the new app uses the account you had in the old one, then choose File > Open.
2. Restore deleted sections from the Notebook Recycle Bin
Deleted pages and sections don't disappear right away. Open the notebook in the Windows desktop app, select the History tab and choose Notebook Recycle Bin.
Right-click the section or page you want back, choose Move or Copy, and pick where it should go. OneNote keeps deleted pages and sections there for 60 days after you delete them.
A deleted section group comes back as loose sections, not as a group, so recreate the group and drag the restored sections into it. And if you only deleted something a moment ago, Ctrl+Z is quicker.
3. Open OneNote's automatic backups
The desktop app saves backup copies of your sections on a schedule, and those copies survive even when the notebook itself is gone. To get at them, choose File > Info > Open Backups.
Open the folder named after the missing notebook, pick a section file and select Open. It shows up under Open Sections, where you can read every page before you keep anything.
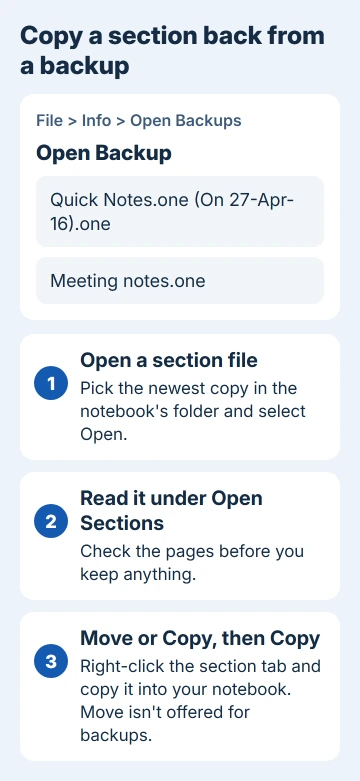
To keep it, right-click the section tab, choose Move or Copy, select the notebook you want and choose Copy. Move isn't offered when restoring from a backup, so you can't delete part of the backup by accident.
Once the pages are safely copied, close the backup section, pick your real notebook from the notebook list again and carry on working there.
In the Microsoft 365 version or OneNote 2016, the backups are ordinary .one files in %localappdata%\Microsoft\OneNote\16.0\Backup. Sort that folder by date to find the newest copy.
One owner on OneNote 2013 found theirs in the 15.0 folder instead and got a lost Quick Notes section back from a dated copy.
Each backup opens one section at a time, which gets slow with a big notebook. An owner on OneNote 2016 complained about exactly that, so restore the sections you need most first and leave the rest for later.
Backups only exist if OneNote was making them. File > Options > Save & Backup shows how often it saves one and how many copies it keeps, and I'd check that setting today even if this notebook comes back.
4. Get a deleted notebook back from the OneDrive recycle bin
If your notebook was stored in OneDrive, it's a folder there too, and deleting it sends it to the OneDrive recycle bin. Sign in at onedrive.com, select Recycle bin in the left pane, select the notebook and choose Restore.
A personal OneDrive account keeps deleted items for 30 days. Work and school accounts keep them for 93, though an administrator can change that. Once the bin has been emptied, the notebook can't come back this way.
After the restore, reopen the notebook with File > Open as in fix 1. If you deleted it from File Explorer's OneDrive folder, check the Windows Recycle Bin too.
If you pay for Microsoft 365, you can also roll your whole OneDrive back to any point in the last 30 days. That's meant for a day when lots of files vanished at once, though, rather than for one notebook.
5. Rebuild from backup files you copied yourself
If the PC was reset and you kept a copy of the old notebook folders, this method from one owner works even when Open Backups won't. Create a new notebook saved on this PC, then close OneNote completely.
Copy the old .one files from your saved copy into the new notebook's folder in Documents > OneNote Notebooks. Reopen OneNote, and the old sections sit next to a blank New Section 1 that you can delete.
A second owner who'd tried the backup steps without luck wrote back to say this method worked. And if Windows File History was turned on, it can give you an older copy of the notebook folder too.
When the notebook still won't come back
A notebook from work or school is your IT team's job, since they manage the storage it lived on. Tell them its name, where it was saved and roughly when it disappeared.
For a personal notebook, give Microsoft support the same details plus the email address of your Microsoft account. I'd write them down before you call.
If the notebook is back but won't sync, the 0xE000002E refresh steps get it going again without losing your newest pages. On a Mac that's stuck on Saved offline, use the Mac sync checks instead.
The Short Version
Reopen the notebook with File > Open first. Deleted sections wait in History > Notebook Recycle Bin for 60 days, and you can get a whole notebook back from File > Info > Open Backups or the OneDrive recycle bin.
Checked November 20, 2026.
 If you have any business, I can build it online