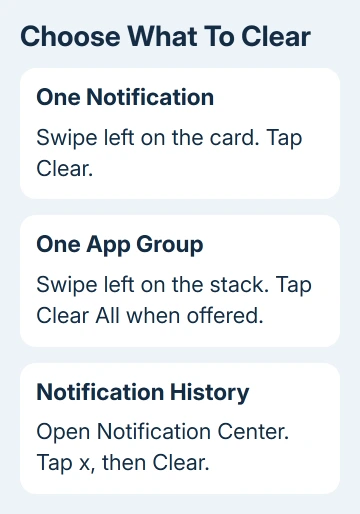
Swipe left on an iPhone notification and tap Clear to remove it. To clear the notification history all at once, open Notification Center and use its clear button.
Clearing removes the alerts from that list; it doesn't delete the messages or stop the app from sending new ones.
For one crowded app, clear its group rather than the entire history. A red number on an app icon is separate, so it can stay after Notification Center is empty.
In this guide
Open the notification list you want to clean
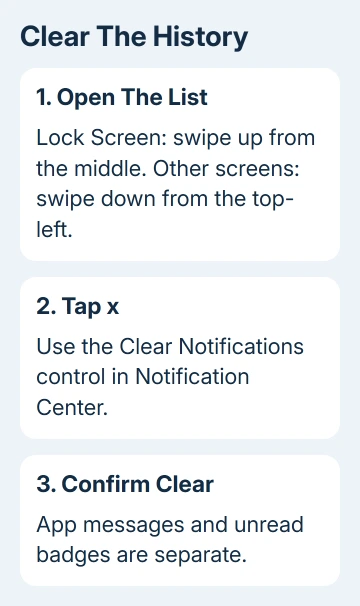
From the Lock Screen, start near the middle and swipe upward to see earlier notifications. From the Home Screen or inside an app, pull downward at the upper-left to reveal Notification Center.
The starting point matters on Face ID iPhones. Pulling down at the upper-right opens Control Center, with brightness and volume controls, rather than your alerts. Close that panel and start from the left.
On Home button iPhones, start at the upper edge and pull downward for Notification Center. The Home button isn't the button for deleting alerts.
If the Lock Screen shows a count instead of cards, open the notification list before trying to swipe an individual alert. A count tells you how many alerts are there; it isn't an individual message you can dismiss.
Unlock the phone if asked. Depending on your privacy settings, you may need to unlock it before you can see or manage the full notification history.
Clear one alert without opening its app
- Find the notification in the Lock Screen list or Notification Center.
- Swipe left across that notification to reveal its controls.
- Tap Clear.
- Check that the chosen card disappears and the alerts you wanted to keep remain.
Apple says its notification controls can clear a card without opening the app. Swipe the card itself, rather than tapping the message text first.
If the alert belongs to a stack, tap the stack to expand it before choosing a particular item. That lets you keep the other alerts from the same app instead of clearing their entire group.
Touching and holding a notification can show a preview or actions provided by the app. That's useful for a reply, but it isn't the simplest way to clean the list. Close that preview and use the swipe controls.
Swipe upward on an incoming banner to dismiss it while using another app. That hides the interruption. To remove stored alerts too, open Notification Center and check its list.
Remove a group or clear the history together
To clear a group, swipe left across its stack and tap Clear All if that option appears. Read the button before tapping: clearing a stack affects the notifications in that group.
For the whole Notification Center list, open Notification Center, tap the Clear Notifications button, shown as an x, then tap Clear. The confirmation is separate from the first tap.
I'd expand an important app's stack first if it contains something you still need to act on. Once an alert is cleared, use the app itself to find the message or event; there isn't a general Undo button for the cleared notification list.
An empty history doesn't prevent another alert from arriving immediately. A fresh card with a new time can simply be a new notification, rather than the old one refusing to clear.
Clearing alerts leaves your messages, emails and calendar entries in their apps. To delete a conversation or event too, open the app and delete it there.
Deal with an app badge that stays red
The red badge on your Home Screen has its own controls, separate from the notification cards. Clearing the list can leave that number unchanged because the app still has unread or outstanding items.
Open the app and inspect its unread messages, inboxes or pending tasks. For example, dismissing an email alert doesn't mean the email has been marked read in the mailbox.
If the goal is to hide the badge rather than read those items, open Settings > Notifications, select the app and switch Badges off when available. That hides the badge without deleting your unread items.
Keep Allow Notifications enabled if you still want alerts from that app. Turning off all notifications to remove a badge changes more than the red number, including the future alerts you may want to receive.
The notification viewing controls help when the cards are hidden or grouped differently. Visibility settings and unread counts can make an empty-looking screen misleading.
Stop the list filling again when necessary
Clearing is a one-time cleanup. If an app keeps interrupting you, swipe one of its alerts to the left, tap Options, then choose a temporary mute option for an hour or a day.
Muted notifications go to Notification Center without the usual Lock Screen appearance, sound or banner. They can therefore still collect in history. Muting and clearing serve different purposes.
For a lasting change, use Settings > Notifications > the app and choose which alert locations or sounds to allow. The steps for stopping iPhone notifications cover choosing between an app-wide switch and a temporary quiet period.
If the same card remains after tapping Clear, restart the iPhone and try that card again. Note whether only one app is affected and whether its actual unread items can be managed normally.
For a problem affecting one app, contact its developer through the App Store support link.
If cards from several apps won't clear, use Apple Support's iPhone help. Include your iOS version and say which clear button doesn't respond.
The Short Version
Swipe left and tap Clear for one notification, or Clear All for a group. Use Notification Center's x button and confirmation to clear its history. Unread messages, app badges and future notifications have their own controls.
Checked November 10, 2026.