An iCloud Mail alias gives your existing mailbox another email address. Create it through the web settings, then use the new address for sending and receiving without signing out of your devices.
A separate mailbox needs a separate Apple Account instead. Choose that route for another person or independent account access. An alias suits a second public address when you're happy for its messages to reach your existing mailbox.
In this guide
Decide whether you need another address or inbox
A Mail alias belongs to the iCloud mailbox you already have. Messages sent to it arrive in the primary inbox by default. You can also choose the alias as the sender when writing mail.
That makes an alias useful for a public contact address, a club, or a different name. It doesn't provide a second password, separate storage, or a mailbox another person can manage independently of your account.
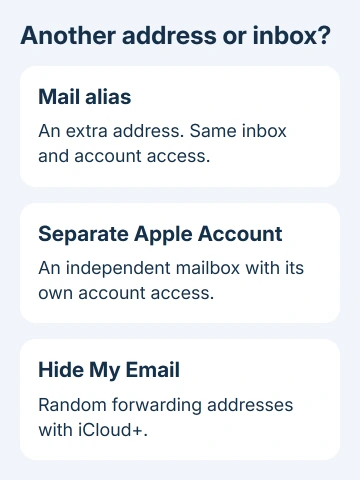
Hide My Email is a different feature. With iCloud+, it creates random forwarding addresses to keep your personal address private. Choose an ordinary Mail alias when you want to pick the address text yourself.
A custom domain is another iCloud+ option, using a domain you own rather than an @icloud.com address. You don't need that setup just to add another @icloud.com address to the same mailbox.
For a second person's mail, keep account ownership clear from the start. Sharing your Apple Account to give them an inbox can also expose other account services. Use a separate account when separate access is the goal.
Create the alias in iCloud Mail settings
Use a browser on your computer or tablet to open icloud.com/mail. Sign into the mailbox where you want messages for the new address to arrive. Check the inbox before creating anything.
If the page asks you to Create Email Address rather than showing mail, this account doesn't yet have a primary address ready for iCloud Mail. Complete that first. An alias attaches to an existing primary mailbox.
Apple's alias-creation instructions describe the fields and controls. Open the settings menu at the top of the Mailboxes list, then choose Settings.
- Find Add Alias in Mail settings. Some versions place it within Account settings.
- Enter the requested Alias Address, using an available name between 3 and 20 characters.
- Add a Label so you can recognize the address in settings.
- Enter the Full Name you want recipients to see.
- Select Create.
The address text becomes the part before @icloud.com. The label is for organizing the aliases; it doesn't change the actual address. Check the spelling before saving or sharing it.
If the chosen address is unavailable, try another name. Changing Full Name won't make a taken address available because the display name and email address serve different purposes.
Check the alias limit shown for your account
The current creation instructions list up to nine aliases, while Apple's separate alias overview still lists three. Those official pages disagree, so follow the capacity and controls shown in your own Mail settings.
That difference matters if you remember the older three-alias limit. Don't delete an address you still use just to make room based on an old limit. First check whether Add Alias is available in your account now.
The creation instructions also say that after deleting an alias when all nine slots are used, creating a replacement requires seven days. The older overview gives the same wait for its three-alias limit.
A capacity warning or a wait before replacing an alias means you've reached an account limit. Changing the proposed spelling won't bypass it. If your settings don't match the instructions, ask support which limit applies to your mailbox.
An alias can't become a separate Apple Account or be transferred into another mailbox. Choose the right type of address now if you expect to hand it to somebody else later.
Test receiving and choose the correct sender
From another mailbox, email the new address a brief test message. Open your iCloud inbox and confirm it arrives. Seeing the alias in settings tells you it's been created. Receiving a message confirms that mail reaches it.
Next, start a fresh message in iCloud Mail. Open the From field and select the alias before sending. Check the received message from the other mailbox to confirm the new address appears as the sender.
I'd do both tests before putting the address on a form or business card. It's easier to correct a spelling mistake or sender choice before people begin relying on it.
The alias can also send and receive on devices with iCloud Mail enabled. If a device doesn't show the expected messages, confirm the mailbox account matches. Our iCloud email access guide covers the browser and device routes.
A message sent to the alias doesn't create another inbox automatically. To keep its messages separate, use folders or rules in your existing mailbox instead of setting up the account again.
Set up a separate mailbox when needed
For an independent iCloud inbox, create a separate Apple Account through the normal account-creation process. Keep its password, trusted phone number, and recovery access separate from the account you already use.
Once that account exists, create its primary iCloud Mail address. On iPhone or iPad, open Settings > your name > iCloud > iCloud Mail, sometimes labeled Mail, and follow the address-creation prompts.
On Mac, open System Settings > your name > iCloud > Mail or iCloud Mail. In macOS 13.3 and later, turn on Sync this Mac. macOS 13 through 13.2 uses Turn On before the address prompts.
These steps apply to the account signed in on that device. Don't sign your everyday phone out just to experiment. For an existing account, you can also create its primary mailbox through Create Email Address at iCloud Mail on the web.
Afterward, add the second iCloud inbox to iPhone Mail if you want both accounts in one app. Adding a Mail account is separate from replacing the phone's main Apple Account.
Disable an address carefully or ask for account help
Return to iCloud Mail settings and select an alias to manage it. Disable alias temporarily turns it off; clearing that checkbox turns it on again. Save the change when the settings page offers that button.
Delete alias permanently removes it. Mail sent to a disabled or deleted alias returns to the sender, so update important contacts before making that change. Edit its label or Full Name instead when only those details need changing.
If Add Alias is missing despite an active primary mailbox, contact Apple Support for iCloud Mail aliases. Tell them the limit shown in settings, your account type, and the exact error. Keep the existing working address while they check it.
The Short Version
Use an alias for an extra address in your current inbox, or a separate Apple Account for another mailbox. Test delivery and the sender choice. Follow your account's displayed alias capacity while the official limits differ.
Checked November 16, 2026.