
Missing Excel scroll bars usually need a change in the workbook's display settings. In Windows Excel, open File > Options > Advanced and enable both bars under Display options for this workbook. Check the workbook name first.
If only one file has the problem, start with that workbook's settings. If the bars are already turned on, resize the Excel window next. On a Mac, the system's Appearance setting also controls when scroll bars appear.
1. Turn on both scroll bars for the affected workbook
Bring the workbook with missing bars to the front. Open File > Options, select Advanced, then find Display options for this workbook. These settings apply to the named workbook, apart from the other display options on that page.
Read the workbook name in its list box. Select the affected file if another open workbook is shown. Turn on Show horizontal scroll bar and Show vertical scroll bar, then choose OK.
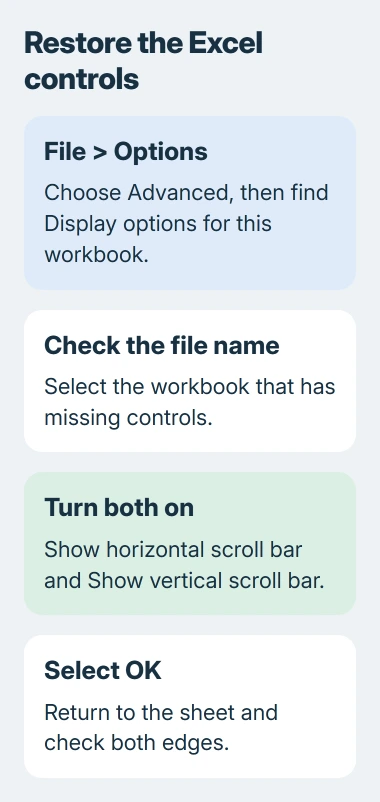
Microsoft says to use these workbook options to restore the bars. The horizontal control normally sits at the bottom; the vertical control sits beside the rows.
Return to your worksheet and look at those two edges. Try dragging each bar you can see. The change has worked when the bars appear and let you move through the sheet. A checked box alone doesn't tell you that.
If the workbook uses a right-to-left layout, its vertical bar can appear on the left. Check both sides before treating the bar as missing. The Advanced options reference explains that layout difference.
Save the workbook to keep its display changes, then close and reopen it when you can. If the switches turn off again, tell support when that happens instead of repeatedly changing unrelated Windows settings.
2. Recover controls hidden by the window's size
If the options are already selected, use the title bar's shortcut menu to select Maximize. Look for the bottom and side controls again with the full worksheet window visible.
Then choose Restore from that same menu. Resize the window so its bottom edge is on screen. This checks whether the saved window size or position is hiding the controls you need.
The missing-scroll-bar guide recommends maximizing and restoring Excel when the display settings haven't helped. This changes the window without repairing or changing the workbook's data.
With several Excel windows open, bring the workbook you're checking to the front. Another window can cover its lower edge and hide controls that are still there.
I'd check the window before repairing Office. It takes only a few clicks and leaves the spreadsheet's formulas and data alone. If a fully visible window still has no bars, compare another workbook next.
3. Check whether one workbook or every workbook is affected
Keep the affected file open and create a blank workbook through File > New > Blank workbook. Look for its horizontal and vertical bars. You're comparing two files in the same copy of Excel.
If the blank workbook has bars, check the original file and its display settings again. If both lack bars, look at the Excel window and the controls for your operating system.
Switch back to the original and check the workbook selector in Advanced options again. It's easy to turn on a switch for one file while checking another, especially when the names look similar.
Keep your original file when making this comparison. The blank workbook is just for checking how another file looks. Copying a few cells into it won't transfer all your formulas, formatting and workbook features.
Ask whoever supplied the workbook whether its scroll bars appear on their computer. Tell them whether the options are checked on yours. That gives them more to work with than saying the spreadsheet looks different.
4. On a Mac, check system visibility and Excel's View options
Open Apple menu > System Settings > Appearance. Under Show scroll bars, choose Always. Return to Excel and check the worksheet edges while the pointer is away from them.
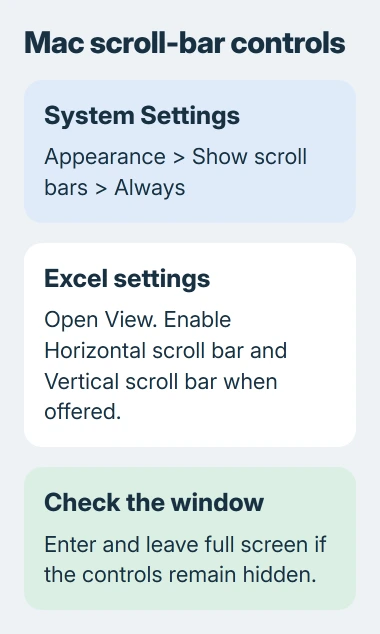
Current macOS puts that setting in Appearance; older releases use System Preferences > General. The MacBook scrolling guide covers when scroll bars appear and other ways to move around.
If Excel still lacks the controls, open its Excel menu and choose Settings or Preferences, depending on the installed version. Open View and enable Horizontal scroll bar and Vertical scroll bar when those options are available.
Then check the window on your Mac: enter full screen with the green window control, leave full screen and check again. Control + Command + F also switches the app in and out of full screen.
The system's automatic setting can hide a bar until you scroll. Choosing Always helps you tell that behavior apart from a workbook or app setting that turns the bar off.
5. Separate a missing control from a scrolling problem
If you can move a bar but the sheet doesn't go where you expect, check how you're moving around the sheet. Frozen rows, a split view and keyboard behavior aren't all controlled by those two switches.
For keys that scroll the worksheet rather than change the active cell, read the Excel Scroll Lock checks. Re-enabling a visible bar doesn't change what those keys do.
To reach a cell in Windows for now, press Ctrl+G, type a known address such as A1, and press Enter. This selects the cell without dragging a scroll bar. It doesn't bring the missing bar back.
If the bars are still missing, give Microsoft Support your Excel version, operating system and whether the blank workbook showed them. Say which switch was checked and what changed when you maximized or restored the window.
If a workbook from work turns the settings off again, ask its owner or IT to check the file before changing your Office installation. Tell them whether it happens immediately or only after you reopen that workbook.
The Short Version
Enable both bars under the correct workbook's Advanced options, then maximize and restore Excel. Compare a blank workbook. On a Mac, check Appearance and Excel's View controls. Treat Scroll Lock and other navigation faults separately.
Checked November 5, 2026.

Isaac Smith is the founder and editor of PC Glance, a website that covers computers, laptops, and technology. He is a tech enthusiast and a computer geek who loves to share his insights and help his readers make smart choices when buying tech gadgets or laptops. He is always curious and updated about the latest tech trends.