
Start an iPad study setup with a folder for each course, one place for lecture notes and a Focus that lets important messages through. Get that simple routine working before adding apps or buying accessories.
Notes and Files can handle that starting setup. Keep lecture notes in Notes, original handouts and submission files in Files, and use the same course names in both so you can find related work quickly.
1. Build the course folders in Files
Open Files, show Browse or the sidebar, and choose where to keep your course documents. Use iCloud Drive to reach them on your other signed-in devices, or choose a local folder to keep them on this iPad.
Create a Study folder using New Folder. Inside it, add a folder for each course. Short names such as Biology and History are easier to recognize than a row of nearly identical course codes.
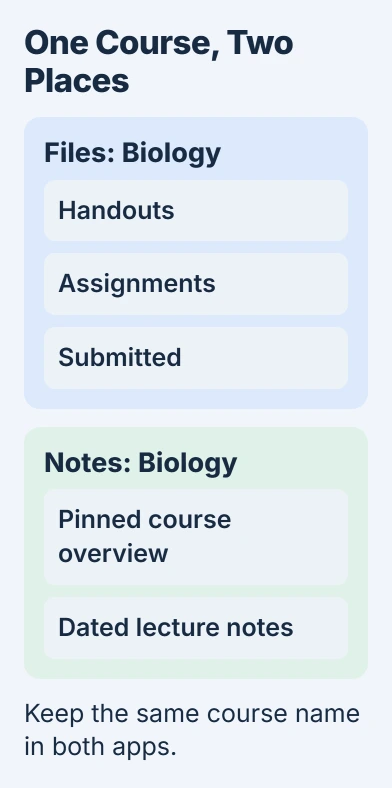
Inside each course, create Handouts, Assignments and Submitted. These are just suggested folder names. Keep the setup small enough that you can file a document in a few taps.
Apple's Files organization instructions explain New Folder, Move and Rename. If New Folder isn't offered, you can't create folders there; choose somewhere that allows it.
To file an existing document, touch and hold it, choose Move and select the course folder. Rename unclear downloads with a topic and date, keeping the file type unchanged.
2. Give each course a matching Notes folder
Open Notes and show its folder list. Tap New Folder, choose the account if asked, then enter the course name. Use the same account for related course notes instead of scattering them between email providers.
The Notes setup guide explains that you get all the features with iCloud notes or notes stored on your iPad. Notes saved through another email account can have fewer features.
Create a course overview note with the course title, your instructor's contact details and the next deadline. In the notes list, touch and hold that note's entry, then select Pin Note.
For each lecture, create a separate note with the date and topic in its title. A name such as Biology 2026-11-05 Cell Division is easier to search later than several notes called New Note.
Use a heading for the main topic and short bullets for explanations. Keep questions you still need to ask in their own section, so they're easy to find when you study the note later.
3. Choose typing or handwriting for the actual task
Try a short practice note before class. Type a paragraph, add a heading and reopen it. If you already have a compatible Pencil, try a diagram or handwritten explanation in the same course folder.
A keyboard helps with long written assignments, while handwriting can suit equations and sketches. You can use both. Choose whichever lets you keep up with the lesson.
Before buying a keyboard case, check the iPad keyboard connection and compatibility. A Bluetooth keyboard, a Smart Connector case and a wired keyboard use different setup routes.
I'd start with the accessories you already have. A week of real classes will show whether typing, handwriting or switching between them is the part that needs improvement.
If a lesson needs a screenshot, capture and crop the iPad screen before sharing it. For your own notes, keep enough context to remember what the image was explaining.
4. Make important reading available without Wi-Fi
Before traveling to class, open the required handouts from Files while you're connected. For a handout stored in iCloud Drive, open its touch-and-hold menu and select Keep Downloaded when that option appears.
The offline-file instructions explain that control. Seeing a file in a cloud folder doesn't mean it's already stored on your iPad.
Open a required document after downloading it and check its pages. Then turn Wi-Fi off briefly and try opening the same file again. Once you've checked that it opens, turn Wi-Fi back on.
Other storage providers can have their own offline controls. Check their app's instructions if you don't see the same iCloud menu in Files.
Keep the original handout separate from the assignment copy you edit. That makes it easier to compare the question with your answer or restart an annotation without downloading the original again.
5. Create a Study Focus with a short allowed list
Open Settings > Focus, tap the Add button and choose Custom. Name it Study, choose its color and icon, then continue to Customize Focus.
Under People, choose Allow Notifications From and add the contacts whose messages must reach you. Under Apps, allow the small set needed during the session, such as your timetable or class app.
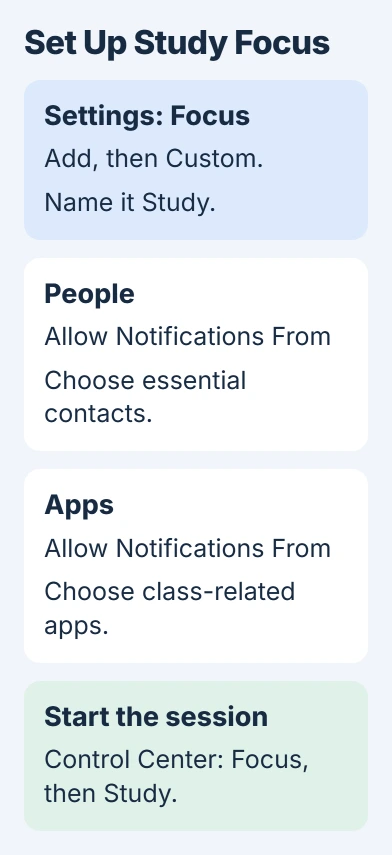
Check whether the screen says Allow Notifications From or Silence Notifications From. Those lists do opposite jobs: adding someone to a silence list won't let their messages through.
The custom Focus procedure also lets you choose a Home Screen page. Use a page containing your study apps if that helps you reach them without opening unrelated apps.
To turn Study on, open Control Center > Focus and choose Study. Check Share Across Devices in Focus settings if you don't want the iPad session to affect your other signed-in devices.
Focus only changes interruptions, so you'll still need to finish and save your work. Keep the allowed list useful so you don't miss a message you need.
6. Rehearse saving and handing in one file
Try the whole process with a practice document before a deadline. Save it in the course's Assignments folder, close it and reopen it from Files. Check that your last edit is there.
Check which file format your instructor accepts. A note, an editable document and a PDF aren't the same format. Use your writing app's export options if the assignment needs a different one.
Name the finished file so you can tell which course and assignment it's for. Save your editable version in Assignments and the exact copy you sent in Submitted. That keeps both versions.
Follow the class app's submission steps and check for confirmation. Saving the file on your iPad doesn't hand it in. If the service gives you a confirmation or receipt, save it with the assignment.
If school IT manages your iPad, ask them about missing apps or blocked account changes. Tell them which file, app or setting you can't use. Changing your personal account settings won't remove a school restriction.
The Short Version
Use matching course names in Files and Notes, keep key reading downloaded, and create a Study Focus with chosen exceptions. Practice reopening and submitting one file before relying on the setup for a real deadline.
Checked November 5, 2026.

Isaac Smith is the founder and editor of PC Glance, a website that covers computers, laptops, and technology. He is a tech enthusiast and a computer geek who loves to share his insights and help his readers make smart choices when buying tech gadgets or laptops. He is always curious and updated about the latest tech trends.