Poor microphone quality after a Windows update can come from its format, sound effects or driver. Check Default Format first. If only Tape Recorder Quality is available, try another microphone before trying to restore a higher setting.
A muffled recording, a silent microphone and clear recordings that sound bad only in calls are different problems. This guide addresses a microphone that records an audible voice but sounds worse after updating.
In this guide
1. Select the right input before changing its format
Open Settings > System > Sound and find Input. Select the microphone you actually speak into. A laptop microphone array, webcam microphone and headset can all appear here, and an update can leave you recording through a different device.
Make a short recording in Sound Recorder on Windows 11, or Voice Recorder on Windows 10. Speak from your usual distance. Play it through a familiar speaker or wired headphones so a playback problem doesn't confuse the comparison.
If that recording sounds normal but calls don't, skip to the app settings in section 4. If every recording sounds thin, continue with the recording format.
For a microphone that records nothing at all, use the Windows microphone detection checks.
Keep the same sentence and distance for comparisons. I'd listen to a saved recording instead of judging quality by the moving bar. That bar shows sound reaches Windows, but it can't tell you how natural your voice sounds.
2. Check the microphone's available recording formats
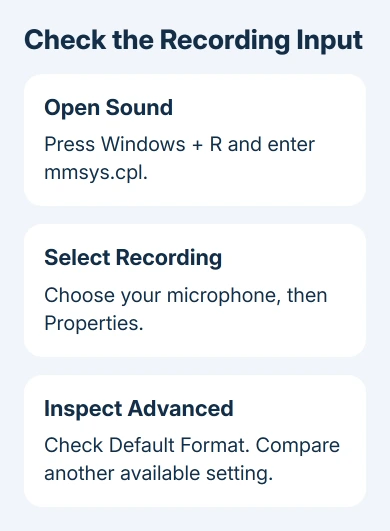
Press Windows + R, type mmsys.cpl, and press Enter. Open Recording, select the affected microphone, and choose Properties > Advanced. This older Sound window is available in Windows 10 as well as Windows 11.
Look at Default Format and note the current selection before changing it. The entry describes the channels, bit depth and sample rate. These describe how audio is recorded. The choices depend on what your microphone and its driver support.
If Tape Recorder Quality is selected and the menu offers a suitable higher format, select an available alternative, apply it, and make the same recording again. Don't copy a sample rate from another microphone if yours doesn't offer it.
Some devices also offer the format on their Input properties page in Windows 11. Use Settings > System > Sound, select the microphone under Input, and look for Format. Controls differ with the driver.
If the menu is grayed out or has only the low-quality entry, Windows isn't offering a higher format for that microphone. Increasing the volume won't add one.
Try the computer's built-in microphone or a separate USB microphone, then continue to the driver check.
A Bluetooth headset's calling input differs from its music playback output. Choosing high-quality headphones under Output doesn't change the microphone selected under Input. Check those settings separately.
3. Turn off microphone processing for one comparison
Noise suppression and other voice effects can make a working microphone sound clipped, hollow or unnaturally quiet.
On Windows 11, open the selected input's properties in Settings > System > Sound and choose Off for Audio enhancements when available.
On Windows 10, open the microphone's Device properties > Additional device properties. Alternatively, return to mmsys.cpl, open Recording, and select Properties for that microphone. The available tabs depend on its driver.
Microsoft's microphone enhancement instructions describe two possible locations. On Enhancements, select Disable all enhancements or Disable all sound effects. On Advanced, clear Enable audio enhancements if that's where it appears.
Save the change and record again. If your voice becomes clear, leave that processing off while checking the app you normally use. If nothing improves, restore the previous setting so an unhelpful adjustment doesn't stay in place.
Not every microphone has an enhancement control. A missing tab doesn't mean you opened the wrong Windows edition. Use the controls your device provides; don't install an audio control app intended for another computer.
4. Correct the app when local recordings sound clear
Open the affected calling app's Audio, Voice or Devices settings. Select the same named microphone that produced the clear Windows recording. An app can keep its own input choice even when Windows uses a different default.
Use the app's microphone test or test call. Compare its noise suppression or voice effects one setting at a time. Restore an option that doesn't improve the result, then make a real call to confirm the sound.
Check the recording level too. A voice that's very loud and distorted needs a different adjustment from one that's quiet.
In the microphone's Properties > Levels tab, reduce excessive gain or boost if those controls exist, then compare the same sentence.
For a broader check of what Windows hears, the built-in microphone test separates a detected device from a useful input signal. If the saved recording sounds clear but the call doesn't, check the calling app or its connection next.
Send the microphone's name and clear local recording to the calling app's support team if the trouble happens only there. Replacing the system audio driver is a bigger change than selecting the correct input inside one program.
5. Restore the previous audio driver when the update changed it
Open Device Manager using Start's right-click menu. Expand Sound, video and game controllers, select Properties for the affected audio device, and select Driver. Note its provider, date and version before making a change.
Use Roll Back Driver when enabled, follow the prompts, and restart the PC. The post-update audio repair steps explain that rollback is available only when Windows has kept a previous driver.
If the button is gray, get the manufacturer's audio package for your exact laptop, motherboard or USB microphone. Use another connection or computer if needed. Save the installer before removing a driver you'll need to replace.
Install the matching package and restart as directed. Check the format list and record again. Check that the missing format is back and your voice sounds clear, even if the installer says it succeeded.
If the same microphone sounds bad on another computer, contact its manufacturer about the device. If it works elsewhere, ask your computer manufacturer to review the audio driver for your Windows build.
Send the update KB number, driver versions and available formats.
The Short Version
For degraded input, inspect Default Format on the microphone you need. Compare a recording with enhancements off. If the format list changed after updating, roll back the audio driver or install the PC maker's matching package.
Checked November 13, 2026.