
Print iPhone photos at home with an AirPrint-compatible printer. Open the picture in Photos, tap Share, then Print. Choose the printer and check its paper options before sending one test copy.
A photo shop can print your original file if you don't have a suitable printer. At home, check that the printer supports AirPrint, that it's on your network and that the photo fits the paper.
Prepare the printer and the original photo
Turn on the printer and check its paper and ink. Use photo paper your model supports and load it as its manual shows. The tray position doesn't always make it clear which way the glossy or printable side should face.
Keep your printer and iPhone on the same local network, with neither kept separate on a guest network. AirPrint uses a network connection; pairing the printer to your phone over Bluetooth won't set it up.
Apple's AirPrint procedure explains the connection you need. Check that your printer model supports AirPrint. Having Wi-Fi alone doesn't mean it'll appear in the printer list.
Open the original picture in Photos. If you only have a screenshot of it inside a message, try to get the original file. The screenshot can lose detail and include parts of the screen you don't want in the print.
For future shots, the iPhone photo-taking guide covers focus and exposure. Those affect the picture you send to the printer; extra print copies won't correct a blurred original.
Send one photo from the Photos app
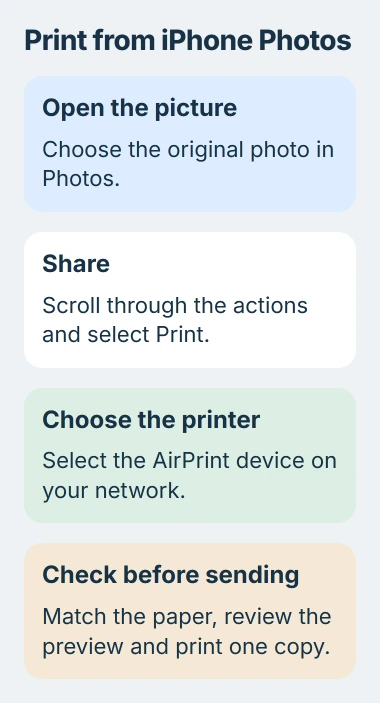
Open the picture so it fills the Photos viewer, then tap Share. Scroll through the sharing actions and choose Print. If it isn't immediately visible, look farther through the action list.
On the print screen, tap No Printer Selected or the button that opens your printer list. Choose your AirPrint printer and check its name if several home or office models appear.
Check the preview and select one copy for your first print. Your printer may also offer paper size, color and layout options. The choices vary by model.
Load the matching paper before sending the job. Choosing a size in the phone's print screen doesn't put that paper in the printer, and the wrong tray or size can produce an unexpected result.
Tap Print and let the page finish. If the printer's photo-paper instructions give a drying or handling time, follow it before stacking the prints or touching their surface.
I'd try one photo from the set first. You'll see how the crop, paper and color look before printing a whole album.
Check the preview for a cropped face or missing edge
Compare the print preview with the photo in Photos. Look especially at faces near the edge, text inside the picture and anything you need to keep at the top or bottom.
A photo and a sheet of paper can have different shapes. Filling the sheet can cut off edges; fitting the whole picture can leave white space. Check the layout choices to see which result you'll get.

If the preview cuts off something important, try another available paper or layout option. If the print screen lacks the control you need, check the printer maker's supported app or manual.
Keep your original and try another crop on a separate copy. A tight crop can remove parts of the picture you'll need later for a differently shaped print.
If the preview looks right but the print cuts off more, check the printer's own paper and borderless settings. This helps you tell whether the crop changed before or after the job reached the printer.
Print several selected pictures after the test works
Return to the Photos library or open the collection holding the pictures. Tap Select, choose the photos, then open Share > Print. The photo-printing instructions cover this multiple-selection route.
Check the pictures you've selected before confirming. When their small previews look alike, it's easy to include a duplicate or a photo you didn't mean to print.
Check how the copy count and layout apply to your selection. Several photos and several copies of one photo are different jobs. Use the preview to check the result, as well as the number beside Copies.
Print small batches while you learn the options. Send photos separately if they need different crops or paper sizes, so each gets the settings you've chosen for it.
Check or cancel a job in Print Center
Open your iPhone's App Switcher while printing and select Print Center. On a Face ID model, swipe upward from its bottom edge and pause. On a Home-button model, double-click Home.
Select the job to check it, or choose Cancel Printing to stop it while it's waiting. The iPhone printing guide explains how to manage those jobs.
Check the queue before repeatedly tapping Print after a delay. Otherwise, the printer can receive several copies of the same job once it becomes ready.
If the printer has started feeding a sheet, follow its manual to stop it using the printer's controls. Canceling a job on your phone doesn't handle paper already inside the printer.
When the printer is missing or the print looks wrong
For an empty printer list, follow the iPhone printer-discovery checks. Confirm the network and AirPrint support before downloading another app or changing the photo file.
For streaks, missing colors or a blank sheet, follow the printer's maintenance instructions. Run its own print-quality check to see whether the same problem appears without your iPhone photo.
If that check looks normal, compare the image preview, paper selection and another photo. Give the printer maker those results, its model name and which app sent the job.
If you don't have a suitable printer, ask a photo shop how to send your original files and which print sizes it offers. Ask to preview the crop and start with a small order if the edges or color matter.
The Short Version
Use Photos, Share and Print with a compatible networked AirPrint printer. Match the paper, inspect the preview and make one test print. Select more pictures only after that result is right, and use Print Center to manage queued jobs.
Checked November 5, 2026.

Isaac Smith is the founder and editor of PC Glance, a website that covers computers, laptops, and technology. He is a tech enthusiast and a computer geek who loves to share his insights and help his readers make smart choices when buying tech gadgets or laptops. He is always curious and updated about the latest tech trends.