System Restore blocks a restore point when it detects file system corruption on the Windows drive. Repair the named drive with CHKDSK, then use SFC if the warning stays. A scan that reports errors without fixing them won't clear the damage.
Damage to the drive's file system and damaged Windows files can both block the restore. They need different repairs, so keep each scan's result. Check what it reports before choosing to repeat a scan.
In this guide
1. Repair the drive named in the warning
Copy your important documents and photos to separate storage before starting repairs. If the disk keeps disconnecting, clicks, or makes files unreadable, get help recovering the data before asking it to do more work.
Open Start, type cmd, right-click Command Prompt, then select Run as administrator. Approve the permission prompt. Even with an administrator account, you still need Run as administrator for these commands.
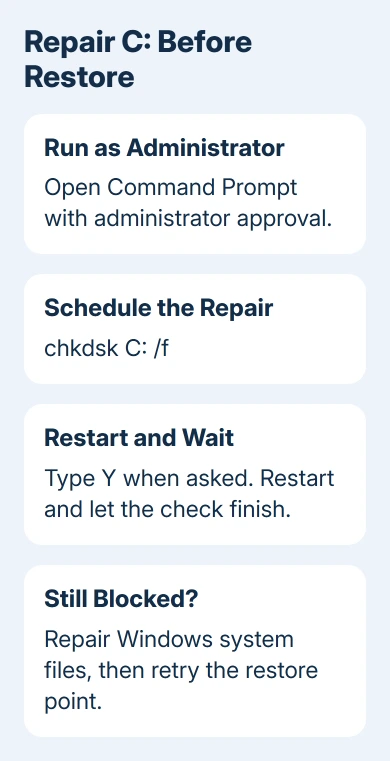
For a warning that names OS (C:), enter:
chkdsk C: /fAdding /f tells CHKDSK to fix file system errors. These are problems in the records Windows uses to organize files. Running chkdsk C: without that switch checks the drive but doesn't repair it.
The C: drive normally can't be locked while Windows is running. When CHKDSK offers a check during the next Windows startup, type Y, then press Enter. Save open files, then select Restart in the power menu.
Let the scheduled disk check finish. Plug in the laptop charger throughout the check. You need that restart to run the repair. Scheduling the check and reopening System Restore won't change the drive.
The CHKDSK command reference explains that /f repairs errors, while /r adds a search for bad sectors and recovery of readable information. Don't add /r just to repeat a completed check.
After Windows loads, try the same restore point. If the disk warning has cleared, follow the restore wizard. If the message stays, continue with the Windows-file repair rather than assuming the disk check failed.
2. Repair Windows files when the disk check isn't enough
Two replies on Microsoft's forum say SFC /SCANNOW fixed this specific System Restore problem. Another owner completed SFC but still had files it couldn't repair, so the final scan message matters.
SFC, short for System File Checker, repairs protected Windows files. It serves a different purpose from CHKDSK: a healthy drive can still contain damaged copies of files Windows needs.
For Windows 10 and 11, use an administrator Command Prompt and run this command first:
DISM.exe /Online /Cleanup-Image /RestoreHealthDISM repairs the Windows components that SFC uses for repairs. Wait for its completion message, then run:
sfc /scannowLet SFC finish scanning. If it reports successful repairs, restart the PC and try System Restore again. If it reports no damaged files, keep that result and move to the disk-check result in the next section.
The reports date from the Windows 7 era, including a confirmed repair on Windows 7 64-bit. For Windows 7 or Vista, enter sfc /scannow in the administrator Command Prompt. The modern DISM sequence doesn't apply to those releases.
I'd keep the SFC result beside the original error. A message saying it couldn't repair some files needs different follow-up advice from a message saying it repaired them successfully.
For Windows 10 and 11, the System File Checker repair sequence gives the current DISM-then-SFC order. If DISM itself fails, record its error code rather than skipping past it and declaring Windows repaired.
3. Check whether the scheduled repair actually ran
A disk check that never starts is a separate problem. An owner describing this failure said Windows counted down to a scheduled check, then loaded normally without checking the disk. That doesn't mean the disk passed a check.
Use the saved CHKDSK report in Event Viewer to see what happened. Startup checks use Wininit; checks inside Windows use Chkdsk. The report records the work the check completed.
Match the log entry to that restart. Read its report to see whether the check finished, repaired anything, or couldn't complete. An older entry from a different day doesn't describe the repair you just scheduled.
If no matching report appears, tell the technician you couldn't find a report for that restart. Ask them to verify whether the check ran. An absent log isn't a clean result; don't disable disk checking just to remove its countdown.
When the report mentions bad sectors or the same corruption returns after repairs, ask the computer or drive manufacturer to check the drive's hardware. Repeated repairs shouldn't become the way you start the PC every day.
4. Follow the error that remains after repairs
Once the corruption warning clears, a different System Restore error needs its own repair. Copy the complete new message and error code. Changing restore points before repairing C: won't address a warning about C:'s file system.
If the wizard now says there are no restore points, check whether System Protection was enabled. Turning it on now creates protection for future changes; it doesn't bring back a restore point that never existed.
If Windows stops starting instead, follow the recovery error shown by Automatic Repair. That situation needs the recovery error and startup log, rather than another attempt through the desktop restore wizard.
Still blocked after completed CHKDSK and SFC repairs? Give Microsoft Support or a technician the exact warning, Windows version and both repair reports. Ask them to assess the storage and whether Windows needs installation repair.
The Short Version
Schedule chkdsk C: /f from an administrator Command Prompt and let the startup check finish. If corruption still blocks System Restore, run SFC, using DISM first for Windows 10 or 11. Keep both repair results for support.
Checked November 17, 2026.