
To turn off an ad blocker on Chrome, open Extensions > Manage extensions and switch off the blocker you've installed. If Chrome itself reports blocked intrusive ads, change that site's Intrusive ads permission instead.
These are separate controls. Allowing ads in Chrome won't turn off an extension such as AdBlock, and disabling an extension won't change Chrome's own site permission.
Turn off an installed blocker on your computer
Open Chrome on Windows, Mac or a Chromebook. Select the three-dot menu, choose Extensions, then Manage extensions. You can also type chrome://extensions into Chrome's address bar.
Find the blocker by name. Use the switch on its card to turn it off. Leave Remove alone if you only want to pause it; switching it off keeps the extension installed so you can enable it again later.
When replacing an unsupported blocker, install a current Chrome ad extension and compare the same webpage after reloading.
Google lists this switch in its extension management instructions. Check the extension's name rather than turning off every item on that page.
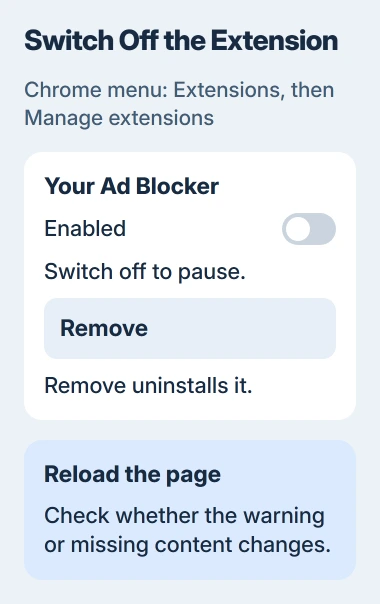
Return to the website and reload the tab. An open page can keep showing the old warning or missing content until you reload it, so check the same page again after it refreshes.
If the warning disappears or the missing player loads, that blocker was affecting the page. Use its own site-exception controls if you want it enabled elsewhere, or leave it off until you've finished the task.
If nothing changes, turn the extension back on before checking another blocker. Trying one at a time helps you find which one affects the page without leaving unrelated extensions disabled.
Allow Chrome's blocked ads for one website
Use this route when Chrome shows Intrusive ads blocked, or when you want to change its built-in ads permission. Chrome uses this setting to block ads on sites with poor ad experiences; it doesn't block every ad.
Open the website you trust. Select the site-information control beside the website address, then choose Site settings. Find Intrusive ads in the permissions and change it to Allow.
Switch back to the website and reload it. You've changed the permission for that site; the default for other websites stays the same.
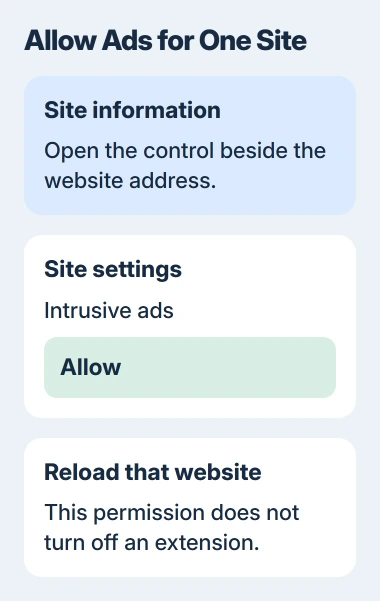
Google's ad permission guide gives this single-site route as well as the browser-wide setting. I'd use the single-site choice when just one page needs it.
Check the address before allowing ads. If payment, video or account access opens a different website address in a new tab, that site may need its own exception.
If you can't find the permission, check that you're in the website's settings in desktop Chrome. Android uses a different screen; follow the phone or tablet section for that device.
Allow intrusive ads across desktop Chrome
For a browser-wide change, open Settings > Privacy and security > Site settings. In the Content section, expand Additional content settings, then open Intrusive ads.
Under Default behavior, select Any site you visit can show any ad to you. Reload the website after changing this option so Chrome can use the new permission.
This allows ads that Chrome would otherwise block on sites with poor ad experiences. Any installed ad blocker keeps its own rules, and security apps outside Chrome keep their own settings.
Check any saved website exceptions on the same settings page too. One site can have a different permission from the default, so two sites may behave differently.
If you changed the default for a quick check, return here afterward and choose the blocking option you want. You can allow the site you need without permanently allowing ads everywhere.
These controls work without a browser reset or clearing your browsing data. Both would change more than this one ads setting.
Use the Android setting on a phone or tablet
In Chrome for Android, tap the three-dot menu and open Settings > Site settings. Under Content, tap Intrusive ads, then turn Intrusive ads on to allow them.
Refresh the website after changing this setting. Read the description beside the switch: turning this setting on allows intrusive ads. It doesn't turn on a separate ad blocker.
For this Android setting, use Site settings rather than the desktop extensions page. If a separate filtering app or VPN blocks the page, use that app's controls and help instructions.
On an iPhone, don't look for the Android menu just because both apps are named Chrome. An iPhone pop-up problem also needs its separate pop-up permission checks.
Match the steps to your device and the problem you see. Desktop extensions, Android's ads permission and an iPhone's pop-up switch control different things.
When a page still says an ad blocker is on
Check for another installed blocker in Manage extensions. A privacy extension can also filter page content, even if its name doesn't contain the words ad blocker. Read its description before changing it.
Unpinning an extension hides its toolbar icon; it stays turned on. If you only hid the icon, return to Manage extensions and check its switch.
If Chrome won't open a new window, check pop-up blocking rather than ads removed inside a page. On a Mac, use the single-site pop-up instructions for that problem.
If the site still refuses access after you've turned off the relevant controls, send its support team the exact warning and your browser version. Say which extension or permission you changed and whether reloading helped.
If your company manages Chrome and a switch is locked, ask the administrator. For an extension's site exceptions, follow its developer's instructions; Chrome doesn't have one pause button that works for every blocker.
The Short Version
Disable the installed blocker in Manage extensions, or allow Intrusive ads for the site. Reload to test the change. Prefer an exception for a single website, then restore the blocking you want afterward.
Checked November 5, 2026.

Isaac Smith is the founder and editor of PC Glance, a website that covers computers, laptops, and technology. He is a tech enthusiast and a computer geek who loves to share his insights and help his readers make smart choices when buying tech gadgets or laptops. He is always curious and updated about the latest tech trends.