
Your Mac looks sharp on its own screen, but text on the external monitor looks soft, smeared or shadowed. Windows on the same monitor looks fine, which makes it more maddening. It is not your eyes.
I would change the cable before any setting. Cheap fixes come first.
Two owners solved it by swapping HDMI for DisplayPort, a cable that costs far less than a new monitor. After that come the resolution list in System Settings and two display switches to test one at a time.
Asked on Ask Different in June 2022, the question has 109,544 views and seven answers. Answers kept arriving until December 2024, from owners on newer Macs running macOS Sequoia.
What the blur looked like
The asker had moved an M1 Mac mini from a 28 inch 4K monitor to a new one. The monitor was the only change.
The new one was a 31.5 inch 1440p gaming screen, picked for a Windows PC that they also used for games. At 1440p, "the fonts look so atrociously blurry that it gives me a headache within minutes".
The scaled 1080p mode looked a little better but still wrong to them, with text that still felt soft. In their words, "text seems to have a shadow instead of it looking blurry".
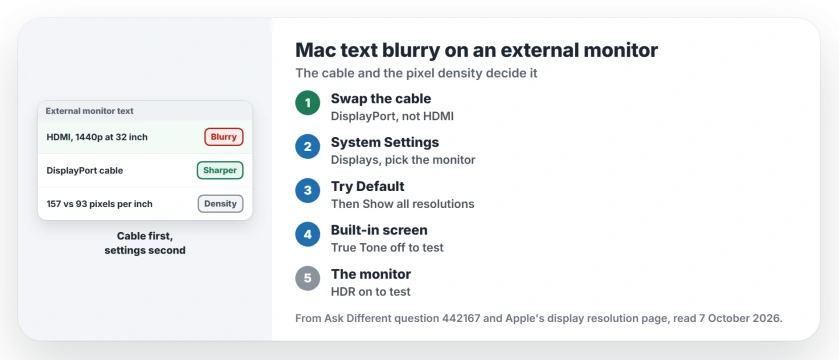
Status: checked 7 October 2026. Text on an external monitor can look blurry on a Mac over HDMI or at low pixel density. DisplayPort and a scaled resolution fixed it for owners.
Part of the problem you see may be the monitor itself. An answer on the thread worked out that the old 4K screen packed 157 pixels per inch and the new one only 93, "so slightly blurry text may be inevitable".
1. Swap HDMI for DisplayPort
One owner on a 2024 Mac mini with macOS Sequoia: "Connecting via DisplayPort instead of HDMI fixed this for me". It cost them an adapter. They used a small Thunderbolt to Mini DisplayPort adapter to keep their old monitor cable.
A reader with a full 4K HDR setup over HDMI saw the same thing until they moved to DisplayPort. "Even if HDMI should work, try DisplayPort to see if it helps". The cable mattered.
Ours: a USB-C to DisplayPort cable works on any Mac with Thunderbolt or USB-C ports. Plug it into your monitor's DisplayPort input, then pick that input in the monitor's own menu.
2. Pick the right resolution
Open System Settings, then Displays, and select the external monitor from the displays shown. Apple's display resolution page explains the choices.
Apple says "your Mac automatically uses the best resolution for the display", so try Default first. Default is the safe start.
For more options, turn on Show all resolutions, which Apple describes as a way to see additional resolutions for the display.
Look for scaled options and try a few, judging the same text in an app you use daily.
I would start with the scaled mode closest to how your old monitor looked. Then live with it a day. Apple also warns that scaled modes can slow your Mac a little.
On a 1440p monitor, owners wanted HiDPI modes that macOS does not offer there for that panel size. Several owners used third-party display tools to add those missing modes, some free and some paid.
Ours: we have not tested those, so read their reviews before you install one on a Mac you rely on.
3. Check True Tone and HDR
Both are quick to test. One owner on an M1 MacBook Air fixed a Samsung monitor by turning on High Dynamic Range for it in Displays. A reader followed that thread and found a different culprit on their own setup.
They turned off True Tone on the laptop's own screen, "which was also affecting external display and making things look blurry". Try each switch on its own, and compare the same text in the same app before and after. Leave on what helps.
What did little for owners
The asker's own answer re-enabled font smoothing with a Terminal command. One reader said it "absolutely worked".
Another was not convinced it does anything, and a later owner said it barely helped. Skip it at first. I would leave it until your cable and resolution are sorted.
No picture on the monitor? Then you have another problem entirely, and our external monitor not detected page covers it. Using two monitors in a chain? Our daisy chain page shows which setups work.
Is it my Mac or the monitor?
Often it is the monitor rather than your Mac. Sometimes it is both. Ours: a large screen with few pixels per inch shows text less crisply on macOS than on Windows, which sharpens text differently. So if you are shopping, a 27 inch 4K panel suits a Mac better than a 32 inch 1440p one. Pixel density decides it.
The Short Version
- Blurry text on an external monitor is often an HDMI or pixel density issue.
- Try DisplayPort first, since two owners cured it that way.
- In Displays, use Default, or turn on Show all resolutions for scaled modes.
- Check True Tone on the built-in screen and HDR on the monitor, one at a time.
- Font smoothing helped few owners.
- Low pixel density can leave some softness whatever you change.
Where to Next
Swap to a DisplayPort cable or adapter if your monitor has the input, then judge the text before touching any setting.
What fixed your monitor, and what size and resolution is it? Share it in the comments, since it helps the next owner choose.

Isaac Smith is the founder and editor of PC Glance, a website that covers computers, laptops, and technology. He is a tech enthusiast and a computer geek who loves to share his insights and help his readers make smart choices when buying tech gadgets or laptops. He is always curious and updated about the latest tech trends.