Printer fuser issues can stop printing with an error, leave loose toner, or jam paper near the fuser. Follow the model's restart instructions for an error; for toner that rubs off, first match the paper and selected paper type.
A printer missing from Windows calls for software checks; damaged prints call for a look at the printer itself. Start with what the printer itself shows or prints, so you don't buy a replacement part for a software problem.
In this guide
1. Match the symptom to the printer's own output
Read the full message on the printer, including every digit after the error number. Write down the model from its label too. Fuser codes and restart steps differ between models, even within the same brand.
Inside a laser printer, the fuser bonds powdered toner onto the sheet using heat and pressure. An inkjet doesn't have a fuser, so wet or smeared ink on an inkjet needs a different repair.
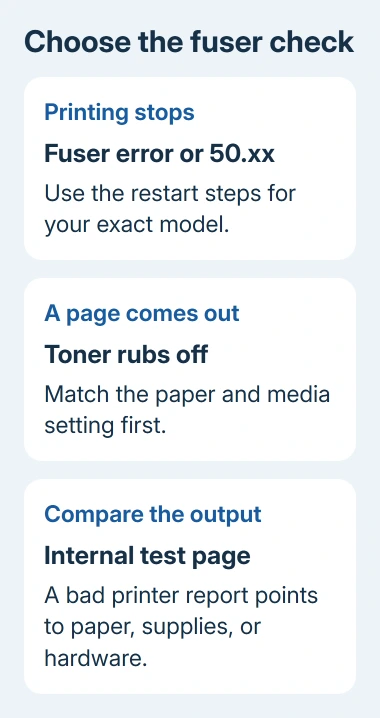
If the printer can still print, use its own control panel to print an internal report or test page. Look in the model's manual for that command rather than sending another document from the computer.
If that page has defects too, check the paper, supplies, or printer hardware. If it's clean but the computer's print isn't, check that job's settings or software. Save both sheets and compare their marks side by side.
For a Windows message without a printer-side fuser warning, the configuration error checks walk through app and driver problems. Reinstalling a driver won't repair a heater that the printer itself reports as faulty.
2. Restart a stopped printer using its model's timing
For a LaserJet Pro 200 color M251 displaying 50.x Fuser Error, turn the power off for at least 30 seconds, then switch it on and allow startup to finish. Its manual also calls for at least 25 minutes with the power off before retrying.
That model's instructions also say to disconnect any surge protector and plug directly into a wall socket. Use a suitable outlet and the correct power cord. Another LaserJet may need a different wait, so check its manual first.
Watch the printer's screen after startup. If it shows that it's ready, the warning has cleared for now. Print one small job and see whether the same code returns during warm-up or printing.
The Brother HL-2130 family uses a different sequence for FUSER ERROR: switch off, wait a few seconds, switch on, then leave the printer powered on for 15 minutes. That last wait is with the power on, not disconnected.
On supported Brother models showing Self-Diagnostic, restart and leave the printer idle with the power on for 15 minutes. Follow your exact model's help page if its timing differs.
Don't repeat the off-and-on cycle if the same fault returns. I'd record the repeat code after one proper restart; that gives a technician something more useful than a stack of failed print jobs.
3. Correct the paper type when toner rubs off
Load fresh, dry paper approved for your laser printer. Set specialty sheets aside for this test. Inkjet-only paper, an unsuitable coating, or the wrong paper weight can make a print-quality problem harder to judge.
If your tray has a paper-type setting, match it to the sheets you've loaded. Check the computer's print job too: just because thicker paper fits in the tray doesn't mean Plain Paper is the right setting.
On Windows 11, choose your printer in Settings > Bluetooth & devices > Printers & scanners, then open Printing preferences.
Windows 10 places it in Settings > Devices > Printers & scanners. Select the printer and choose Manage > Printing preferences.
The driver determines the remaining labels. Look for Paper/Quality, Paper Type, or Media Type, then choose the option matching the paper. Check the app's print settings too if it offers a separate media choice.
Microsoft's print-quality checks explain the internal-page comparison and matching paper settings. Try one page after changing them, rather than using a long document as the test.
If the toner now stays attached, keep those settings for that paper. If it still rubs away on supported plain paper, continue with the model's print-quality maintenance rather than selecting increasingly heavy media settings at random.
4. Use the prescribed cleaning procedure for marks
Specks, smears, streaks, and repeated marks don't always mean the fuser has failed. Supplies and other parts of the paper path can also affect the page. Compare your print with the defect examples for the exact printer model.
On a LaserJet Pro M304-M305 or M404-M405, press OK, then use the panel controls to open Setup > Printer Maintenance > Print Quality Tools > Cleaning Page. Load plain Letter or A4 paper when prompted and press OK.
Wait until the Cleaning message clears and discard the cleaning sheet. Compare a fresh print with your saved sample. Other models can put cleaning elsewhere; use their own manual rather than expecting this exact menu.
Don't touch the fuser rollers or put liquid inside the printer. The assembly gets hot. Use the cleaning-page procedure rather than trying to wipe the rollers yourself.
For ordinary document setup after the hardware prints cleanly, the Windows printing steps cover selecting the printer, preview, and page range.
5. Clear a paper jam using the named access area
A jam message means paper is stuck in the feed path, rather than a fault with temperature control. Check which area the panel names and open your model's jam-clearing instructions before pulling the sheet.
For the M304-M305 and M404-M405 family, the steps for a jam near the toner cartridge or fuser start at the front door and cartridge access. If no paper is inside the cartridge door, check the rear-door area too.
Follow the pictured jam-clearing sequence, then close the access doors and retry. Don't reach toward hot rollers or dismantle the fuser. Repeated jams in that area need service even when each sheet can be removed.
6. Arrange service when the warning or damage remains
If 50.x Fuser Error remains after the power checks, HP's M251 manual says to contact support. Ask for a fuser diagnosis rather than ordering a part from the code alone. The repair may require a replacement assembly.
Give the printer maker or repair shop the full model and regional voltage so they can confirm the right fuser part. Ask whether your model lets you replace it yourself or needs a technician.
Send the full error and the internal test sheet if you have one. Tell them whether the fault returns before a page prints. For a quality complaint, describe whether toner rubs off, repeats, or smears and which paper type you tested.
The Short Version
Use the error message and the printer's test page to decide what to check. Follow the exact restart timing for a stopped printer. Match paper and media settings for loose toner, then use model-specific maintenance or arrange a fuser repair.
Checked November 12, 2026.