Open the network adapter's connection properties to disable IPv6 in Windows 11, or use PowerShell. The change affects that connection. Leave IPv6 enabled for normal use unless a specific troubleshooting step calls for a change.
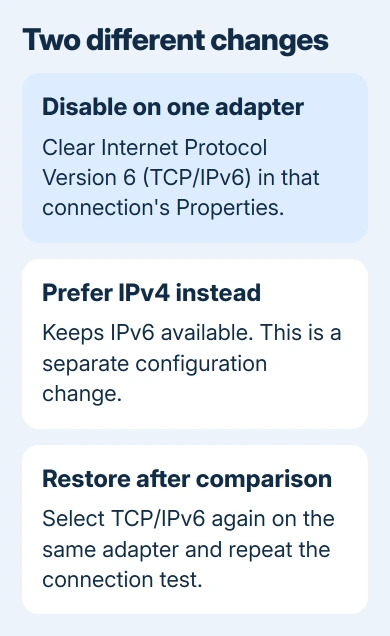
Microsoft recommends keeping IPv6 enabled because Windows components can depend on it. Preferring IPv4 is a separate change. Decide which change you need before clearing the checkbox.
In this guide
1. Choose the connection and a useful comparison
Check Settings > Network & internet to see whether you're using Wi-Fi or Ethernet. A computer can have both, plus virtual adapters installed by a VPN or other software. Change only the connection you're testing.
Write down the exact problem before changing anything. For example, note the website that won't open or the app that can't connect. Open it once with the current settings so you have a result to compare after the change.
On a work-managed PC, ask IT before changing network bindings. Turning off IPv6 on an adapter can leave Windows in an unsupported configuration, and a corporate VPN or service may rely on it. This isn't a routine speed tweak.
If a website alone is slow while downloads run normally, the slow website checks help separate address lookup delays from connection speed. A vague feeling that browsing is slow isn't a useful reason to disable a protocol.
2. Open the adapter's connection properties
Keep a local way to control the PC during the change. The selected network connection can briefly drop, which matters if you were planning to adjust it through a remote session.
Press Windows + R, enter ncpa.cpl, and press Enter. This opens the classic Network Connections window directly, without depending on which Windows 11 Settings layout your version uses.
Find the active Wi-Fi or Ethernet connection. Right-click it and choose Properties. If an administrator prompt appears, approve it. Opening Status or the adapter's hardware settings won't show the same protocol checkbox list.
In the list of connection items, find Internet Protocol Version 6 (TCP/IPv6). Note whether its checkbox is currently selected. If it's already clear, IPv6 is already turned off for this adapter, so leave that setting as it is.
Leave Internet Protocol Version 4 (TCP/IPv4) selected. That's the other protocol the connection needs for ordinary IPv4 access. Changing both at once would make it hard to learn anything useful from the comparison.
For a renamed connection, use its actual name instead of assuming Wi-Fi means the wireless card you use. A VPN's virtual connection can look like another network adapter in this window.
3. Clear IPv6 for that adapter and test once
Clear Internet Protocol Version 6 (TCP/IPv6) and click OK. Close the properties window and allow the network connection to settle, then repeat the exact app or website action that failed before.
This stops that adapter from using IPv6. It doesn't remove IPv6 from Windows, turn off every tunnel, or make every IPv6 address disappear. The loopback address ::1, which refers to the local computer, can remain.
If the original action still fails, restore the checkbox using section 5. Leaving IPv6 disabled won't help if the same problem remains.
If the action works only with IPv6 unchecked, note that precise comparison. It points support toward the IPv6 path, router configuration, VPN or service involved. That comparison alone won't identify which part needs repair.
I'd report both results to the provider or network administrator rather than keep the setting changed indefinitely. A repeatable success or failure gives them a specific action to check.
4. Use PowerShell when you need an exact adapter name
Open Windows Terminal (Admin) from the Start button's right-click menu and use a PowerShell tab. First list the adapters' IPv6 settings so you can see their names and whether IPv6 is enabled:
Get-NetAdapterBinding -Name '*' -ComponentID ms_tcpip6
Read the Name and Enabled columns. Replace the example name in the next command with the exact connection you identified. Keep the quotes if the name contains spaces.
Disable-NetAdapterBinding -Name 'Wi-Fi' -ComponentID ms_tcpip6
The command turns off IPv6 for that adapter. Run the listing command again and check that its Enabled value is now False, then repeat the original connection test. Don't use a wildcard in the disabling command.
The Disable-NetAdapterBinding reference explains the named-adapter operation. If the command returns access denied, the change needs administrator permission; a different spelling won't solve that.
This is an alternative to the checkbox procedure, not an extra fix to perform afterward. If you've already cleared the same adapter's checkbox, its binding should already be disabled.
5. Restore IPv6 and check the connection again
Return to Windows + R > ncpa.cpl, right-click the same adapter, and choose Properties. Select Internet Protocol Version 6 (TCP/IPv6) again, then click OK.
If you used PowerShell, turn IPv6 back on for the same adapter with:
Enable-NetAdapterBinding -Name 'Wi-Fi' -ComponentID ms_tcpip6
Run the binding-list command again and check for Enabled: True in that adapter's row. Retest the app or site after the connection returns. Restoring the checkbox is the important result, not whether the PC can ping its own loopback address.
If the computer has both Ethernet and Wi-Fi, verify which connection the app uses during each test. The Windows connection-priority guide explains why a connected cable doesn't necessarily carry the app's traffic.
6. Is preferring IPv4 the actual requirement?
Preferring IPv4 keeps IPv6 available but tells Windows to favor IPv4 addresses. Microsoft's IPv6 configuration guidance recommends that approach instead of disabling IPv6 when a preference change is needed.
The DisabledComponents value 0x20 sets that preference for IPv4. That preference value differs from disabling IPv6 components or clearing a single adapter's checkbox.
Don't paste a registry command from an unrelated repair into this adapter comparison. If IT asks for a preference change, use its approved instructions and record any existing value so the earlier configuration can be restored.
For an IPv6-only failure at home, give the router's support team or your internet provider both test results. Name the affected site or app so support can repeat the failing action.
The Short Version
Open ncpa.cpl, select the correct adapter's Properties, and clear TCP/IPv6 to test the problem. Restore it afterward. PowerShell can make the same named-adapter change; preferring IPv4 is a separate setting that keeps IPv6 available.
Checked November 13, 2026.