Yes, Microsoft Word documents can be transferred to an iPad. Saving them to OneDrive and opening the same account in the Word app is the simplest way to continue editing one document across both devices.
To send a single copy, use email or AirDrop from a Mac. Cable transfers need a compatible file-sharing app. A subscription prompt is about editing access, so it doesn't mean the file failed to arrive.
In this guide
Use OneDrive for a document you'll keep editing
On the computer holding the document, open it in Word and select File > Save As. Choose your OneDrive account and a folder. Keep the file in .docx format unless the task requires another format.
If Word isn't installed on that computer, upload the file through the OneDrive website instead. Sign in, open the destination folder, select Upload and choose the file. Once uploading finishes, check the iPad.
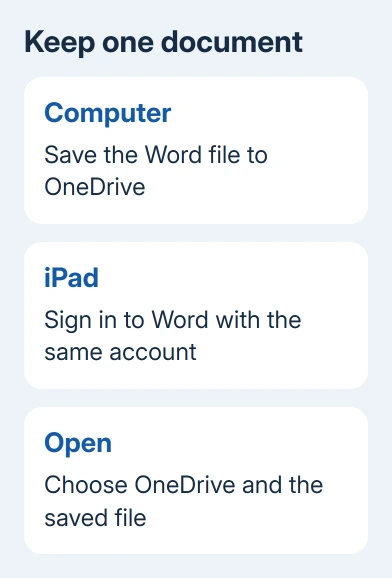
Install Microsoft Word from the iPad's App Store if needed, then sign in with the same Microsoft account. In Word, open the location list, choose OneDrive, find the folder and tap the document's name.
If a document is already open, use Word's Open control to reach the location list. Microsoft explains in its file-sync instructions that you choose the storage service, then find and open your file.
Check the account if the folder is empty. A file saved to a personal OneDrive won't appear inside a work or school OneDrive just because both accounts are signed in on the iPad. Choose the account that actually holds the document.
This route is useful because both devices open the online file. After editing, let saving finish before switching devices. A separately emailed attachment won't automatically replace this OneDrive version when you edit it.
Send a single copy by email or AirDrop
For one document, email the file from your computer. Open the message on the iPad and download its attachment. Use the share control to open it in Word, or save it in Files to choose its storage location.
An attachment is a separate copy. Editing it doesn't change the sender's original document. Name the revised attachment clearly before sending it back, particularly when several people are exchanging revisions by email.
From a nearby Mac, AirDrop is another way to send a Word document without uploading it to cloud storage. Select the file in Finder, choose Share > AirDrop, then select the iPad. Accept the transfer on the iPad when prompted.
AirDrop moves a copy too. Open the received document in Word, and check where it was saved before starting a long edit. If you only see a preview, use the share or open control to pick Word as the app to open it.
For an important original, I'd make a separate Word copy before moving it between apps. It gives you something to return to if the receiving app changes the formatting or saves a different file type.
Transfer through a Mac with Finder
On macOS Catalina or later, attach the iPad using a suitable USB cable. Unlock the iPad and approve the trust request if shown. Open Finder and choose the iPad from its sidebar.
Select the Files tab. It lists iPad apps that support File Sharing. Expand an app to see its documents, then drag your Word file onto the compatible app. Open that app on the iPad to find the transferred file.
The Finder procedure requires a compatible receiving app. Choose Word if it's listed. Otherwise, use OneDrive or another supported route. An unrelated app won't necessarily open a Word file.
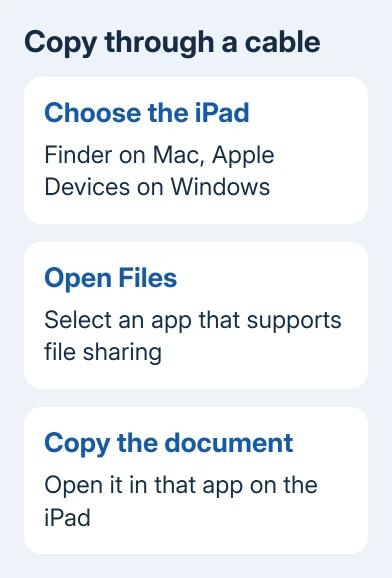
On macOS Mojave or earlier, file sharing uses iTunes instead of Finder. Select the device, open File Sharing, choose the receiving app and add the document. The file is stored inside the app you selected, just as it is with Finder.
Copy important documents back to the computer before deleting their receiving app. Removing an app can remove the documents kept inside it. A cable transfer alone isn't a second backup once the computer's original has been deleted.
Copy from Windows with Apple Devices
On a current supported Windows setup, open Apple Devices and connect the iPad. Select the iPad, then select Files. Choose a compatible app from the list before adding the Word document.
Select Add File, choose the document on the PC, then select Add. The document is copied to the chosen app. You don't need to sync it separately as you would with music.
The Windows file-sharing steps explain that Files is missing when the device has no file-sharing apps. If Files is missing for that reason, install a compatible app or use OneDrive; replacing the cable won't add an app.
Check the document inside the selected iPad app. Eject the device before disconnecting. If Apple Devices never lists the iPad, check its connection and trust request first; the transfer controls need the device to appear.
Check editing access and layout after the transfer
After opening the file, check a page with tables, images or unusual formatting. The iPad app doesn't include every desktop Word feature. Check that your important content is still there before replacing the original.
Viewing and editing have different account and licensing requirements. A larger iPad or a premium feature may need a Microsoft 365 plan that covers editing. Check the mobile plan requirements against the actual device and account.
A visible document followed by a subscription prompt means the file arrived. Sign in under the licensed account, or ask its administrator about access. Sending the file repeatedly won't change the license.
Before paying for editing, check Word's iPad requirements, including the screen-size limit, iPad Pro, and the account carrying your subscription.
To put Word on the source computer as well, follow the Word installation guide. For a file that still won't open on the iPad, give Microsoft support its extension, the exact error and the Word app version.
The Short Version
Use OneDrive for continued work on one document; email and AirDrop send copies. Finder and Apple Devices copy files into compatible iPad apps by cable. Check layout and editing access before relying on the transferred file.
Checked November 15, 2026.
 If you have any business, I can build it online