Choosing a new border color in Word doesn't recolor an existing edge until you apply that choice in Preview. Select the color, then switch the existing edge off, then on, using the preview diagram before confirming with OK.
For a heading style, do this inside the style's Borders dialog. Changing the selected paragraph alone won't necessarily update the other headings using that style.
In this guide
1. Apply the chosen color to the existing edge
Click inside the heading with the stubborn border. In Windows desktop Word, open Home > Borders > Borders and Shading. Use the Borders tab for a paragraph border, rather than Page Border.
Choose the required Color. In Preview, click the existing edge to remove it, then click that edge again to apply the selected color. The preview should show the new color before you close the dialog.
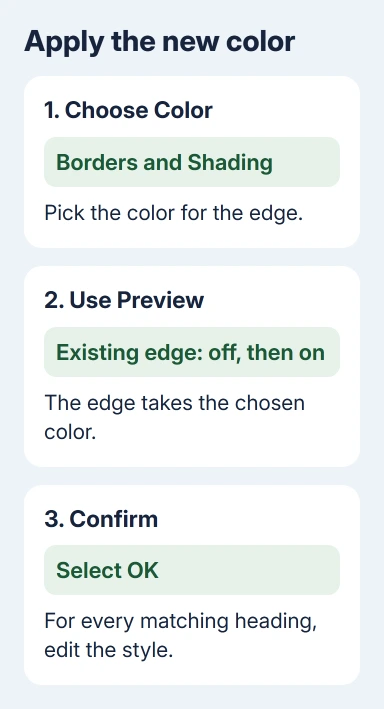
One owner fixed their unchanged border by applying the color in Preview. A later reply makes the missing detail clear: an existing edge may need two clicks, one to switch it off and another to apply the new choice.
The color you choose applies the next time you add or reapply a border. It doesn't immediately recolor every line that's already there. That's why choosing a color and immediately pressing OK can leave the old border unchanged.
Change one edge first if the heading has several. A top edge and bottom edge can use different settings, so applying a color to one doesn't automatically mean that the other should change too.
If the preview changes but only one heading changes in the document, continue with the style itself. If the wrong kind of object changes, first check which border you are editing.
2. Modify the heading style for every matching heading
In Windows Word, open the Home > Styles pane. Find the style used by the heading, right-click it, and select Modify. Choose Format > Border at the bottom of the Modify Style dialog.
In the border controls, select the color, then reapply the intended edge in Preview. Confirm that dialog, then confirm Modify Style. Check a second heading that uses the same style.
If the second heading changes too, the style now includes your border color. Use this method when all chapter headings should share the same border without editing every paragraph separately.
Keep the change in Only in this document if it belongs to the current report. Choose the template option only when you want future documents based on that template to use the new style.
For current Mac Word, open Format > Style, select the heading's style, choose Modify, and open its border settings through Format. Reapply the edge after choosing the color there as well.
Word 2007 also has the Styles controls on Home. The original reports come from that period, but the key step is the same: apply the chosen border settings to the edge before closing the dialog.
If clicking the expected style selects or applies a different one, use the Word Styles pane checks. Confirm the heading's actual style before changing a similarly named entry.
3. Match the border type and Apply to setting
A line under a heading can be a paragraph border, a table-cell border, a text-box edge or a separate drawn shape. Those are different objects with different controls, even when they look alike on the page.
For a paragraph border, click in the heading paragraph and use Borders and Shading > Borders. Check Apply to. Choose Paragraph when the border should follow the paragraph's width rather than wrap only selected words.
Microsoft's text-border steps apply style, color and width through Preview. They also distinguish Text from Paragraph in Apply to.
If clicking the line selects a shape with handles, you're editing a drawing rather than the heading's paragraph border. Use that object's outline controls. A paragraph-style border change won't recolor a separate shape sitting nearby.
If the heading sits in a table and the line belongs to the cell, inspect the table's border controls instead. Changing the heading style won't replace cell-border formatting because that edge belongs to the table.
For a border around the entire page, use the Word page-border controls. Page borders belong to page or section layout, so changing a heading style can't update them.
Once you've identified the right type, reopen its dialog and watch the preview as you apply the new color. A preview that still shows the old edge means the change hasn't reached that edge yet.
4. Check why one heading keeps a different border
When most headings update but one stays different, click inside that heading and check its style. It may use another heading style, or carry border formatting applied directly to that paragraph.
Compare it with a heading that changed correctly. Check the style name and the border's Apply to setting. Two headings can have the same visible font while carrying different paragraph or border settings.
Duplicate your document first, then press Ctrl+Q with the affected heading paragraph selected in Windows Word. This removes direct paragraph formatting and puts back the paragraph settings from its style.
That shortcut can also change paragraph alignment, spacing and indents. Use it only on the affected heading, then inspect those details. Keep the result only if the style supplies the formatting that heading should have.
If the border now follows the style, that heading had its own paragraph formatting. If it doesn't, undo the trial and check again whether the line belongs to a table or shape rather than the paragraph.
I'd repair the exception after confirming that the style works on another heading. Otherwise it's easy to keep modifying the style when the real problem is one paragraph that no longer follows it.
5. Save the document and check the final headings
Save the edited copy and reopen it. Inspect the changed heading and another heading using the same style. The color should remain in both places, with the intended edges still present.
Switch from browser Word to the installed app for the full style and border dialogs. A page border or colored highlight won't replace a heading border just because its controls aren't available in the browser.
If the color still reverts in desktop Word, send your document or template administrator a small sample without private text. Include the Word version, style name, affected border type and whether Preview showed the new color before saving.
Ask them to check the border settings saved in the style and any formatting applied directly to the paragraph. That separates a choice that was never applied from a style or template that is changing it afterward.
The Short Version
Select the color and reapply each affected edge in Preview. Modify the style when all matching headings should change, check Apply to for paragraph versus text borders, and inspect direct formatting when only one heading stays different.
Checked November 17, 2026.