A Class Notebook missing from Add or remove students may belong to Teams or your school's learning platform. Manage students through that class roster. For notebooks created in the Class Notebook Wizard, use the Wizard instead.
An ordinary OneNote notebook saved inside a folder named Class Notebooks isn't converted into a Class Notebook. Check how yours was created before clearing browser data or rebuilding a notebook that already contains lessons.
In this guide
1. Open the roster that created the notebook
Start with the place you normally open the class. A notebook made in a Teams class uses the team's membership. A notebook created through Microsoft 365 LTI, which connects it to your learning platform, uses that platform's course roster.
Microsoft says the student membership steps apply to Wizard-created notebooks. Looking in the wrong management tool won't show the expected roster.
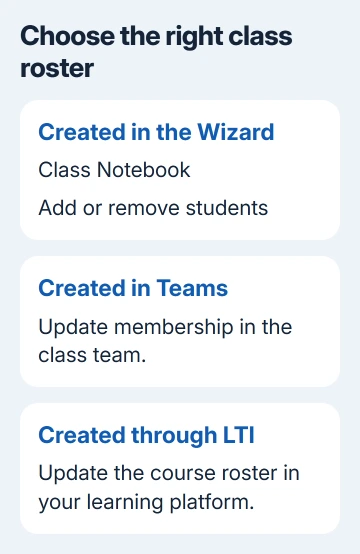
For Teams, add or remove the student in the class team. Then open that team's Class Notebook tab. Don't create a second notebook in the Wizard just because the first notebook isn't offered there.
For an LMS course using Microsoft 365 LTI, update the course roster in that learning platform. The notebook's student membership follows that source, rather than a separate list you maintain in the Wizard.
If the class uses the Wizard rather than either of those systems, continue with the school-account check. I'd settle this distinction first, because it prevents changing the wrong class or creating two competing copies.
2. Use the school's teaching account
Open aka.ms/classnotebook and check the signed-in account. Use the Microsoft 365 account your school gave you, instead of the personal Microsoft sign-in already active in your browser.
Being able to read a notebook in the OneNote app doesn't tell you which account the browser is using. The browser has its own sign-in, and the app may have several accounts added.
If the browser shows the wrong account, use a private window to sign in with your school address. Keep the existing OneNote app open so you can compare the notebook name and class before changing anything.
Choose Class Notebook, then Add or remove students. If the tile isn't visible in Microsoft 365, use the direct Class Notebook address or Apps > All apps.
The list should show the Class Notebooks you manage through that account and tool. If a colleague created the notebook, ask them to check whether you're listed as an educator. Access to its pages doesn't mean you can manage its students.
An access-denied message needs the OneNote permission checks. A blank management list without that message needs the notebook-type check next.
3. Check whether it is really a Class Notebook
A Class Notebook has a Content Library, Collaboration Space and private student areas. An ordinary notebook can hold lessons in a Class Notebooks folder without that classroom structure.
In the original discussion, the owner suspected they'd made ordinary notebooks in the app and saved them in that folder. They thought that might explain the problem, but didn't report fixing it.
The supported way to create the classroom structure is the Class Notebook creation wizard. Moving a standard notebook into a differently named folder isn't that process.
If the existing notebook is ordinary, keep its lesson material in place while you create the intended Class Notebook. Open the Wizard with your school account, choose Create a Class Notebook and give it a recognizable class name.
Work through the educator and student entries, choose the student sections, then review the teacher and student previews before selecting Create. The previews show how the notebook will look to teachers and students before you create it.
Plan how to copy existing lesson content into the new class with your school's OneNote administrator. Don't delete the original notebook during setup: it's still the source of the material you need to keep.
4. Finish student changes in the Wizard
For a genuine Wizard-created Class Notebook, open Add or remove students and select the class. Students need a school Microsoft 365 account before you can add them.
Enter a student's name, school email address or a school group name. Separate multiple students with semicolons, check the list of people who will receive access, then select Update.
The added students receive an email containing their notebook link. Ask them to open that invitation using their school account. A personal account in the browser can make a correct invitation look like an access problem.
To remove someone, select the notebook, clear the checkbox beside that student, then select Next. Review the removal list and choose Update. These controls apply to the Wizard's roster, rather than a Teams or LMS roster.
Leave Delete student's content unchecked when the student's private work needs to remain in the notebook. Removing access and permanently deleting the student's work are separate choices in the removal process.
If the invitation email hasn't arrived, check both the student's roster entry and email delivery. OneNote invitation delivery checks explain that distinction, though Class Notebook membership must still use its proper roster.
5. Refresh a student area that hasn't appeared
If you can open the class but a new student's section is missing, check how long it's been since they were added. Current guidance says the personal section usually appears within five minutes the next time the Class Notebook tab opens.
After 15 minutes, revisit the student-add process. If your school uses School Data Sync to update class rosters, open Teams, enter the class team and select Class Notebook. This starts notebook setup for the changed membership.
That step matters after students or faculty are added or removed through School Data Sync. It doesn't turn an ordinary notebook into a Class Notebook or make a Teams notebook manageable through the Wizard.
Get the school administrator involved
If a genuine Wizard notebook is still missing under the correct teaching account, give school IT its notebook link, the account of the educator who created it and its storage location. Tell them whether colleagues can manage it.
Ask them to check educator access and the class's source roster. Attach an image showing that empty list, hiding any student details. Those details let them check class membership instead of general sync problems.
The Short Version
Manage Teams notebooks in the class team and LTI notebooks through the course roster. For Wizard notebooks, use your school account and Add or remove students. A folder name alone doesn't make an ordinary notebook a Class Notebook.
Checked November 21, 2026.
 If you have any business, I can build it online