Beats headphones that won't charge need a power check first. Connect the right cable to a working power source and check the charging lights. Try another cable or adapter before resetting the headphones.
A dark light, a low battery reading and headphones that won't connect can look similar from the phone. Check the headphones themselves first. A Bluetooth settings change can't repair a damaged charging cable or port.
In this guide
1. Use the charging connection your model needs
Beats Solo 4 and Beats Studio Pro charge through USB-C. Beats Solo3 Wireless uses micro-USB. Identify the headphones before borrowing a cable, since these connectors aren't interchangeable.
Connect the headphones to a power outlet with a compatible adapter and the right cable. Push each connector in securely without forcing it. Check both ends rather than assuming the headphone end is the only loose connection.
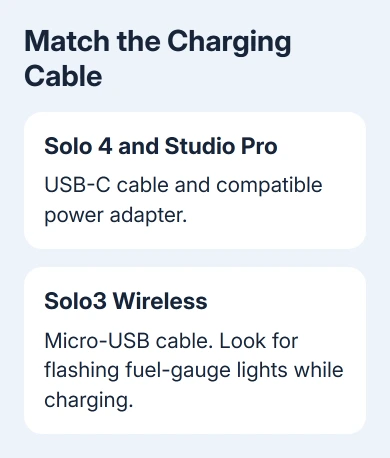
Apple's Beats charging instructions describe a USB-C cable and compatible power adapter for the current over-ear models. Older models need their own charging instructions.
If you normally charge from a laptop, try the wall-powered setup for this comparison. This checks charging independently of the laptop's USB port and whether the laptop is awake.
I'd try a borrowed charging cable before paying for a battery replacement. A cable comparison is quick, and a battery repair won't help if power never reaches the headphones.
If the headphones charge from this setup, return to your usual cable and source one at a time. The part that makes charging stop is the one to replace or check further.
2. Read the charging lights for that model
On Solo 4, the light on the right earcup pulses red during charging. At 95 percent or more, it turns white. A white light therefore doesn't mean the headphones have stopped accepting power unexpectedly.
On Studio Pro, the five fuel-gauge lights on the right earcup flash while charging. A full battery leaves all five lights steadily lit. Those five lights behave differently from Solo 4's single indicator.
On Solo3 Wireless, the fuel-gauge lights flash while charging and all five stay lit when charging finishes. Press and release its power button to check the fuel gauge when needed.
Watch the lights when you connect power. If the lights show charging and the battery level later rises, power is reaching the battery. A phone that still can't connect needs connection checks after charging.
Don't judge a Studio Pro by Solo 4's red-and-white charging behavior. Different models have different status displays, and the reset lights described later aren't the same as their normal charging lights.
If the lights don't show charging, compare the cable and adapter next. If the lights respond but the battery never holds a charge after unplugging, keep that detail for the service request.
3. Compare the cable, adapter and port
Try a second suitable charging cable with the same adapter. If the charging lights now respond normally, stop using the first cable. Look for splits, damaged connector ends or a fit that no longer stays secure.
Next, try a different compatible adapter and working outlet. After each swap, check whether the lights show charging before changing anything else. Replacing everything together leaves you unsure which part failed.
Inspect the headphone port with the power disconnected. A bent connector or charging that depends on holding the cable sideways calls for service.
For wet headphones or a wet charging connection, stop the charging attempt and let the equipment dry before reconnecting. Don't put liquid into the port to clean it or push metal tools inside.
If another cable and power source make no difference, move to the model-specific reset. Note whether the light stays dark or shows charging and then stops. Support will need to know which happens.
4. Reset Solo 4, Studio Pro or an older model
Try a reset after the basic power checks, especially if the headphones respond but don't behave normally. A loose connector or damaged charger still needs repair or replacement.
For Beats Solo 4, hold volume down on the left earcup and power on the right earcup together for 10 seconds. Release them when the light flashes red and white.
For Beats Studio Pro, find the right earcup's system button and hold it for 10 seconds, then release it. Five white lights flash, then one red light flashes. After three cycles, the headphones turn on automatically.
For Solo3 Wireless, use its model-specific support instructions or ask Beats Support for the reset sequence. Its setup page recommends a reset for charging trouble, but the current general reset manual lists newer products.
For Studio3 Wireless, request the Studio3 procedure rather than following Studio Pro's single-button instructions. Similar product names don't make their reset controls interchangeable.
Other Beats models have different controls. Use the exact model's reset instructions, especially for earbuds and charging cases. This guide's headphone button combinations don't apply to every Beats product.
After resetting, reconnect the charging cable and check the normal charging lights again. Pair the headphones with the phone or computer once they respond and have enough power.
5. Reconnect working headphones or arrange service
With charging restored, connect Beats to your iPhone using its model's pairing control. A reset can require a fresh pairing.
For Windows or a MacBook, use the Beats laptop connection steps. Check the selected audio output after the connection succeeds, since pairing alone doesn't choose the speaker in every app.
If a working cable and adapter still give no charging response after the correct reset, ask Apple or Beats Support to assess charging or battery service. Give them the exact model and the cables and power sources you've tried.
Request battery service for headphones that charge but shut down soon after unplugging. A loose connector or charging that changes with movement needs a port inspection. Check warranty or AppleCare coverage before paying for repair.
The Short Version
Use the cable your model needs and compare its charging lights with the expected pattern. Try another cable and adapter, then the correct reset. A dark light, loose port or failing battery after those checks needs service.
Checked November 13, 2026.