AirPods settings appear on an iPhone or iPad when the earbuds are connected: open Settings and tap your AirPods' name near the top. If that shortcut isn't visible, open Bluetooth and use the information button for that pair.
The choices depend on the model: AirPods 1 and 2 have double-tap assignments; supported newer pairs have stem controls and listening modes. Look inside Controls & Gestures or Audio & Routing on newer software.
In this guide
Connect the AirPods and open their settings
Connect the pair to your iPhone or iPad, then wear the earbuds. Open Settings and select their name. Seeing a saved Bluetooth entry alone doesn't mean the earbuds are currently connected.
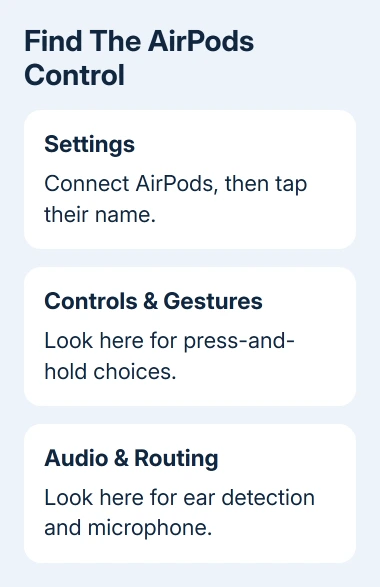
The alternate route is Settings > Bluetooth, then the information button beside your AirPods. Confirm the selected pair when several saved names look similar. The settings should show the pair you're actually using.
On a current Mac, choose Apple menu > System Settings, then select your connected AirPods by name. Some choices live inside the same grouped sections used on newer iPhone software.
For a name change, open the AirPods information page, select Name, enter a clear replacement, and finish with Done. This changes the label; it doesn't pair the AirPods with a different phone or account.
Android phones and Windows PCs can use AirPods as Bluetooth headphones, but they don't provide the full Apple settings interface described here. Use a supported Apple device for these control and routing choices.
For a missing AirPods page, check the connection first. For a Chromebook that needs pairing rather than customization, the AirPods connection steps for Chromebook address that separate setup.
Choose what a double tap or stem hold does
For AirPods 1 or 2, connect them and open their information page. Select the left or right AirPod's double-tap setting. Choose an available action such as Siri, playback control, or skipping a track.
Set each side according to what you actually use. For example, one side can handle track changes while the other calls Siri. Try the gesture after changing it so you know which action belongs to each earbud.
For AirPods Pro, AirPods 4 with ANC, and AirPods 5, open Press and Hold AirPods. If that isn't on the main page, first open Controls & Gestures. Select Left or Right.
Choose Listening Mode to make the hold switch between the supported modes. Select the two or three modes offered for that action. If both sides control listening modes, changing the selected mode cycle for one side applies to both.
Choose Siri instead if you'd rather use a hold for the assistant. One AirPod can activate Siri while the other changes listening modes. That gives you a Siri shortcut while keeping a stem control for listening modes.
A camera setting can change the hold action in a supported camera app. If Camera Remote uses press-and-hold, that gesture won't switch listening modes there. Check the gesture's setting before assuming a sensor has failed.
AirPods 3 and standard AirPods 4 use stem presses for playback, without the mode cycle on active noise cancellation (ANC) models. They don't have the original AirPods' double-tap choices; missing choices don't mean a broken connection.
Pick listening modes your AirPods support
Noise Cancellation reduces outside sound, while Transparency lets surrounding sound through. Adaptive Audio adjusts the listening experience according to the environment on supported models. You'll only see features your model supports.
Use the AirPods settings page to review the listening-mode choices. For a quick change on iPhone or iPad, open Control Center while wearing connected AirPods, hold a finger on the volume slider, and select the available listening mode.
AirPods without active noise cancellation won't gain it through a settings change. In particular, standard AirPods 4 and AirPods 4 with ANC are different versions. Read the model details before comparing the menus with a friend's pair.
If AirPods Pro sound changes when you adjust them in your ears, check the seal as well as the selected mode. The AirPods Pro tip and fit checks cover the physical fit and the right test for each generation.
I'd change one setting, then listen to the same familiar audio before adjusting another. It makes the difference easier to judge than changing the mode, fit, and sound controls together.
Adjust ear detection and the microphone
To change automatic pausing, open Automatic Ear Detection on the AirPods page. On newer layouts, first open Audio & Routing. The same setting is available under the connected AirPods in Mac System Settings.
With detection enabled, removing an AirPod can pause playback and putting it back can resume it. Removing both stops playback. When the AirPods aren't being worn, audio can play through the device's own speakers instead.
With detection off, audio keeps going to the AirPods whether they're in your ears or elsewhere. Check this setting if the earbuds keep receiving sound after you've taken them out.
For the microphone, open Microphone, using Audio & Routing first if needed. Choose Automatically Switch AirPods, Always Left AirPod, or Always Right AirPod. Both earbuds have microphones.
Automatic switching lets either AirPod handle the microphone, including when you use one earbud. A fixed side stays selected even if you remove that earbud or put it in its case. That can explain a sudden sound change during a call.
Return to automatic switching if you don't need a specific microphone. If only one side sounds bad, note which setting was active and report whether the fault follows the selected earbud during calls.
Use the headphone controls on AirPods Max
AirPods Max have Automatic Head Detection, rather than ear detection. Find it in Audio & Routing when that group appears. This controls behavior when you remove the headphones.
On iPhone or iPad, select Digital Crown in the Max settings, opening Controls & Gestures first if necessary. Choose which rotation direction increases volume. Mac places that choice beside Increase Volume by Rotating Digital Crown.
Max 1 switches between Noise Cancellation and Transparency. Max 2 also supports Adaptive Audio. Use the listening-mode choices offered for your generation instead of following earbud stem instructions.
Review newer audio choices without chasing missing menus
AirPods 4 and newer, plus AirPods Pro from the second generation onward, can pause media as you fall asleep. Once connected and worn, find Pause Media While Falling Asleep. It may be inside Audio & Routing.
On supported models, open Audio & Routing > Equalizer > Custom to adjust Low, Mid, and High. Choose Recommended to restore the standard sound. The model and installed software determine whether EQ appears.
Apple says the available AirPods choices depend on the model, with some controls inside newer menu groups. Check the model and software version against those instructions when a control is absent.
If a supported control still doesn't appear while the AirPods are connected, give Apple Support the model, device software version, and missing control's name. Ask them to check that feature's compatibility before you reset a working pair.
The Short Version
With AirPods connected, open their Settings page, and choose the controls your model supports. Look inside Controls & Gestures for stem actions and Audio & Routing for detection and microphone choices on newer layouts.
Checked November 11, 2026.