

A two-cartridge Canon PIXMA needs to stay on while you change the ink. Open its cover, wait until the holder stops, then remove the empty cartridge. Fit and lock the new one, then finish print-head alignment.
These steps use the PIXMA TS3500 series. Other PIXMA printers can have separate ink tanks or different locking parts, so check your full model number before following the cartridge steps.
Check the PIXMA model and cartridge type
Find your printer's full model number and compare it with the replacement cartridge's compatibility list. PIXMA is a product family, so that name alone isn't enough to choose ink that fits.
On the TS3500 series, each FINE cartridge combines an ink container with a print head, the part that puts ink on paper. There are two slots: color on the left and black on the right, viewed from the open front.
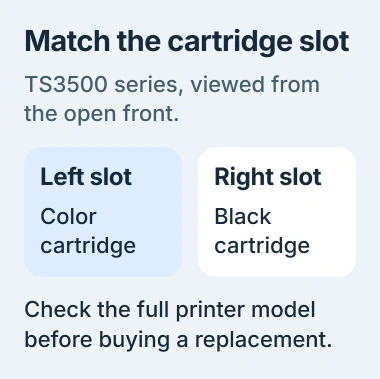
Have your replacement ready, but leave it sealed while you prepare the printer. Change only the empty cartridge. The black cartridge goes in the right-hand slot, even if the two slots look similar.
An ink warning and poor print quality don't always mean the same thing. The printer ink-level guide explains the estimate, while missing lines on a page can also come from blocked nozzles.
If your printer has individual tanks or refillable reservoirs, use that model's replacement or refill instructions. The TS3500 lever steps don't apply to every PIXMA.
1. Open the cover and let the holder move
Check that the printer is turned on. Retract the paper output tray and its extension, then open the cartridge cover. The holder should move into its replacement position by itself.
Wait until the holder stops completely. Don't pull it across by hand or hold it while it moves. Let the printer move it into place before you reach for the locking lever.
Canon says to leave the printer on in its cartridge replacement procedure. Turning the printer off first can leave the holder somewhere you can't reach normally.
If the holder doesn't move into position, check the displayed error and whether the printer has power. A stuck or unusually noisy holder needs support's help; forcing it into the opening isn't the next step.
2. Release only the empty cartridge
Find the lever for the cartridge you're changing. Push that ink cartridge lock lever down until it clicks, then remove the cartridge from its holder.
Use the slot position to check your choice: left for color, right for black. The inside-view guide confirms that arrangement for this series.
Handle the cartridge by its body and use its locking lever. Don't touch the electrical contacts, nozzle surface or other internal parts, since that can cause ink or connection problems.
If the cartridge won't come out with the lever lowered, compare its position with the picture in your model's manual. If the locking parts look different, follow that model's steps instead of pushing harder.
3. Remove the protective tape and fit the new cartridge
Unwrap the new cartridge and gently peel off its protective tape. Hold it by the plastic body so your fingers stay away from the contacts and nozzles.
Slide the cartridge straight into the correct slot until it reaches the back of the holder. Raise the locking lever until it clicks. The click locks it in place; leaving it loose in the opening isn't enough.
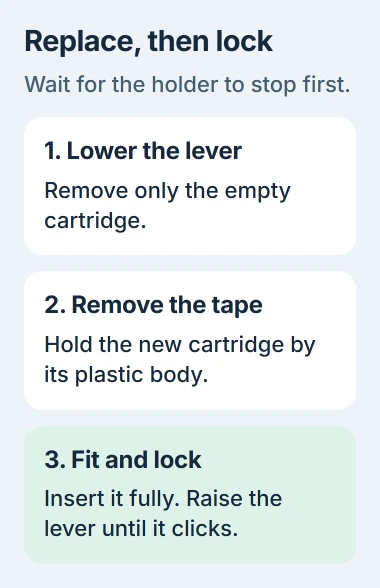
Check that the cartridge sits securely, then close the cover. If an error appears, write down the exact code before removing anything again. It tells support which part of the installation needs checking.
4. Complete alignment and inspect the printed result
On the TS3500, load one sheet of plain A4 or Letter paper in the rear tray. Press Setup until 4 appears, then press Black or Color to print the alignment sheet.
Place that sheet facedown on the scanner glass. Match its upper-left mark to the printer's alignment mark, close the document cover and press Black or Color again. The printer scans the pattern and adjusts alignment.
Wait for the ON lamp to finish flashing and stay lit, then remove the sheet. Keep the scanner cover closed and the pattern still until that adjustment finishes.
Print a short document with ordinary text, plus some color if you changed the color cartridge. Look at the paper itself. A job leaving your computer's queue doesn't tell you whether every color printed properly.
If the page is blank or a color is missing, check the cartridge before running more cleaning cycles. The ink-not-coming-out checks include protective tape left on and a cartridge that isn't fitted securely.
If lines stay broken with the cartridge fitted properly, print a nozzle-check pattern to see which ink isn't reaching the paper. The print-head cleaning guide explains why cleaning repeatedly without checking the pattern wastes ink.
5. Follow the remaining fault instead of replacing more ink
If the printer shows a cartridge error, check that code. If its display is clear but a job stays stuck in Windows, check the computer instead. These problems need different checks before you replace any more ink.
For a stuck Windows job, use the Windows printer installation checks to check that your Canon printer is listed. Replacing another cartridge won't send the job to the right printer.
If the printer still won't recognize the correct new cartridge, or the holder won't latch, contact Canon. Give support your full printer model, cartridge label and display code, and say whether the cartridge locked into place.
The Short Version
Use the cartridge made for your PIXMA model. On a TS3500, open the powered-on printer, wait for the holder, lower the lever and replace the cartridge. Remove its tape, lock it, close the cover and finish alignment.
Checked November 5, 2026.

Isaac Smith is the founder and editor of PC Glance, a website that covers computers, laptops, and technology. He is a tech enthusiast and a computer geek who loves to share his insights and help his readers make smart choices when buying tech gadgets or laptops. He is always curious and updated about the latest tech trends.