

Apple silicon iMacs and Intel iMacs with Apple's T2 security chip can remove personal content through Erase All Content and Settings while keeping macOS installed. Older Intel iMacs need Recovery, Disk Utility and a reinstall instead.
Check the model before choosing the erase method. Reinstalling macOS on its own normally keeps your files, so it isn't a factory restore when you're preparing the iMac for another owner.
Identify the iMac and protect the files you need
Open Apple menu > About This Mac. A Chip entry such as Apple M1 identifies Apple silicon. If it lists an Intel processor, check whether your model has the T2 chip.
Among Intel iMacs, the iMac Pro and 27-inch Retina 5K iMac from 2020 have T2. An older standard Intel iMac can't use Erase Assistant just because it can run macOS Monterey.
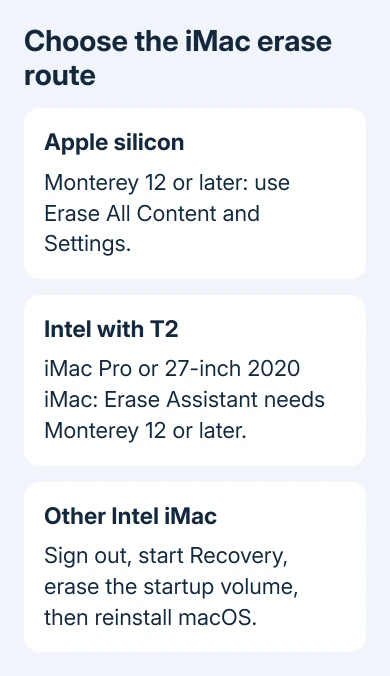
Erase All Content and Settings requires macOS Monterey 12 or later plus Apple silicon or T2. Apple lists both requirements in its supported erase methods; the operating-system version alone isn't enough.
Back up the files you need before proceeding and confirm you can access the backup. These procedures erase personal data. Have your Mac login password and Apple Account password ready, and keep a working internet connection available.
On an Apple silicon iMac running macOS 26 or later, check Repair Assistant before erasing if it's been repaired or you don't know its repair history. Follow its prompts if it reports unfinished work.
I'd also have USB input devices ready, including a keyboard and mouse. Recovery and erasure can disconnect Bluetooth accessories, which is especially awkward on an iMac with no built-in keyboard or trackpad.
Use Erase Assistant when the iMac supports it
In Ventura (macOS 13) and later releases, open System Settings > General > Transfer or Reset, then select Erase All Content and Settings.
On macOS Monterey 12, open System Preferences, then choose Erase All Content and Settings from the System Preferences menu in the menu bar. It isn't a General pane in that version.
Follow the assistant's prompts. Use your Mac login password when asked for the administrator password. For the Apple Account password, use the one for your account with services such as iCloud.
Review the information, then confirm Erase All Content & Settings. After removing your content, the iMac restarts and activates. The installed macOS stays in place; the original factory version isn't reinstalled.
If asked for internet access, select Wi-Fi or connect a network cable. If a Bluetooth accessory doesn't connect within 30 seconds, turn the accessory off and back on as prompted.
For a sale or gift, stop at Setup Assistant. After Erase Assistant, switch off the iMac by holding its power button rather than creating a new account for yourself. The next owner should complete setup with their own details.
An other-volumes warning can appear if you installed Windows through Boot Camp. Remove that installation and partition through Boot Camp Assistant, then retry. Avoid deleting an unidentified partition to clear the message.
Prepare an older Intel iMac for the Recovery route
Use this route when Erase Assistant isn't supported. If you're passing the iMac to someone else, sign out of Apple services before erasing, while the normal system still opens.
On Ventura or later, open System Settings, select your name, then Sign Out. On Monterey, Big Sur or Catalina, use System Preferences > Apple ID > Overview > Sign Out. Earlier versions use System Preferences > iCloud.
In Messages, open Messages > Settings or Preferences, select iMessage, then Sign Out. On systems earlier than Catalina, also open iTunes and choose Account > Authorizations > Deauthorize This Computer.
Keep your keyboard and mouse connected for the remaining steps. If you unpair Bluetooth accessories that you're keeping, connect USB replacements before continuing.
Shut down the iMac. Start it while immediately holding Command-R. Release the keys when the Apple logo appears or a globe starts spinning. Enter the requested password and continue to the Recovery utilities.
If the issue is that the Mac won't reach a usable system at all, the startup-logo checks explain the Recovery distinction. Erasure is still a separate decision that removes files.
Erase the Intel startup volume and reinstall macOS
In Recovery, select Disk Utility, then Continue. Select the internal startup volume, normally Macintosh HD, in the sidebar. Use its existing name if you renamed it previously.
Click Erase. Name the new volume Macintosh HD and select the format Disk Utility recommends for that system: APFS for the newer format, or Mac OS Extended (Journaled) for an older installation.
Select Erase Volume Group when offered; otherwise choose Erase. Supply Apple Account details if requested. Check any extra internal volumes you created too. You'll need to remove personal files from those as well.
Quit Disk Utility to return to Recovery. Choose Reinstall macOS and follow the installer. Keep the iMac powered and connected until installation finishes.
With Command-R, Recovery normally supplies the current version for the macOS installed most recently on that iMac.
Option-Command-R might offer the latest compatible macOS. Shift-Option-Command-R might offer the original macOS or the closest version still available.
For an Intel iMac you're handing over, complete the NVRAM reset in Apple's ownership-transfer checklist. Shut down, start the Mac, and immediately hold Option-Command-P-R for about 20 seconds.
When Setup Assistant appears afterward, press Command-Q to shut down. Don't restore your personal backup onto a computer you're about to hand over.
Use Apple silicon Recovery only when needed
If a supported Apple silicon iMac can't use Erase Assistant, shut it down, then hold Power until you see startup options. Choose Options > Continue and enter your password if asked. Intel startup-key combinations don't apply here.
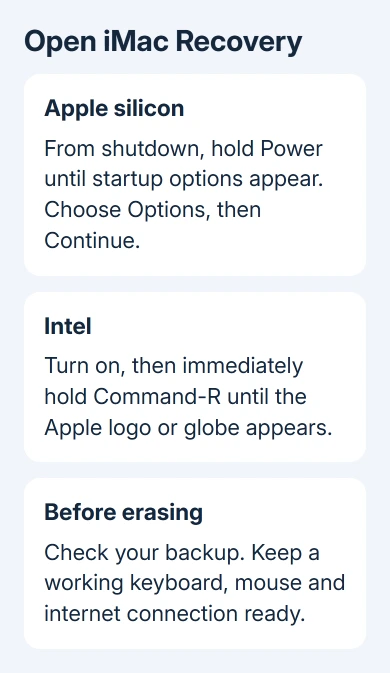
Open Disk Utility. If you previously added separate internal volumes, remove those additional volumes first, leaving Macintosh HD and Macintosh HD - Data for the main erase operation. Leave external disks and disk images alone.
Select Macintosh HD, choose Erase, use the name Macintosh HD and format APFS. Choose Erase Volume Group if offered; otherwise select Erase. Confirm Erase Mac when prompted.
After restart, choose the language and connect to the internet for activation. Select Exit to Recovery Utilities, then Reinstall macOS. For another owner, leave Setup Assistant unfinished when installation completes.
For a missing internal disk, shut down and disconnect nonessential external devices before checking Recovery again. If it's still absent or erasure keeps failing, tell Apple Support what happened and request a check of the internal storage.
For a laptop using the same erase features, the MacBook reset guide covers its model branches. When you ask for help with this iMac, give its model, chip, macOS version and the exact erase error.
The Short Version
Use Erase Assistant on Apple silicon or T2 iMacs running Monterey or later. Other Intel iMacs need account sign-out, Recovery, disk erasure and macOS reinstallation. Back up first and leave Setup Assistant for the next owner.
Checked November 8, 2026.

Isaac Smith is the founder and editor of PC Glance, a website that covers computers, laptops, and technology. He is a tech enthusiast and a computer geek who loves to share his insights and help his readers make smart choices when buying tech gadgets or laptops. He is always curious and updated about the latest tech trends.