
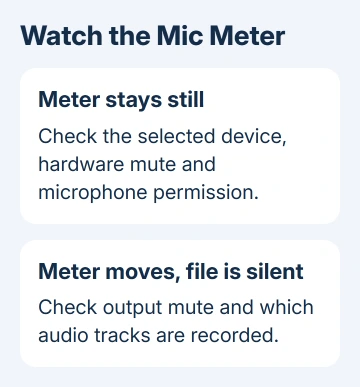
OBS microphone silence often comes from a wrong input, a muted channel or a missing recording track. Select your mic and speak. Check Audio Mixer: a still meter and a moving meter with silent playback need different fixes.
Working voice chat doesn't automatically mean OBS uses the same device. A headset, webcam and laptop can each supply a separate microphone, and OBS can capture any one of them.
In this guide
1. Select the microphone OBS should capture
Open Settings > Audio in OBS and look at Global Audio Devices. Set a Mic/Auxiliary Audio entry to your microphone's device name rather than relying on Default. Apply the change and speak at a normal volume.
Check the corresponding channel in Audio Mixer. A bar that rises with your voice shows that audio is reaching OBS. If the channel is present but remains still, continue with the physical input and permission checks.
Another route is Sources > Add > Audio Input Capture. Choose the microphone in its Properties. This puts your microphone in that scene. Choose this route when some scenes need your voice and others should leave it out.
Capture each microphone in just one of those two ways. OBS's audio-source instructions warn that capturing it both globally and through a scene source can create an echo. Disable its global entry if you choose the scene source.
Switch to the scene you're recording and confirm that its microphone source is there. A scene source doesn't automatically supply every scene. A global audio device works across OBS.
2. Check the microphone before changing OBS further
Check the mute switch on your microphone, headset cable or audio interface. Unmute it, plug the connector in fully and turn up the gain if it was turned down. Gain controls how much microphone signal the interface sends to OBS.
On Windows 11, open Settings > System > Sound. Choose your device under Input and run the microphone test. In Windows 10, use Settings > System > Sound to select the input and check its test meter.
On a Mac, choose the microphone in System Settings > Sound > Input and speak while watching its level. That route applies to current macOS on Intel machines as well as Apple silicon models.
If Windows or macOS can't hear you either, work on the microphone or its connection first. OBS needs a working input before it can record your voice. The Windows microphone repair guide covers input levels and a missing recording device.
If Windows or macOS picks up your voice, select that same device name in OBS. Don't select a similarly named playback device: Audio Output Capture captures sound being played, while Audio Input Capture is the microphone route.
3. Allow the desktop app to use your microphone
In Windows 11, open Settings > Privacy & security > Microphone. Turn on these controls:
- Device permission: Microphone access.
- App permission: Let apps access your microphone.
- Desktop programs: Let desktop apps access your microphone.
In Windows 10, open Settings > Privacy > Microphone. Enable device access, then Allow apps to access your microphone and Allow desktop apps to access your microphone.
OBS can be absent from the individual Microsoft Store app list. The desktop-app microphone permission is the setting to check for a desktop program like OBS.
On current macOS, allow OBS under System Settings > Privacy & Security > Microphone. Follow any prompt to relaunch the app, then check whether its mixer receives your voice.
When a work or school policy locks the permission, ask IT to allow microphone access for OBS. Changing OBS scenes won't get around a permission blocked by Windows or macOS.
4. Unmute the output and remove a filter that blocks speech
In Audio Mixer, check the microphone's mute control and volume fader. With the fader all the way down, your voice won't come through. Bring it up gradually while speaking and avoid a level that repeatedly reaches the red end of the meter.
Open the microphone channel's Filters. Temporarily disable audio filters one at a time and record a short sample. A noise gate can reject quiet speech if its threshold is set higher than your speaking level.
If disabling one filter brings your voice back, adjust that filter rather than replacing the microphone. If your voice didn't register in the Windows or macOS input test, changing an OBS filter won't fix that.
Monitoring is the sound you hear through your own listening device. It isn't the same as sending that sound to the recording or stream. Hearing your voice in headphones alone doesn't confirm that viewers receive it.
OBS 32.2 separated mute and monitor controls and removed Monitor Only from Advanced Audio Properties. Older versions have Monitor Only (mute output), which keeps sound out of the output.
Check the controls your version actually offers. In a newer mixer, unmute the microphone's output even if monitoring already lets you hear it. The 32.2 release notes describe the change.
5. Send the microphone to the track being recorded
If the meter moves but playback is silent, check which track gets your voice. Open Edit > Advanced Audio Properties and find the microphone row. Check which numbered audio tracks include that source.
Open Settings > Output. With Output Mode: Advanced, choose file tracks on the Recording tab. At least one recorded track must also be checked for the microphone in Advanced Audio Properties.
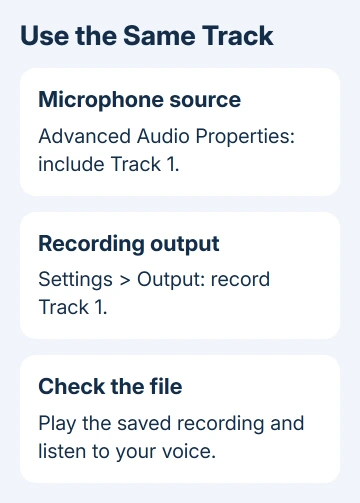
For a mixed recording, put your microphone and other wanted sounds on Track 1, and record Track 1. You can also keep sounds on separate tracks, but first check that the playback track has everything you want to hear.
Most players play one audio track at a time. If voice is on a different recorded track, choose that track in the player or inspect the file in your editor. The multitrack recording guide explains this distinction.
Streaming has its own selected audio track. Check the Streaming output settings when recordings contain your voice but the live stream doesn't. Matching recording tracks alone won't change the stream's choice.
6. Retest the exact scene and output
Record a short sample using the scene and settings you plan to use. Stop the recording, open the saved file and listen to your words. Repeat the sample after changing scenes if your microphone is a scene source.
If it's still silent, make another recording that has the problem, then use Help > Log Files > Upload Current Log File. Give the OBS forum that link, your operating system, device name, meter result and chosen tracks.
Tell support whether recording works outside OBS and whether silence affects recordings, streams or both. When a USB microphone fails in other programs too, try the connection checks first.
The Short Version
Select your mic, allow desktop-app access and check the mixer. If the meter moves but the file is silent, unmute output and match the source and recording tracks. Listen to a saved sample before a full session.
Checked November 15, 2026.





