Ubuntu HDMI problems often come from a disabled display, the wrong monitor input or a graphics driver that hasn't loaded. Check Displays if the monitor appears there. Otherwise, check the cable and any adapters before changing drivers.
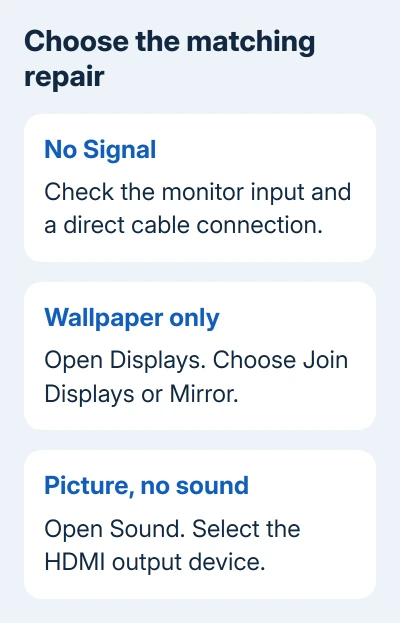
A working picture with no sound needs Sound settings instead. An external screen showing only wallpaper can already be working as an extended desktop. Check those settings separately from a monitor reporting No Signal.
In this guide
1. Confirm the input and simplify the connection
Open Input or Source using the monitor's physical controls. Select the numbered HDMI input containing your cable; choosing the unused socket leaves the screen waiting for a signal that isn't arriving.
Reseat both cable ends, then compare a cable you have already used successfully elsewhere. If you're using a dock, switch or adapter, try a direct connection between the computer and display where the available ports allow it.
This checks whether the extra equipment is stopping the computer's HDMI signal from reaching the screen. A direct connection that works points you toward the dock, adapter, its power or its compatibility rather than an Ubuntu reinstall.
Keep a laptop's built-in screen open while working through the settings. That keeps Settings accessible when the external panel rejects a display mode or remains undetected.
If the cable or adapter also fails with another computer, use the HDMI connection checks to compare the hardware. A Linux driver change can't repair a cable that fails with both computers.
On a Windows comparison PC, the external-monitor troubleshooting steps include checking the selected display mode. Use those Windows controls on that PC, not as Ubuntu menu instructions.
2. Enable the monitor in Displays
On the standard Ubuntu desktop, press the Super key, type Displays, and open the matching Settings panel. Super is usually the key carrying a Windows logo on a PC keyboard.
Look for both screens in the display arrangement. If the external monitor is present, select its entry and enable it if necessary. Choose Join Displays for extra desktop space or Mirror for matching content on the two screens.
Select Apply, then confirm Keep Changes when the picture is usable. If the new setting makes the screen unreadable, let the confirmation timer run out; the previous display settings will return.
The controls described here apply to Ubuntu's standard GNOME desktop. Kubuntu uses KDE Display Configuration, while other Ubuntu flavors arrange the same kinds of controls differently.
If the monitor never appears in Displays, you can't enable it from that panel. After checking the cable and any adapters, move on to the graphics driver.
3. Fix wallpaper-only output and rejected display modes
Wallpaper without your open windows often means Join Displays is active. Move the pointer across the edge of the laptop screen toward the monitor, or drag a window across to it.
In Displays, arrange the screen rectangles to match their physical positions. A monitor placed to the left on the desk but to the right in Settings makes the pointer seem to leave through the wrong edge.
Use Primary Display if you want the external monitor to carry the main desktop controls. Choose Mirror when the monitor should repeat the laptop's view instead of adding desktop space.
For a detected monitor that goes black after selecting a mode, pick a listed resolution with a supported refresh rate. Start with a lower option, such as 1080p with a 60 Hz refresh rate when the screen and connection offer it.
Apply one change at a time. If a simpler mode works but a higher one doesn't, review the monitor, cable and adapter specifications for that exact resolution and refresh rate.
I'd keep the working mode until those limits are clear. Adjusting resolution, refresh rate and scaling in one attempt leaves you unsure which setting caused the black screen.
For a USB-C adapter rather than a direct HDMI port, the USB-C to HDMI checks cover the video capability required at the computer's USB-C port.
4. Check the graphics driver on NVIDIA systems
This step matters when an NVIDIA-equipped computer loses its external display after an update, or when the NVIDIA driver isn't working. Skip it if your computer has only Intel or AMD graphics.
On Ubuntu installations that include it, open Software & Updates > Additional Drivers and let it finish checking. Choose the recommended NVIDIA package for your hardware, apply it, then restart after installation.
If that app is missing, use the terminal route next. Not every Ubuntu release includes the same app for managing drivers.
Ubuntu recommends the hardware-matched tool in its desktop NVIDIA installation guidance. For ordinary desktop use, its automatic selection commands are:
sudo ubuntu-drivers list
sudo ubuntu-drivers install
Run the list command first to see the available hardware-matched choices. The installation command changes your drivers and asks for your administrator password. Don't add a driver branch number copied from an unrelated computer.
If installation asks you to create a Secure Boot enrollment password, keep it for the restart prompt and follow the enrollment instructions. Secure Boot checks whether a driver is trusted before allowing it to load.
Don't turn Secure Boot off as the first repair. Use the supported signed-driver route and complete any requested enrollment. After restarting, reconnect the monitor and check Displays again.
If the driver installation reports an error, keep that exact message. Repeatedly removing every graphics package can take away the laptop's remaining usable desktop.
5. Choose HDMI audio when the picture already works
Open Settings > Sound and find Output. Select the HDMI or DisplayPort output associated with the connected monitor or TV rather than the laptop's internal speakers.
Use Test if it is offered, then check the display's own volume and mute controls. Even with the right output selected, you won't hear anything if the TV is muted.
Also confirm that the monitor actually has speakers or an audio output you can use. A display can accept an HDMI picture without providing built-in sound.
If the HDMI audio entry is missing, record that separately from video detection. Tell support whether Displays sees the screen and whether the laptop speakers work. That tells them whether the problem affects the picture, sound or both.
When a working cable still produces no display
Give the computer maker's Linux support or Ubuntu support community your Ubuntu version, desktop, GPU, driver and connection layout. State whether Settings lists the monitor and whether another operating system can use it.
For a managed work computer, give IT those details before changing more packages. Request a review of the installed graphics driver and any dock firmware supported for the model.
The Short Version
Verify the input and direct connection. Use Displays to enable, join or mirror the screen. Repair an NVIDIA driver only on matching hardware. A picture without sound needs the HDMI output selected in Sound settings.
Checked November 16, 2026.
 If you have any business, I can build it online